
Kicks, concave and outline affect how a deck feels under your fingers, even when its length and width match another deck's. Kicks and concave come from the mold that presses the wood; the outline comes from the shaper used to trim it.
How a deck is made
A wooden fingerboard starts with thin layers of wood, called veneers. They're glued together and pressed in a mold, which gives the deck its kicks and concave. Once the glue has cured, you have a blank: a piece of wood with the deck's curves, but still a rough rectangle around the edges.
Next come the truck holes, often drilled at marks left by the mold. The blank then sits on a shaper, or template, which guides the cutting and sanding. Pins through the truck holes keep it in place while you trim it to its final outline.
You can use several shapers with one mold to make different widths and outlines. Riders also describe molds as low, medium or high. Those labels vary between brands, so check the kicks and concave separately. A deck can have steep kicks and very little concave.
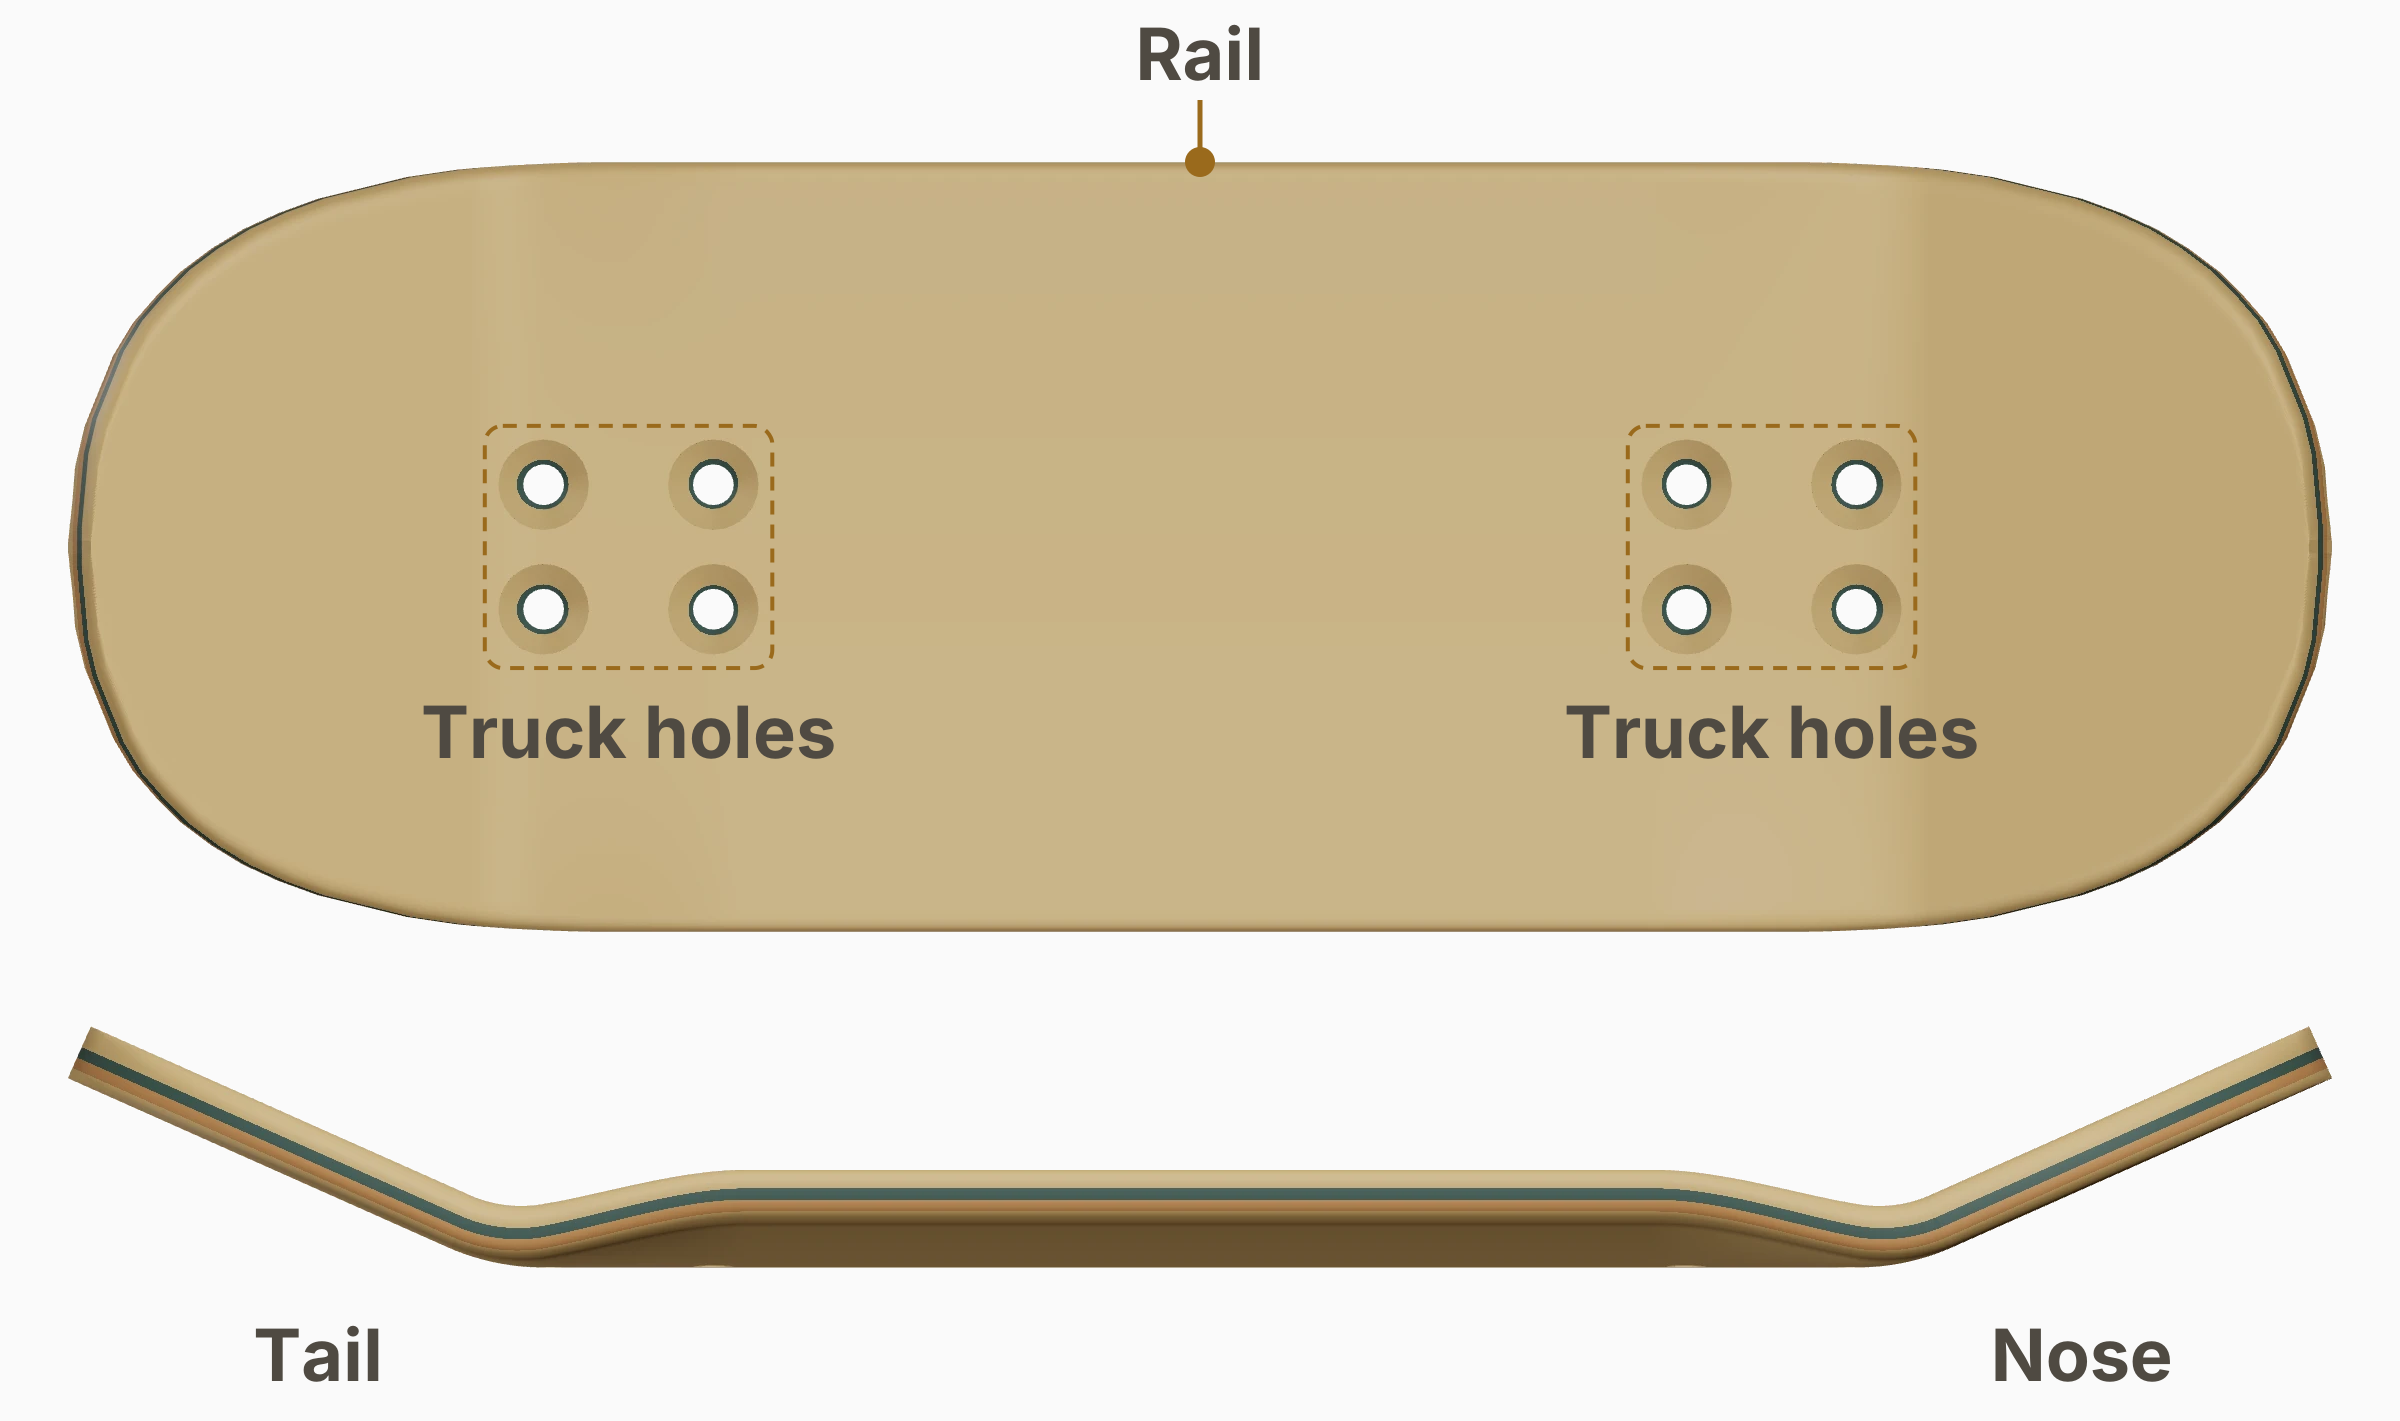
Scroll sideways to see the full illustration.
The raised ends are the nose and tail, and the long edges are the rails. Each group of four holes is where a truck bolts onto the deck.
Deck dimensions
Length
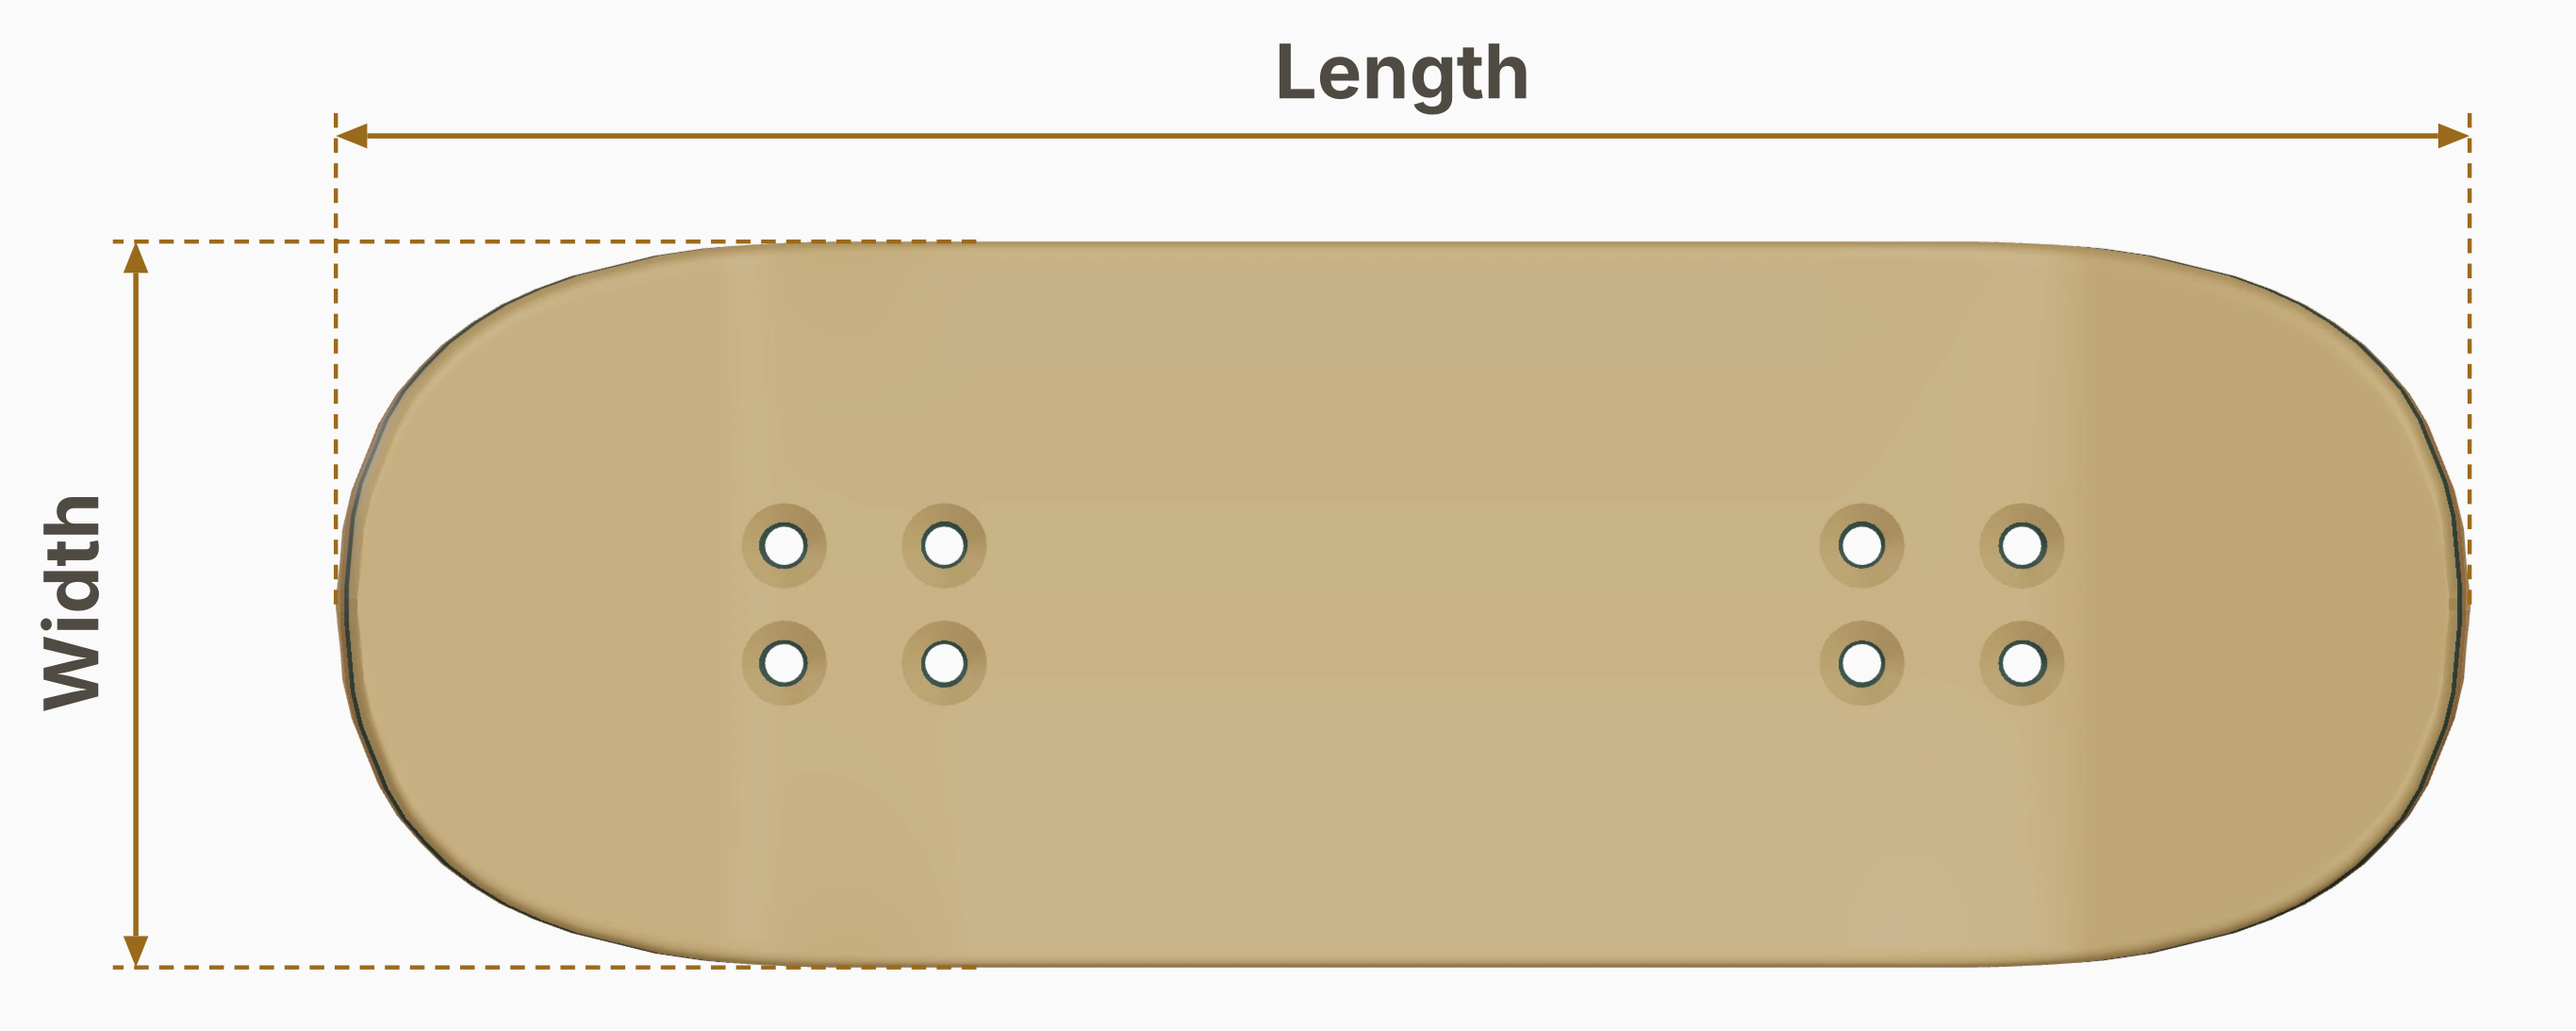
Scroll sideways to see the full illustration.
Measure length straight from tip to tip, as shown from above. Don't follow the curve up and over the kicks.
Width
Width is measured across the widest part of the deck. 32 to 34 mm is a common range, and brands usually put width first when they list a size: a 34 × 96 deck is 34 mm wide and 96 mm long.
Width also affects the concave. If you spread the same concave shape and depth over a wider deck, the sides become gentler. If you take a blank from an existing mold and cut it narrower, you trim away the highest parts of the sides, leaving a shallower concave.
Thickness
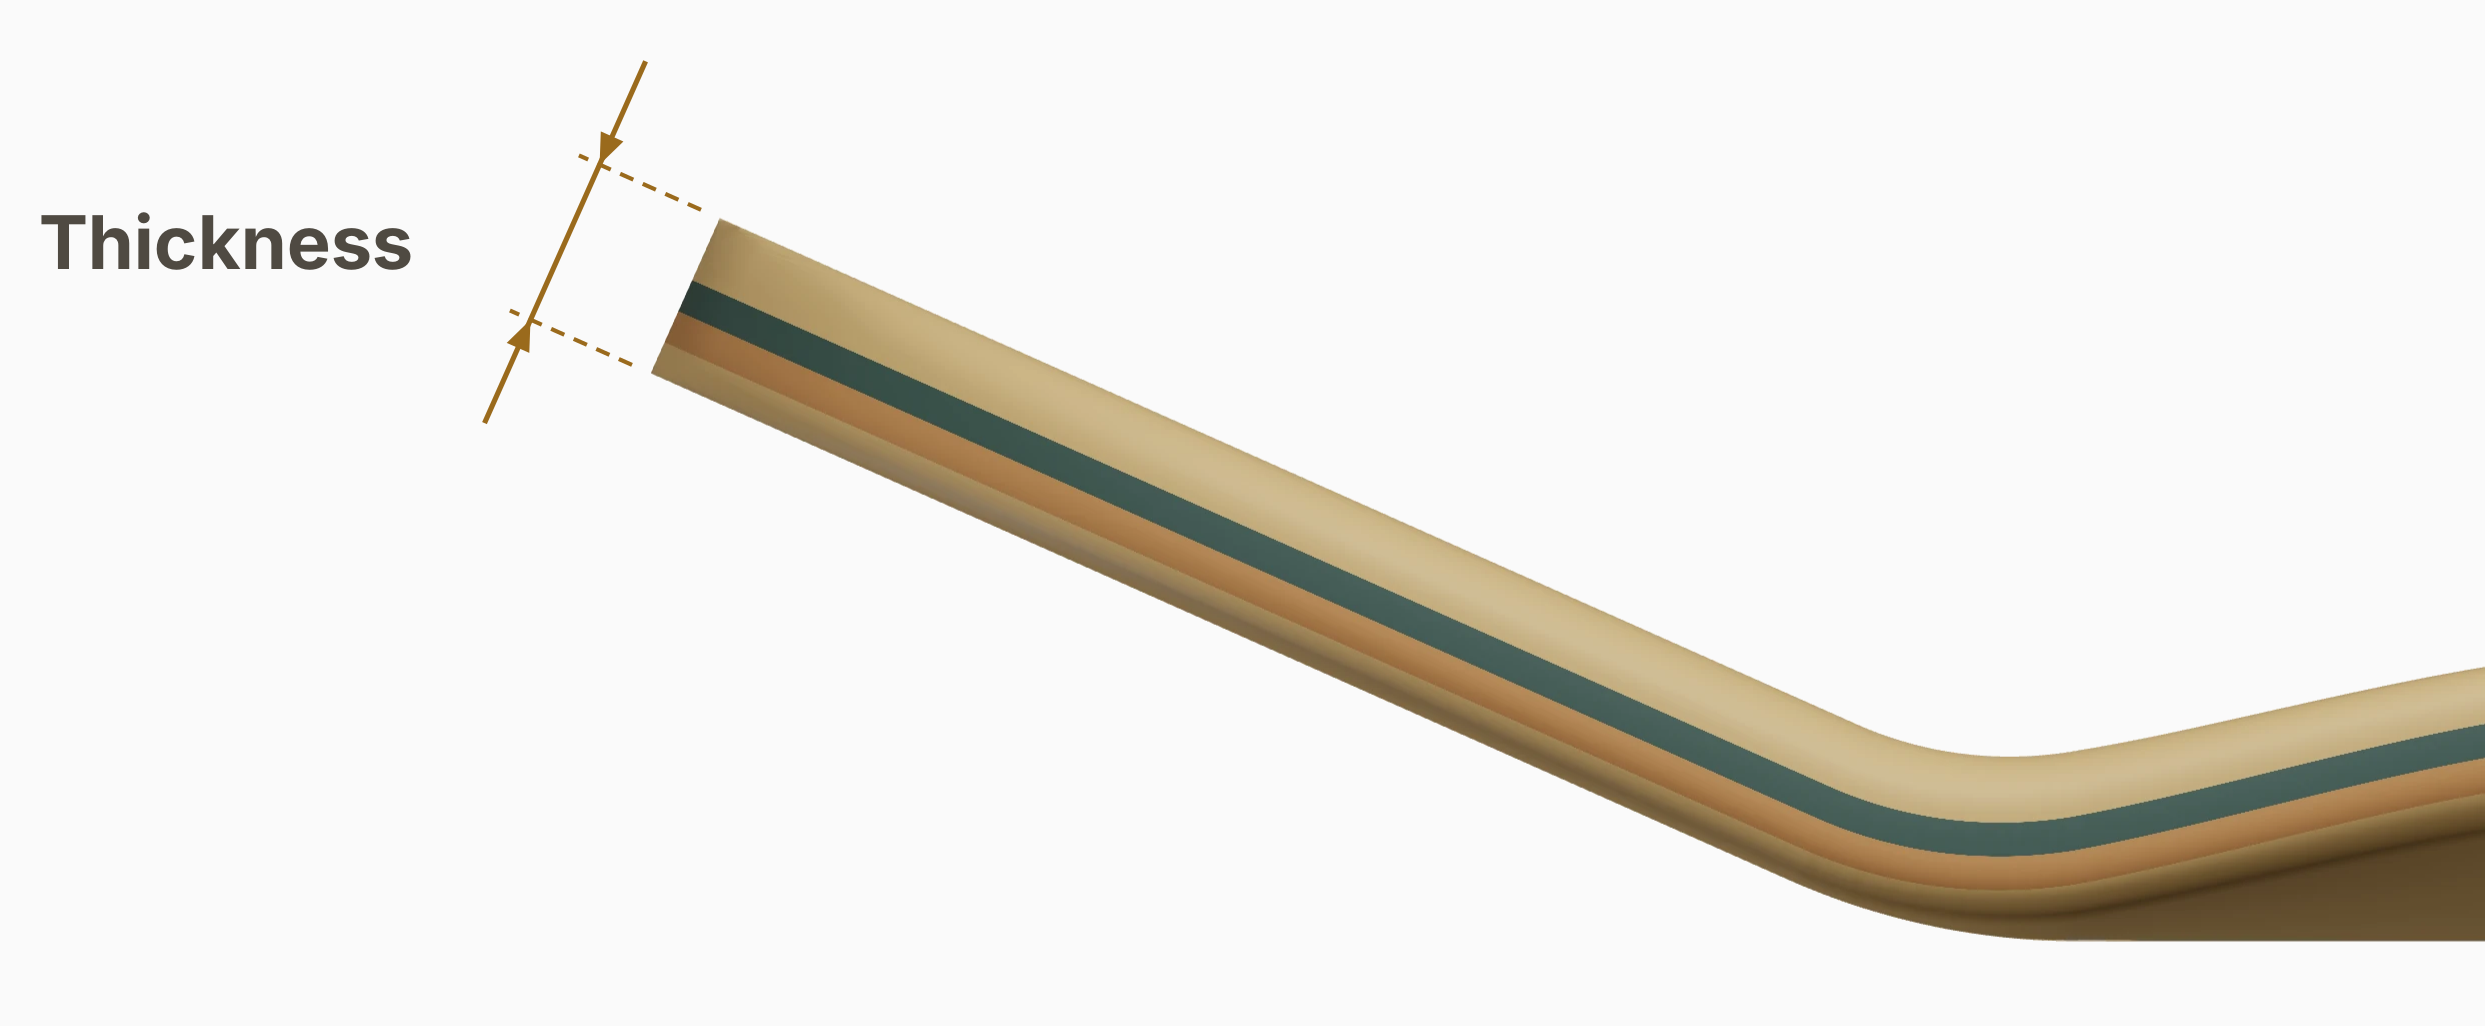
Scroll sideways to see the full illustration.
A typical 5-ply deck is around 2.5 mm thick; 7-ply decks are often closer to 3 mm unless the maker uses thinner veneers. Measure from the top face to the bottom face at a right angle to the surface, leaving out the grip tape.
Finished deck thickness depends on the number and thickness of the plies, the glue and how much the wood compresses during pressing.
Plies
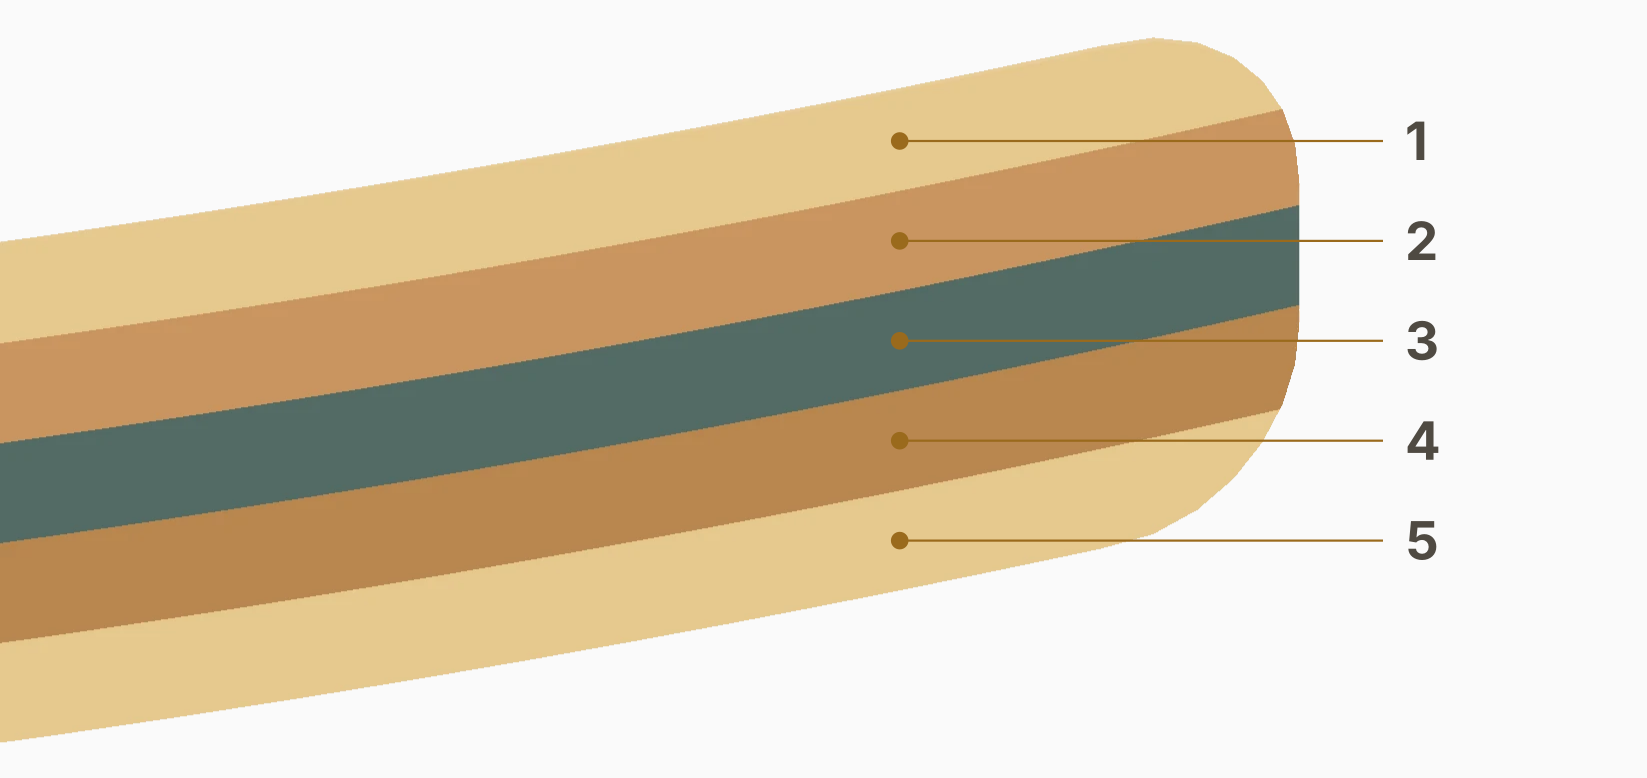
Scroll sideways to see the full illustration.
Each layer of veneer is one ply. Most wooden fingerboards are 5-ply or 7-ply. The colored stripes along the rails come from dyed veneers in the stack.
The two standard veneer thicknesses are 0.5 mm and 0.6 mm, with 0.5 mm the usual default.
Kicks
The kicks turn up at the nose and tail. Each has a length, angle and bend radius, which can differ between the two ends.
Nose and tail length

Scroll sideways to see the full illustration.
In this guide, kick length runs horizontally from the tip back to where the deck starts bending upward. Skateboard specs usually measure from the tip to the outer truck holes instead. Those points can be close on a fingerboard, but they're different measurements, so check which one a maker uses.
On many decks, the nose is a little longer than the tail, much like a skateboard. On a twin, both ends match.
Angle
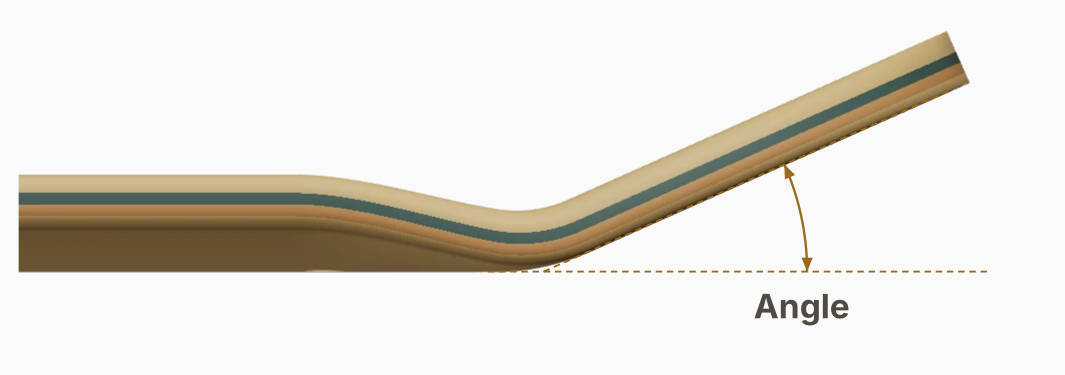
Scroll sideways to see the full illustration.
Kick angle tells you how steep the kick is. Measure it between the flat middle of the deck and the straight part of the kick. Brands often describe this as low, medium or high, rather than giving an angle in degrees. The nose can be a little steeper than the tail.
Some riders find steeper kicks easier to pop high; others prefer low kicks for tricks close to the ground. Your setup and the way you pop also affect trick height.
Radius
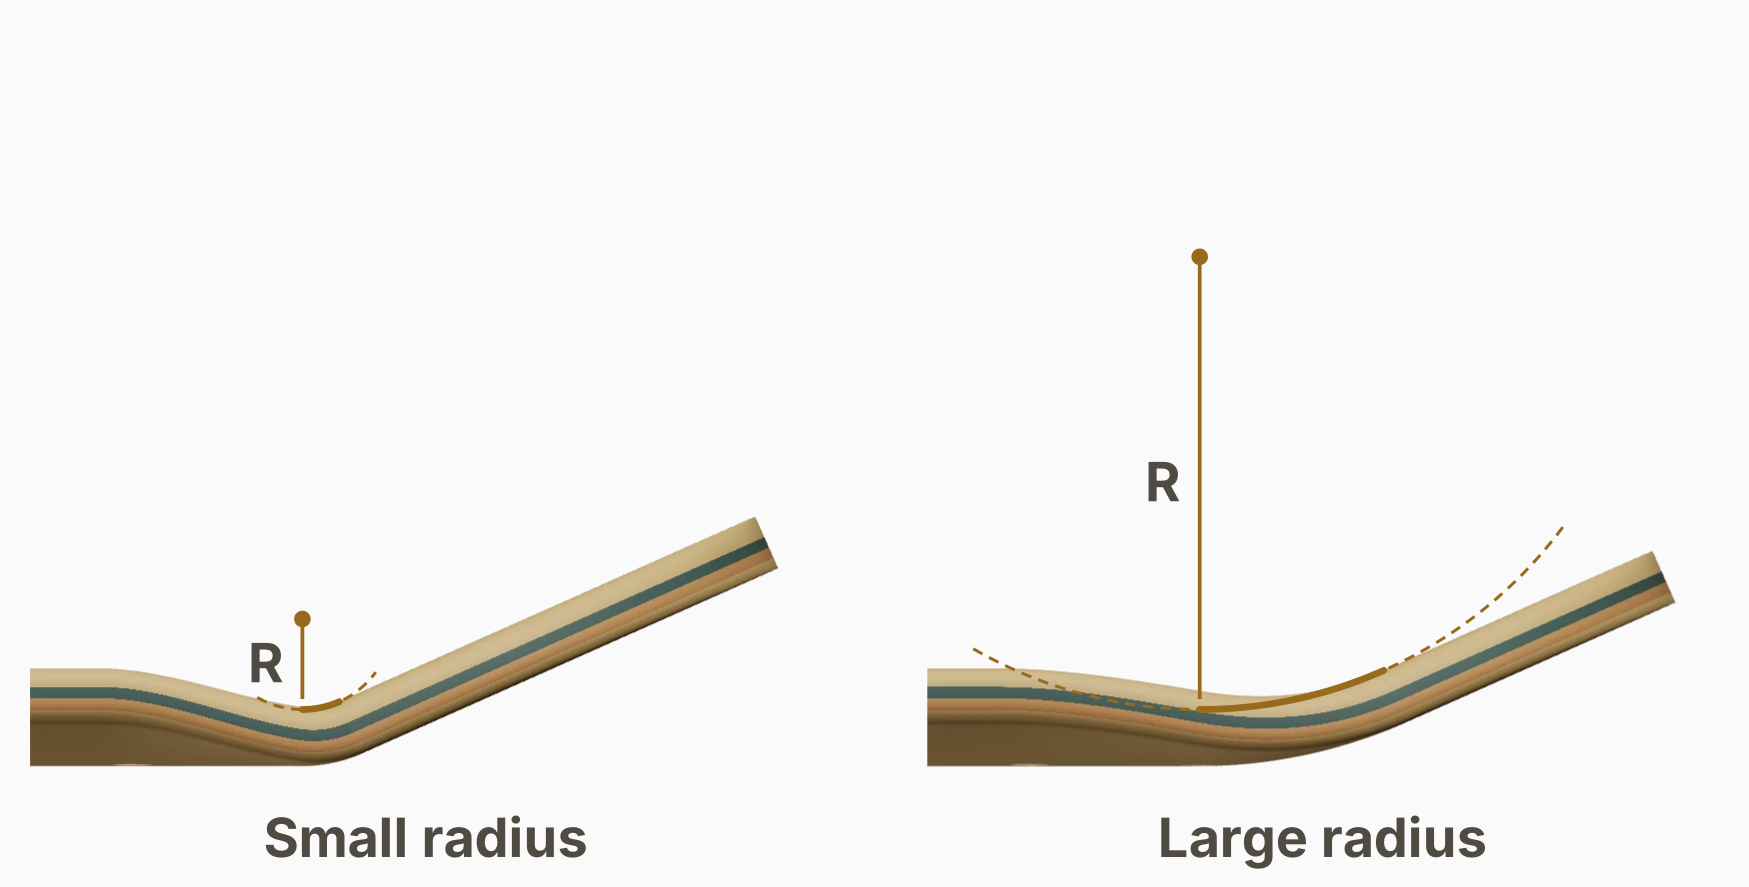
Scroll sideways to see the full illustration.
Radius describes the bend between the flat middle and the kick. In Studio, that bend follows part of a circle. A smaller circle gives you a tighter bend; a larger one gives you a more gradual curve. That's why two kicks can have the same angle but quite different shapes where they meet the middle of the deck.
Outline
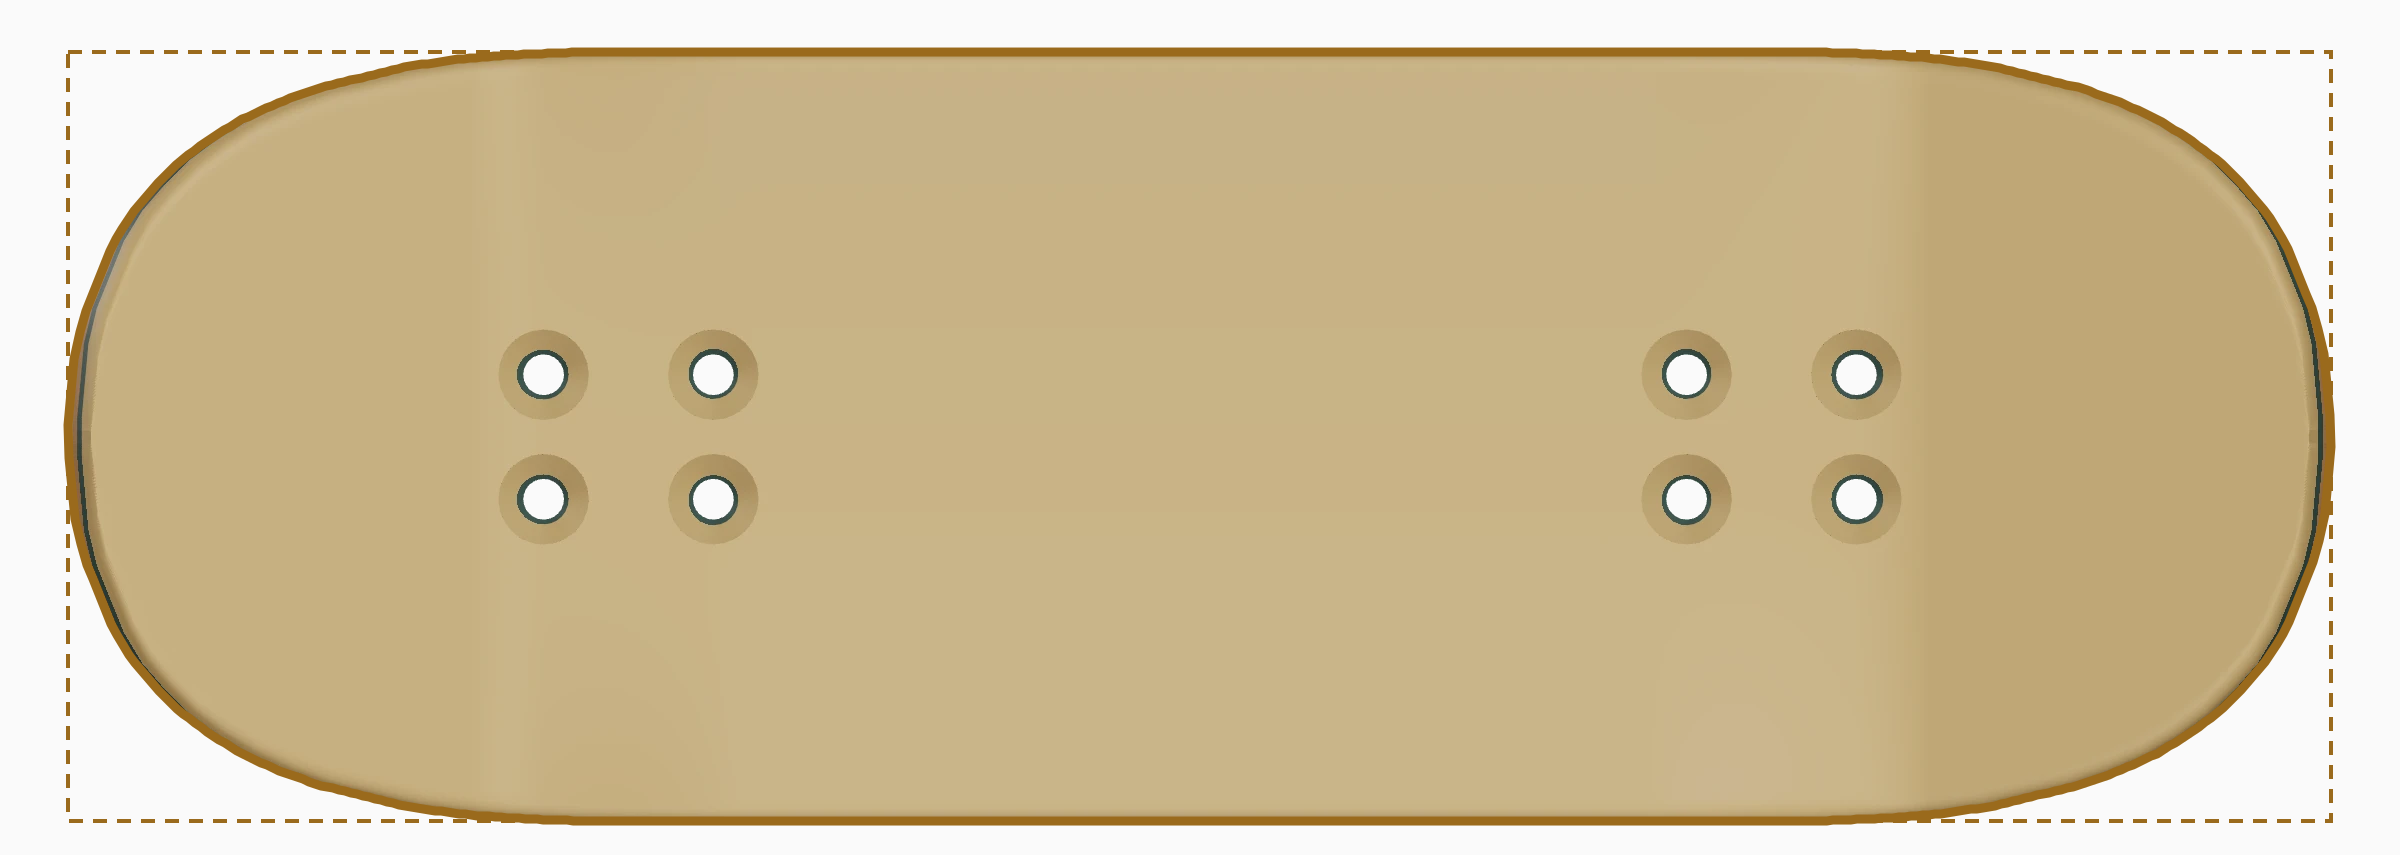
Scroll sideways to see the full illustration.
The outline, often just called the shape, is the deck's edge seen from above. Most decks are symmetrical from left to right; the nose and tail can differ.
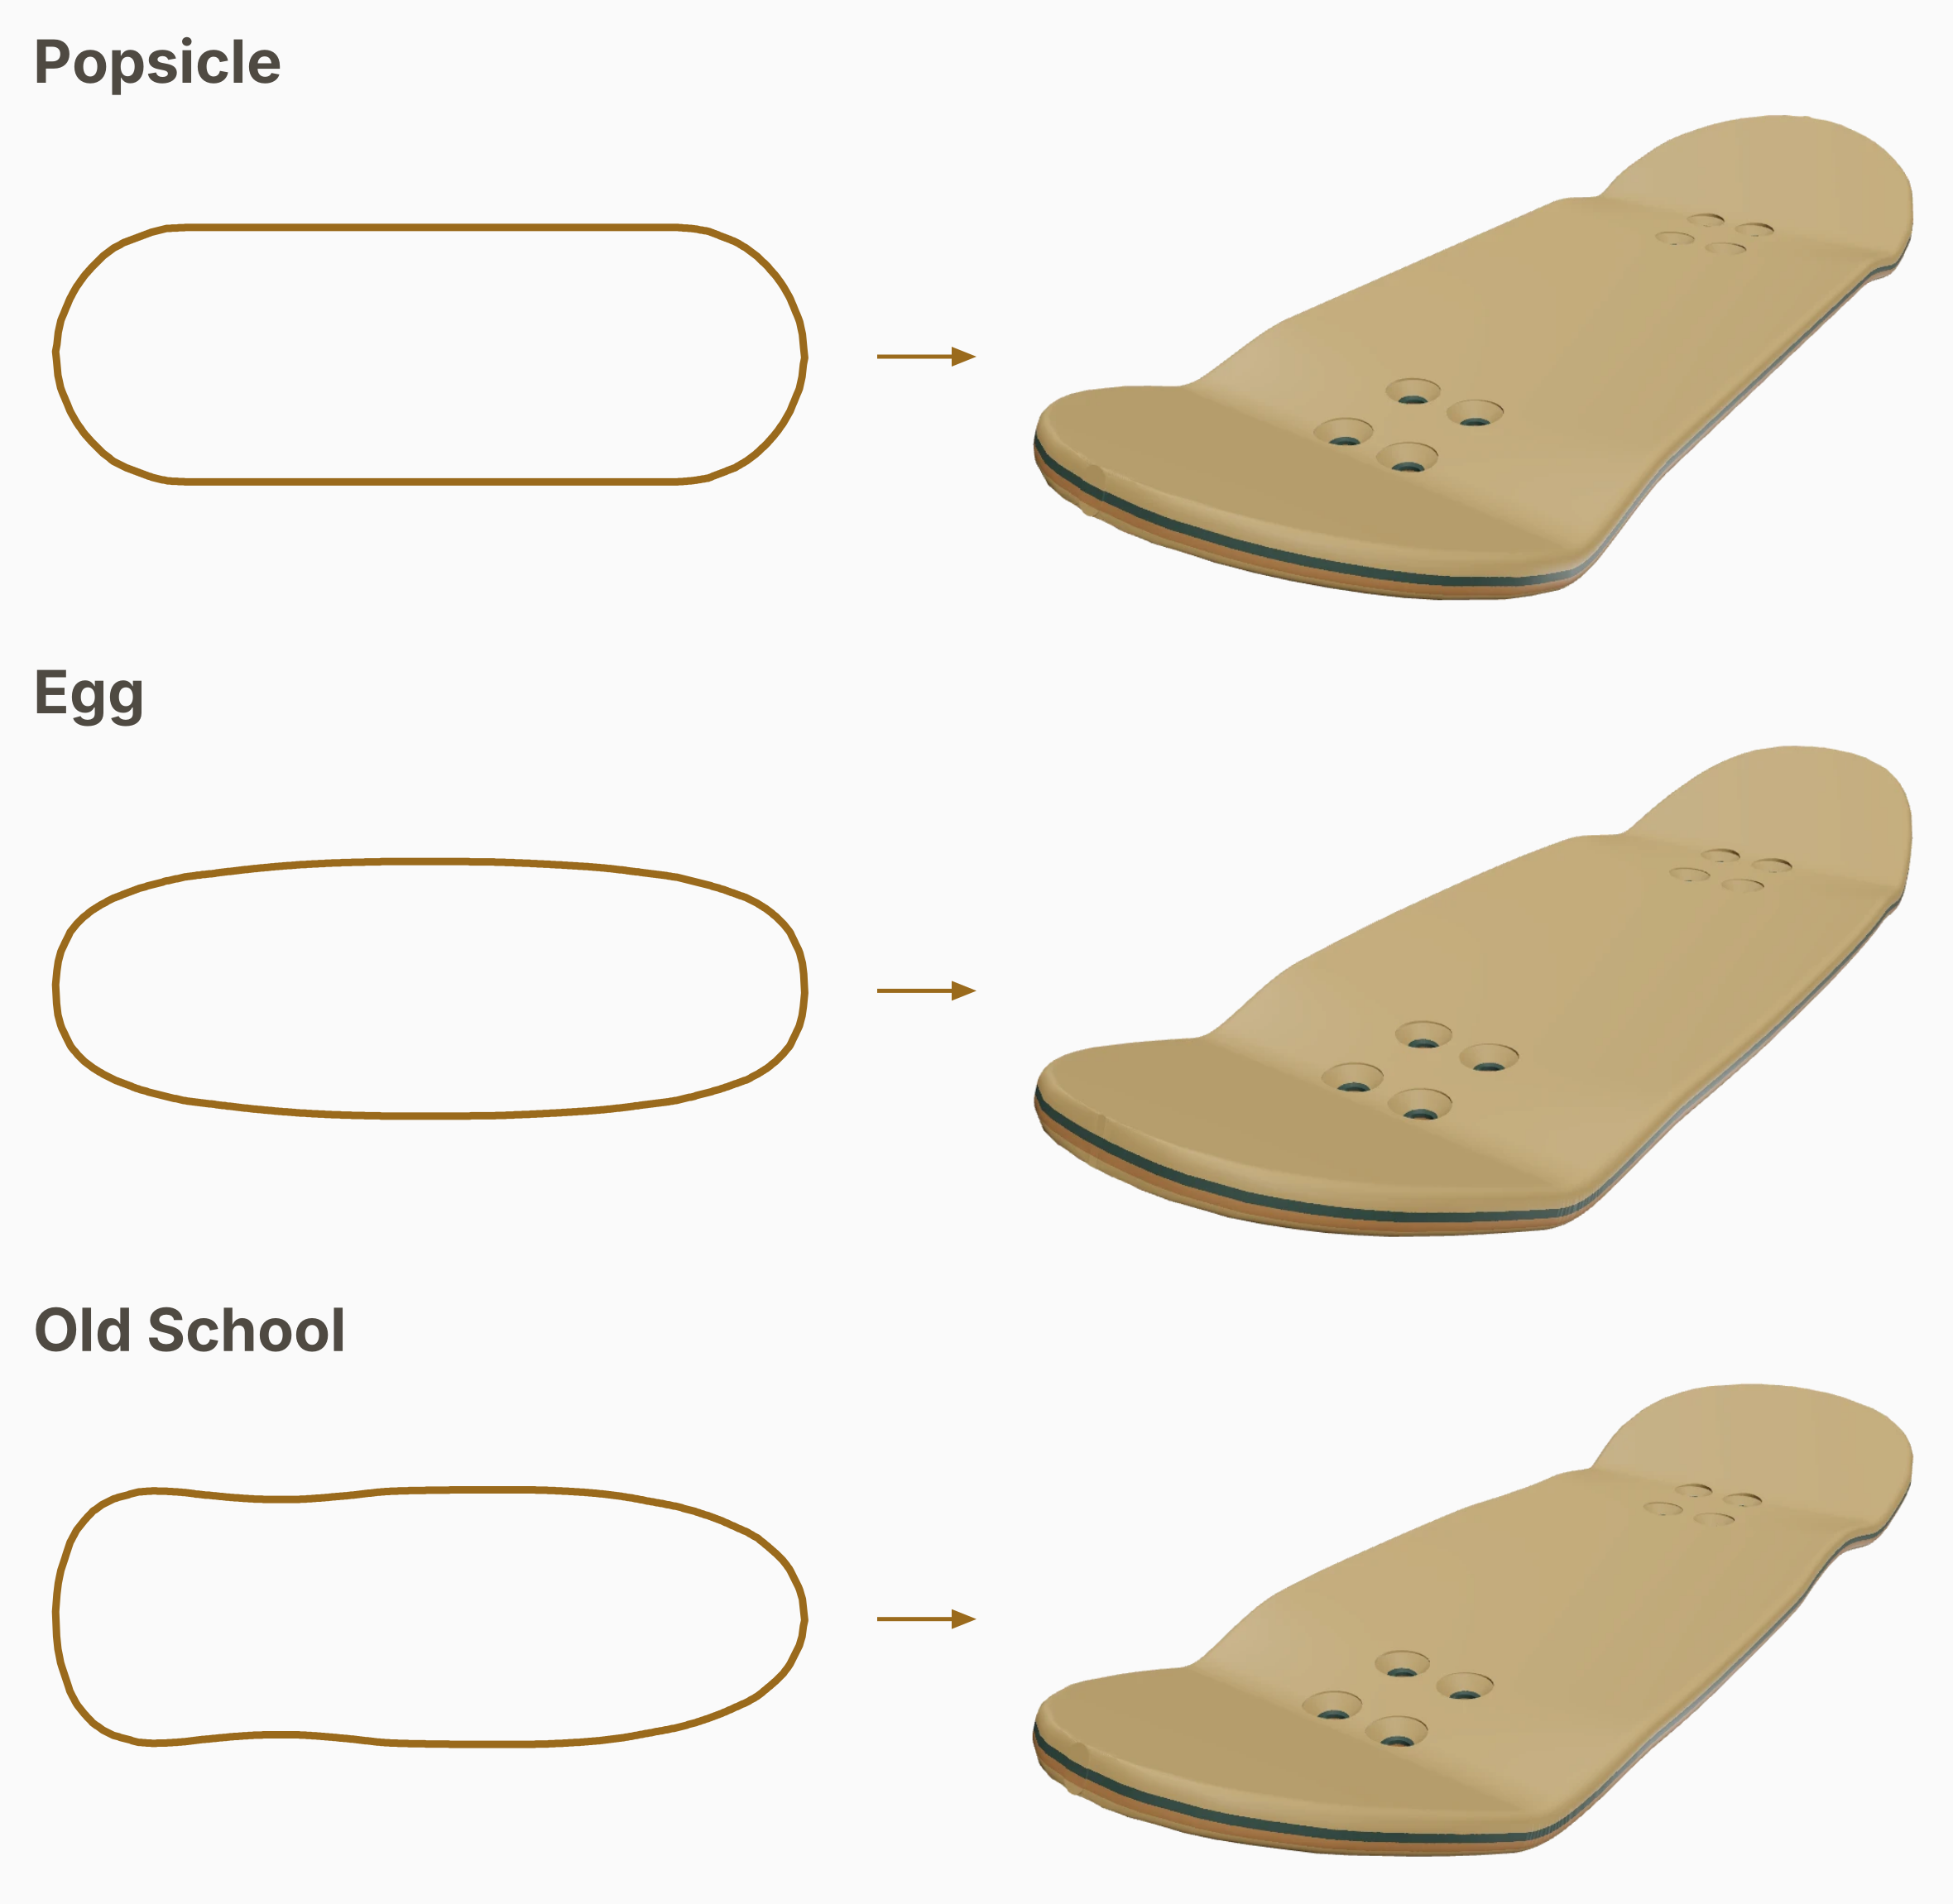
Scroll sideways to see the full illustration.
These three decks have the same length, width, kicks and concave. Only the outline changes. The popsicle has straight rails and round ends. The egg is widest in the middle and narrows toward both ends. The old school shape has a broad tail, a slight waist ahead of it and a nose that tapers to a point.
Concave
Concave is the curve across the deck, from one rail to the other. It's what makes the middle sit lower than the sides.
Depth
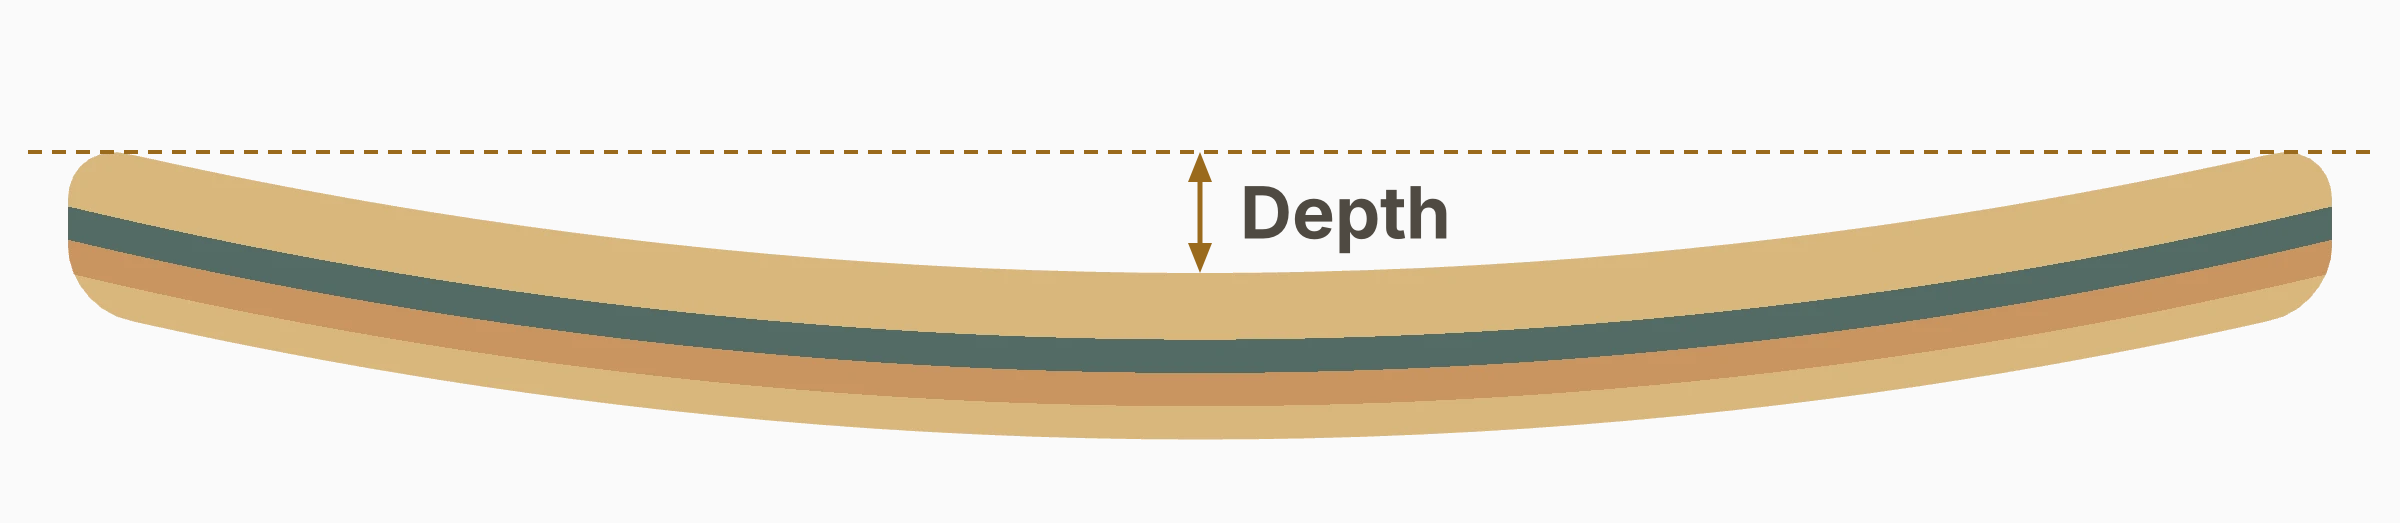
Scroll sideways to see the full illustration.
Lay a straight edge across both rails at the middle of the deck. The gap underneath it, down to the deck's surface in the center, is the concave depth.
You'll usually see brands describe concave as low, medium or deep. Deeper concave gives your fingers more of a raised edge to feel, which some riders find helpful for placement. Others like the feel of a flatter deck.
Type
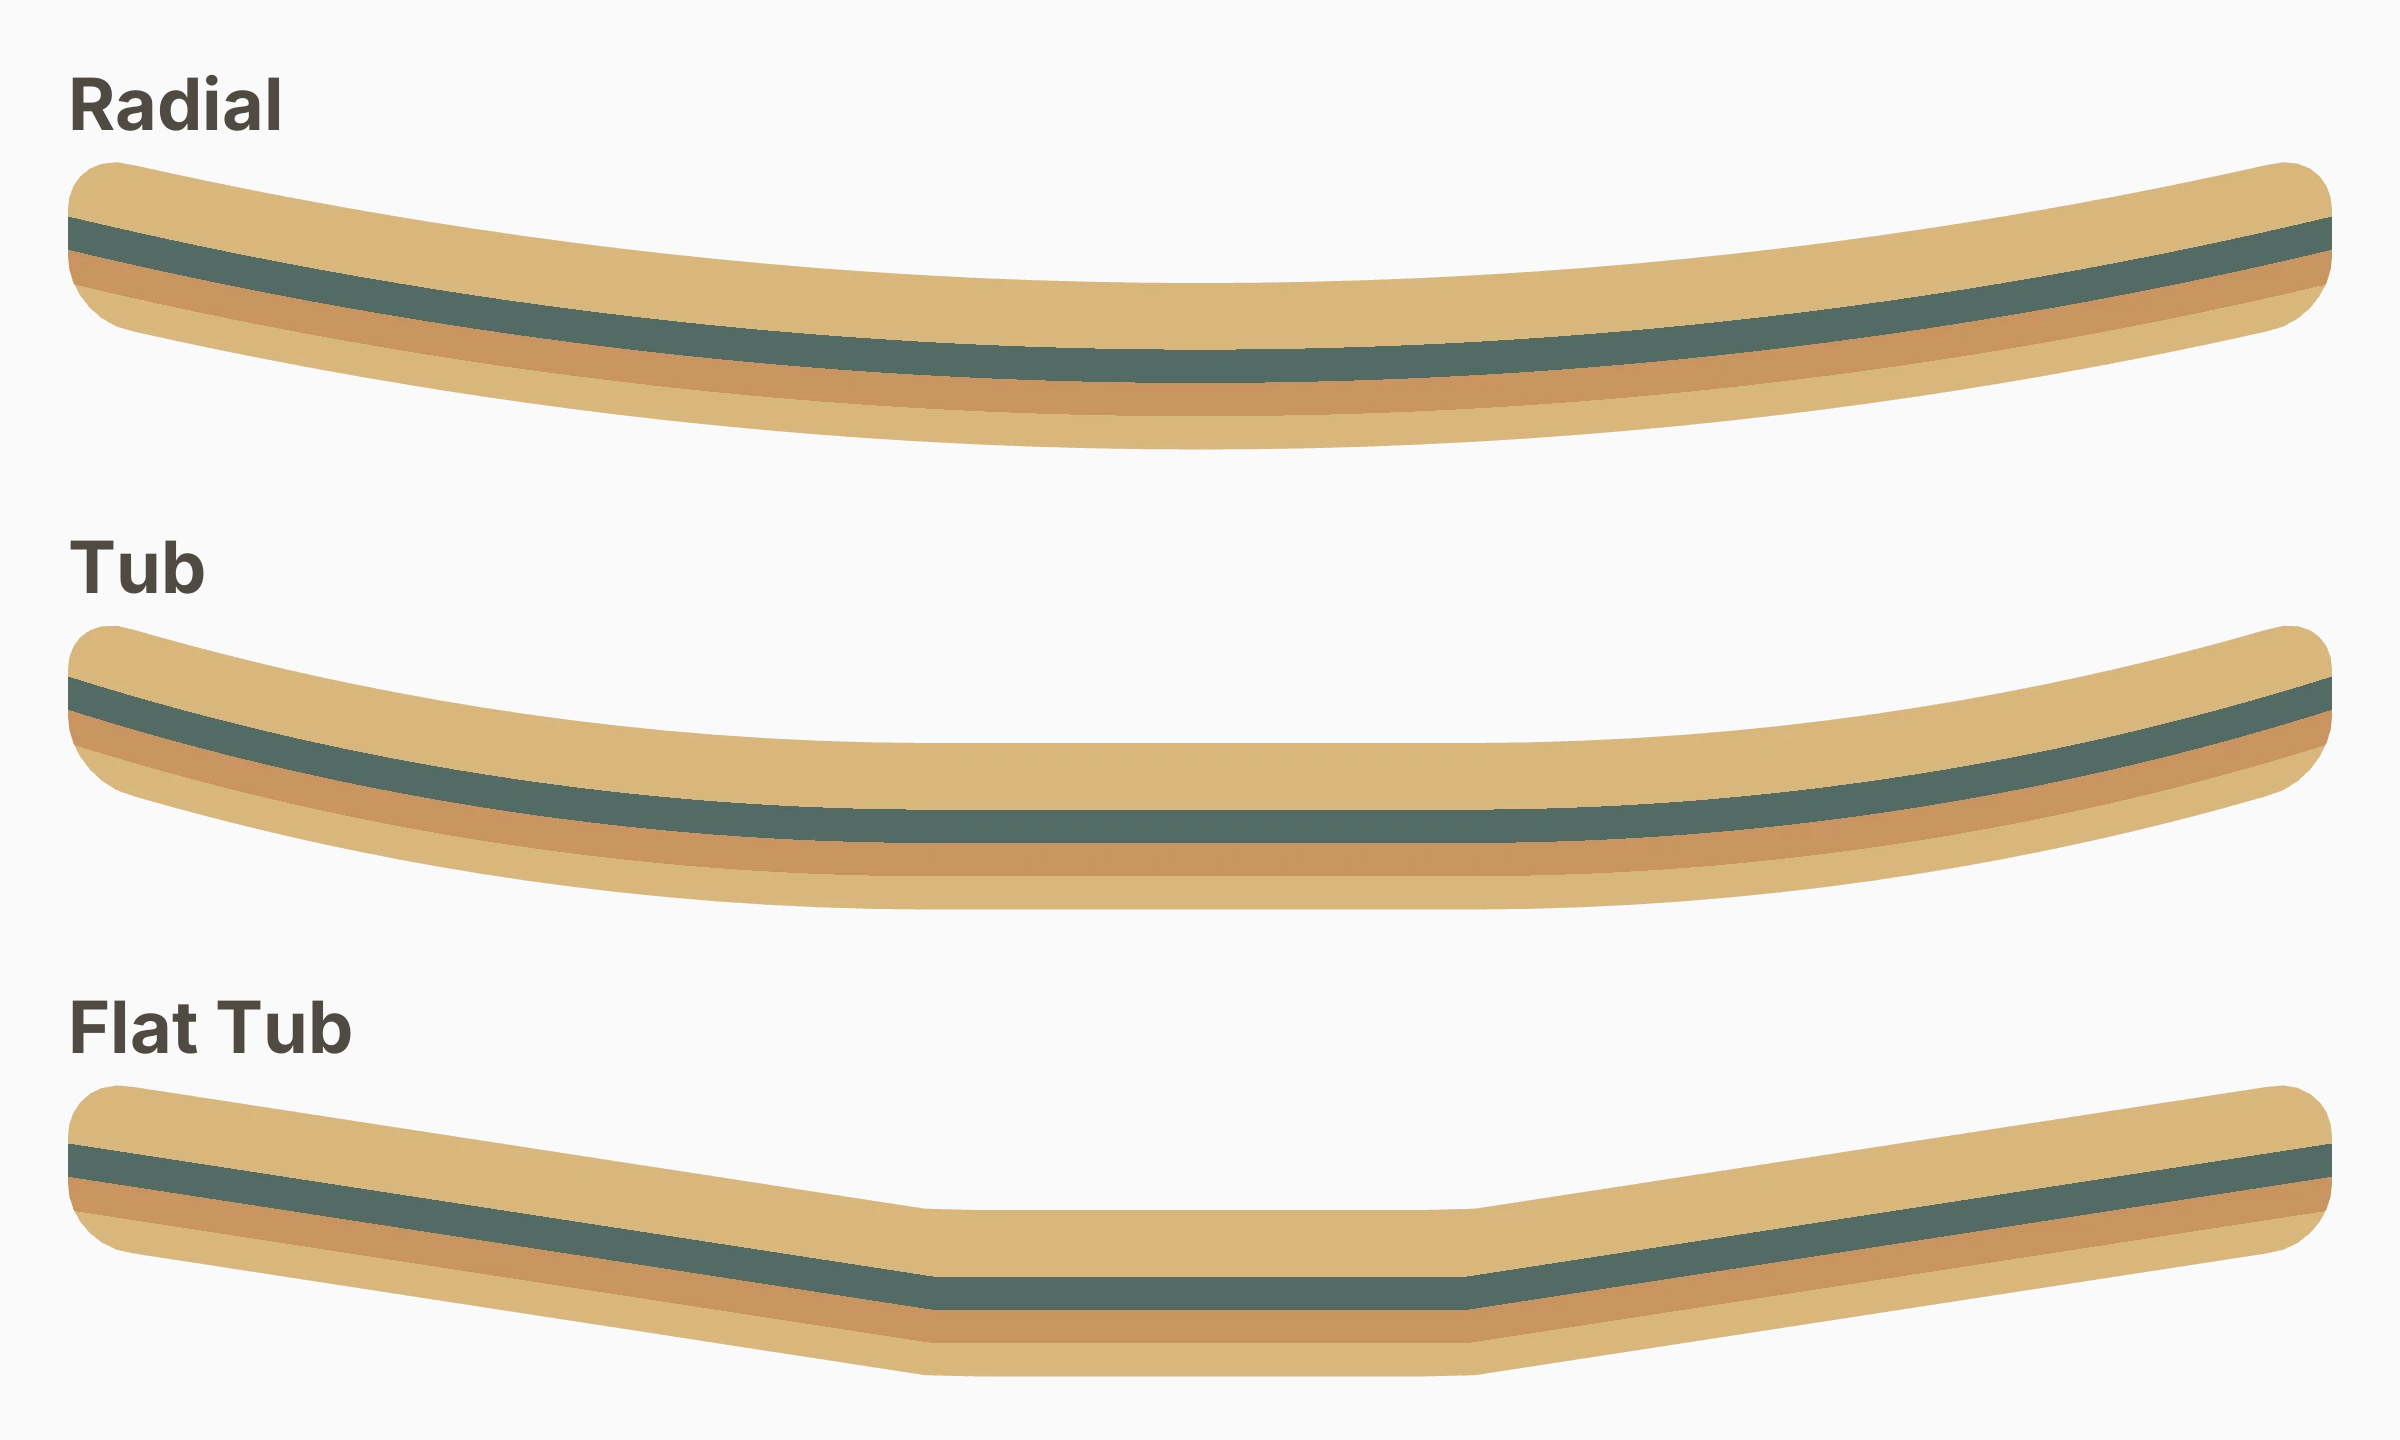
Scroll sideways to see the full illustration.
The three profiles shown here have the same width and depth. Studio calls them Radial, Tub and Flat Tub. Brands may use different names, or only describe the depth.
- Radial curves continuously from the center to the rails, getting steeper toward the edges.
- Tub has a flat middle and curved sides. The sides blend smoothly into the flat, so there's no sharp corner where they meet.
- Flat Tub also has a flat middle, but its sides are straight ramps. You get a distinct change in slope where each ramp meets the flat.
At the same width and depth, a Tub has steeper rails than a Radial because the rise is concentrated at the sides.
Tub flat width
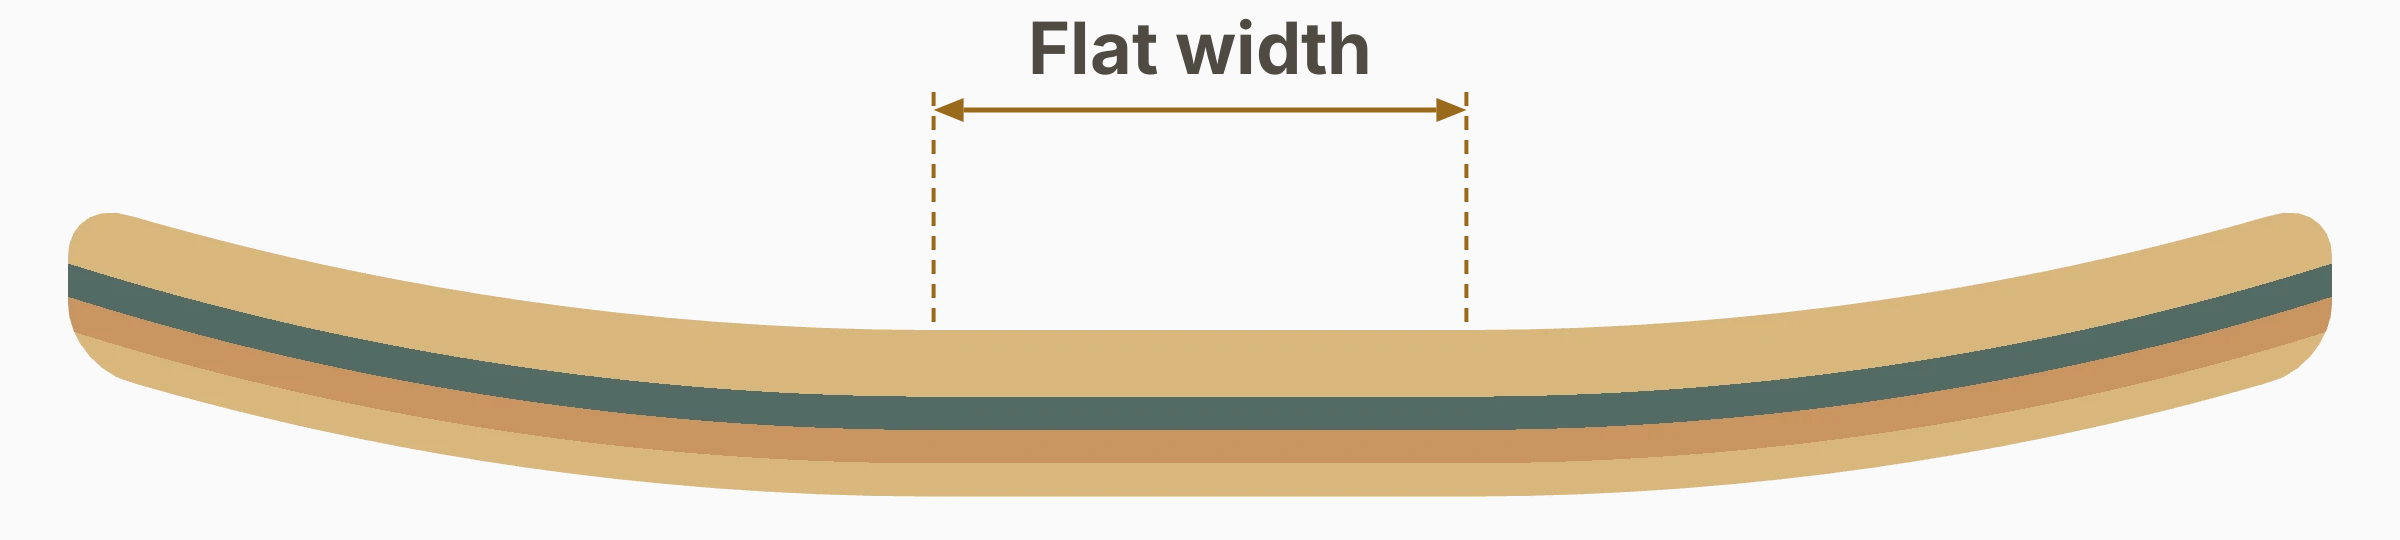
Scroll sideways to see the full illustration.
Tub and Flat Tub both have a flat section. Measure it between the points where the sides start rising. At a fixed deck width and concave depth, a wider flat section makes the sides steeper.
Transition
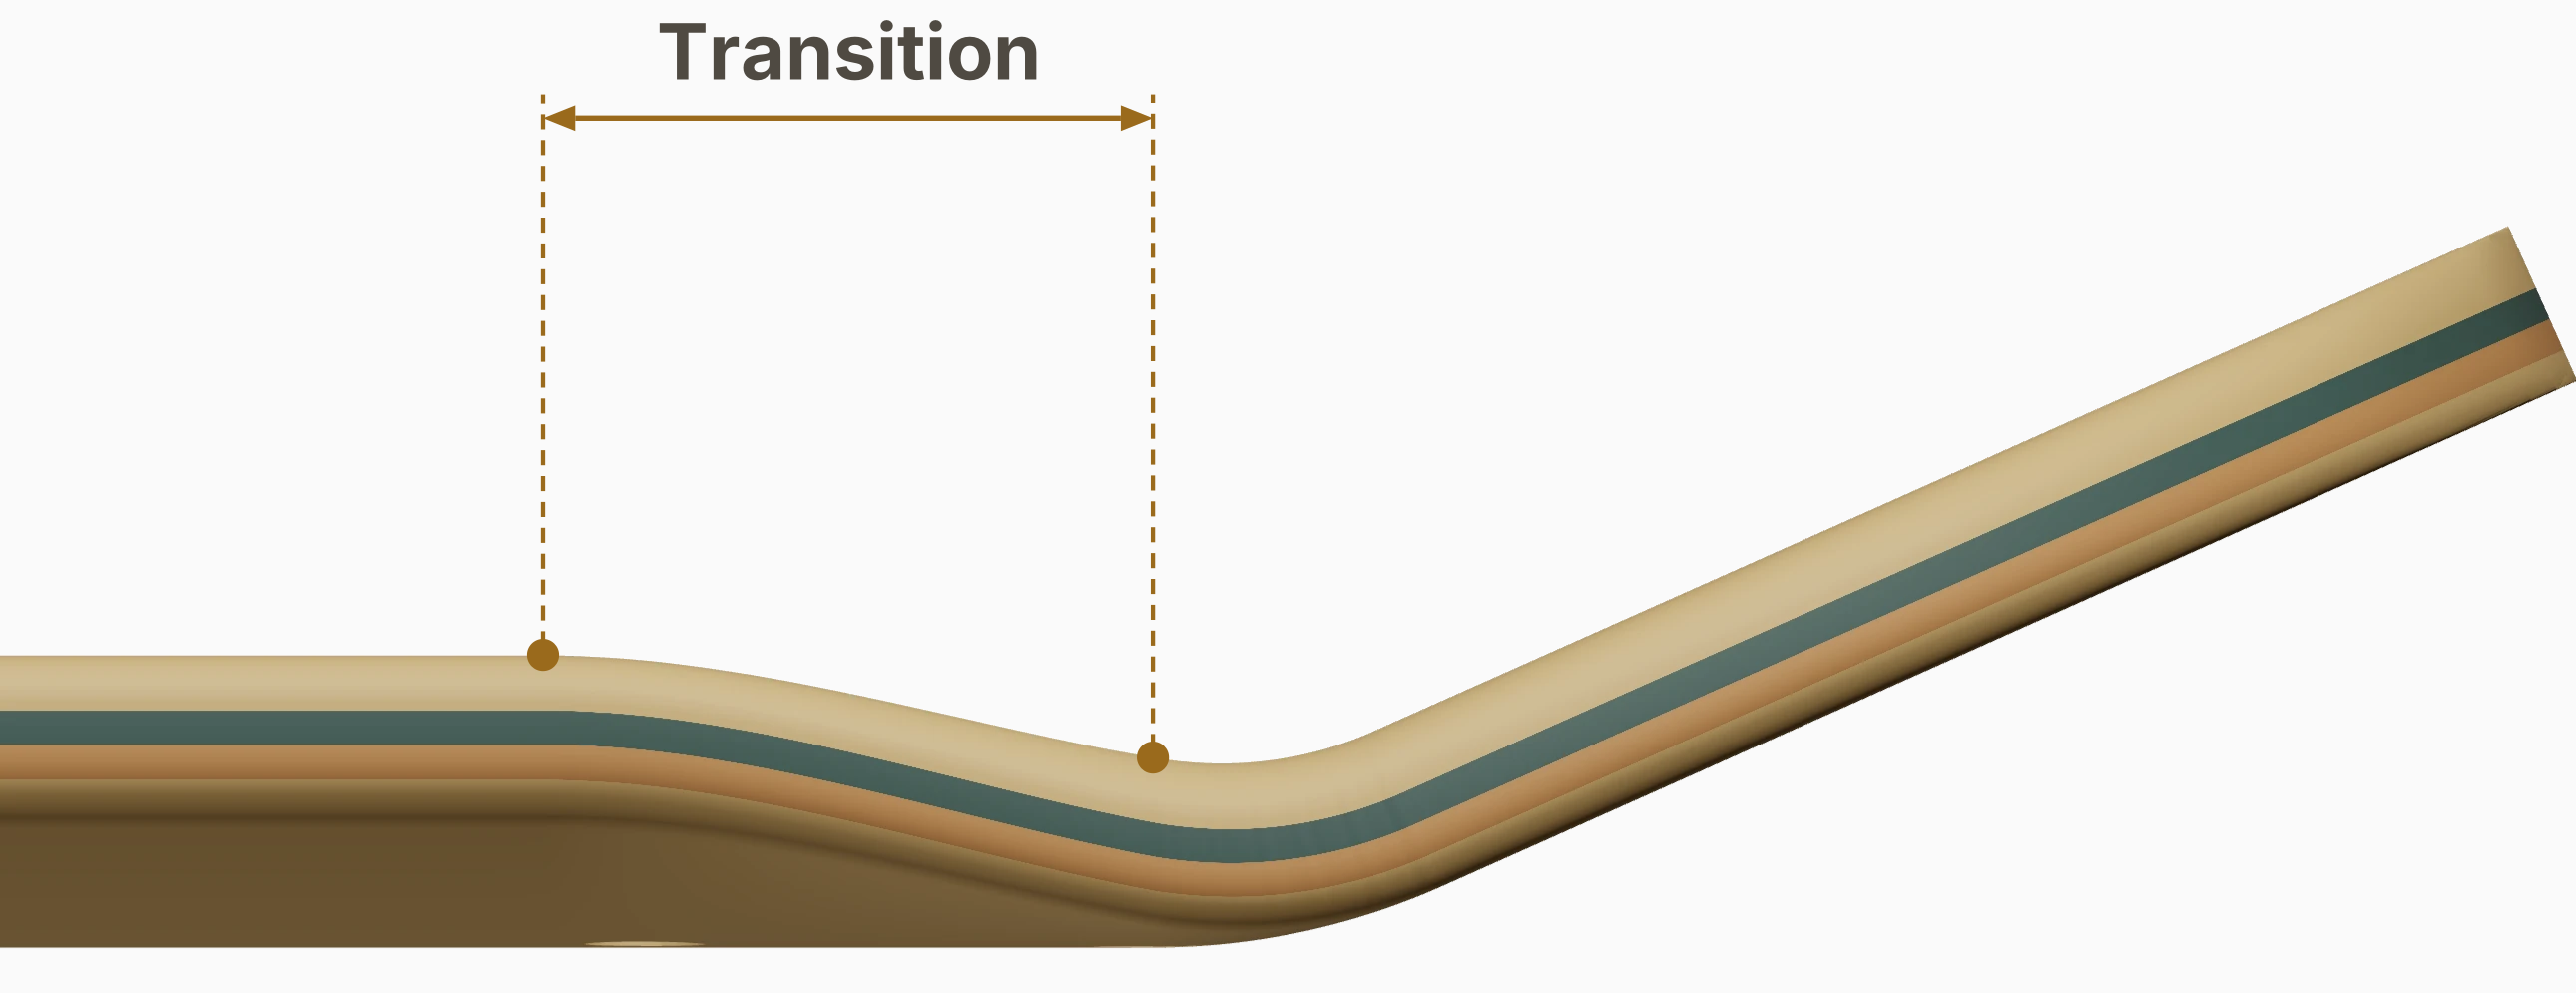
Scroll sideways to see the full illustration.
As you move toward a kick, the concave can become shallower. That change is the transition. In Studio, the transition setting measures from where the fade begins to where the kick starts bending. The fade continues through the bend.
A longer transition lets the concave ease out gradually. A shorter one keeps the full depth closer to the kick.
Kick concave
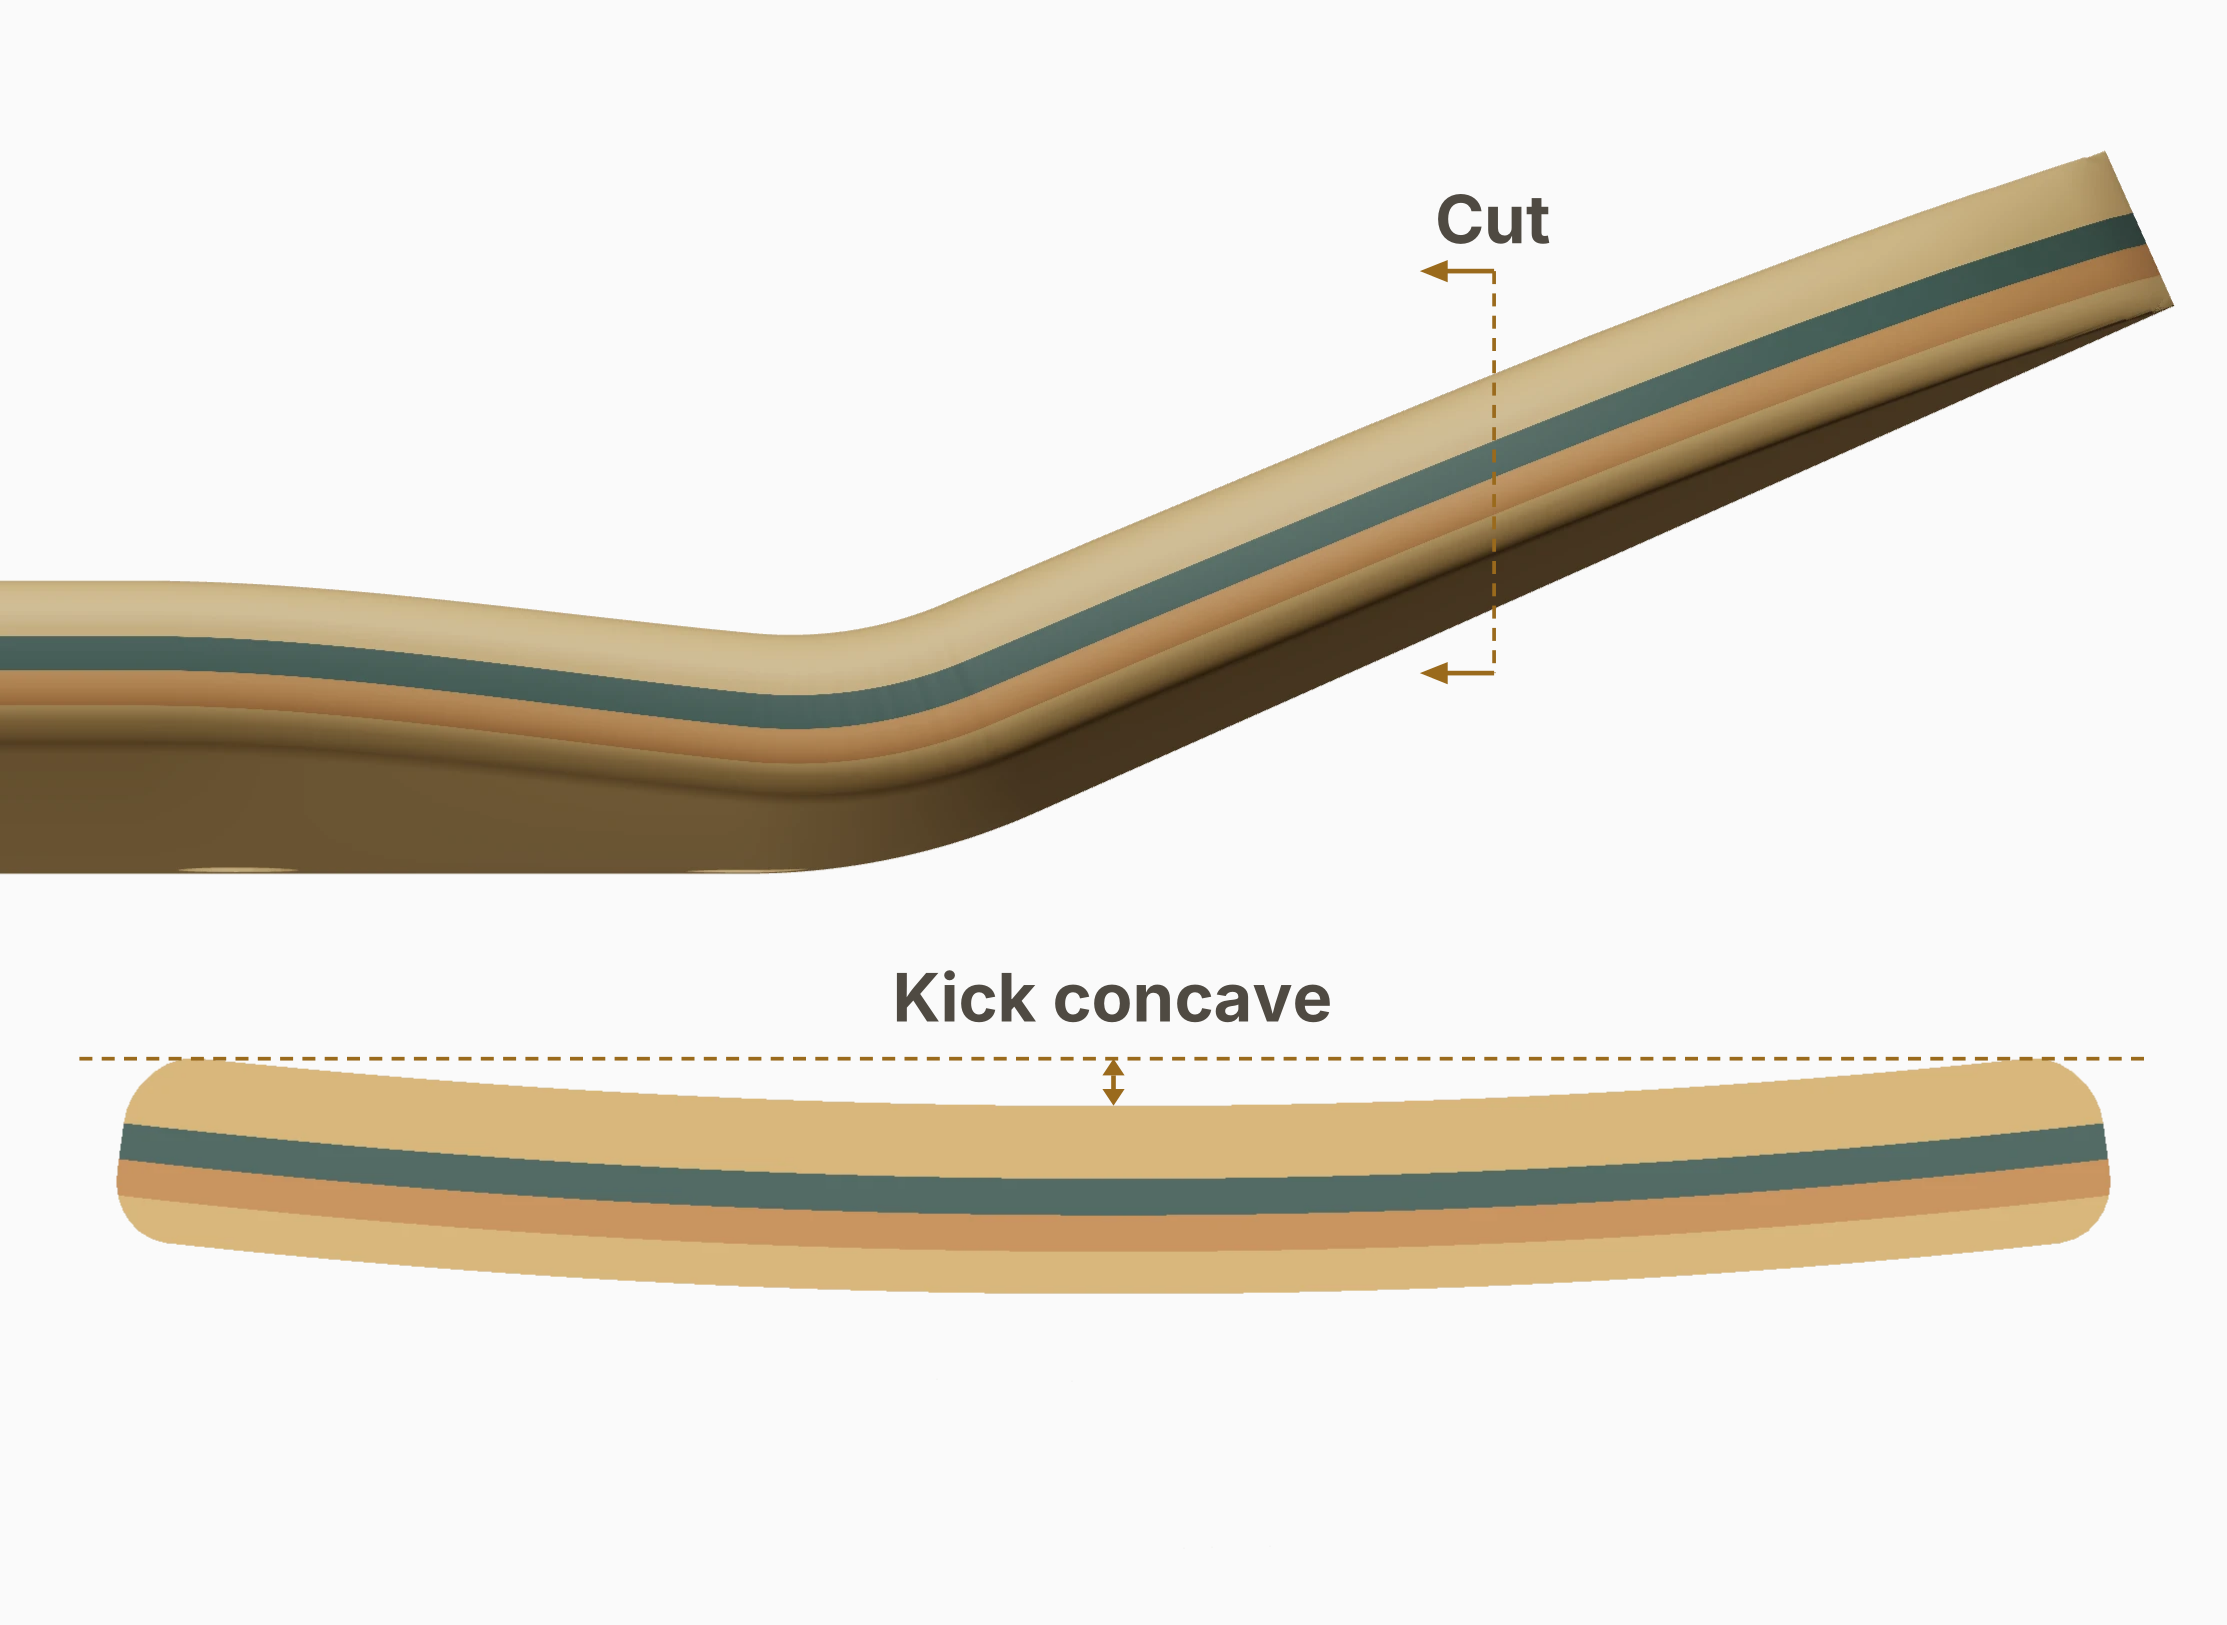
Scroll sideways to see the full illustration.
The kicks can have concave of their own: a small dip across the nose or tail, like the dip across the middle. Measure it the same way, with a straight edge across the kick's rails.
Not every deck has it, and when it does, it's often subtle. Some makers add it to give your fingers a little more shape to work against when flipping out of nose and tail slides.
Trucks
Wheelbase
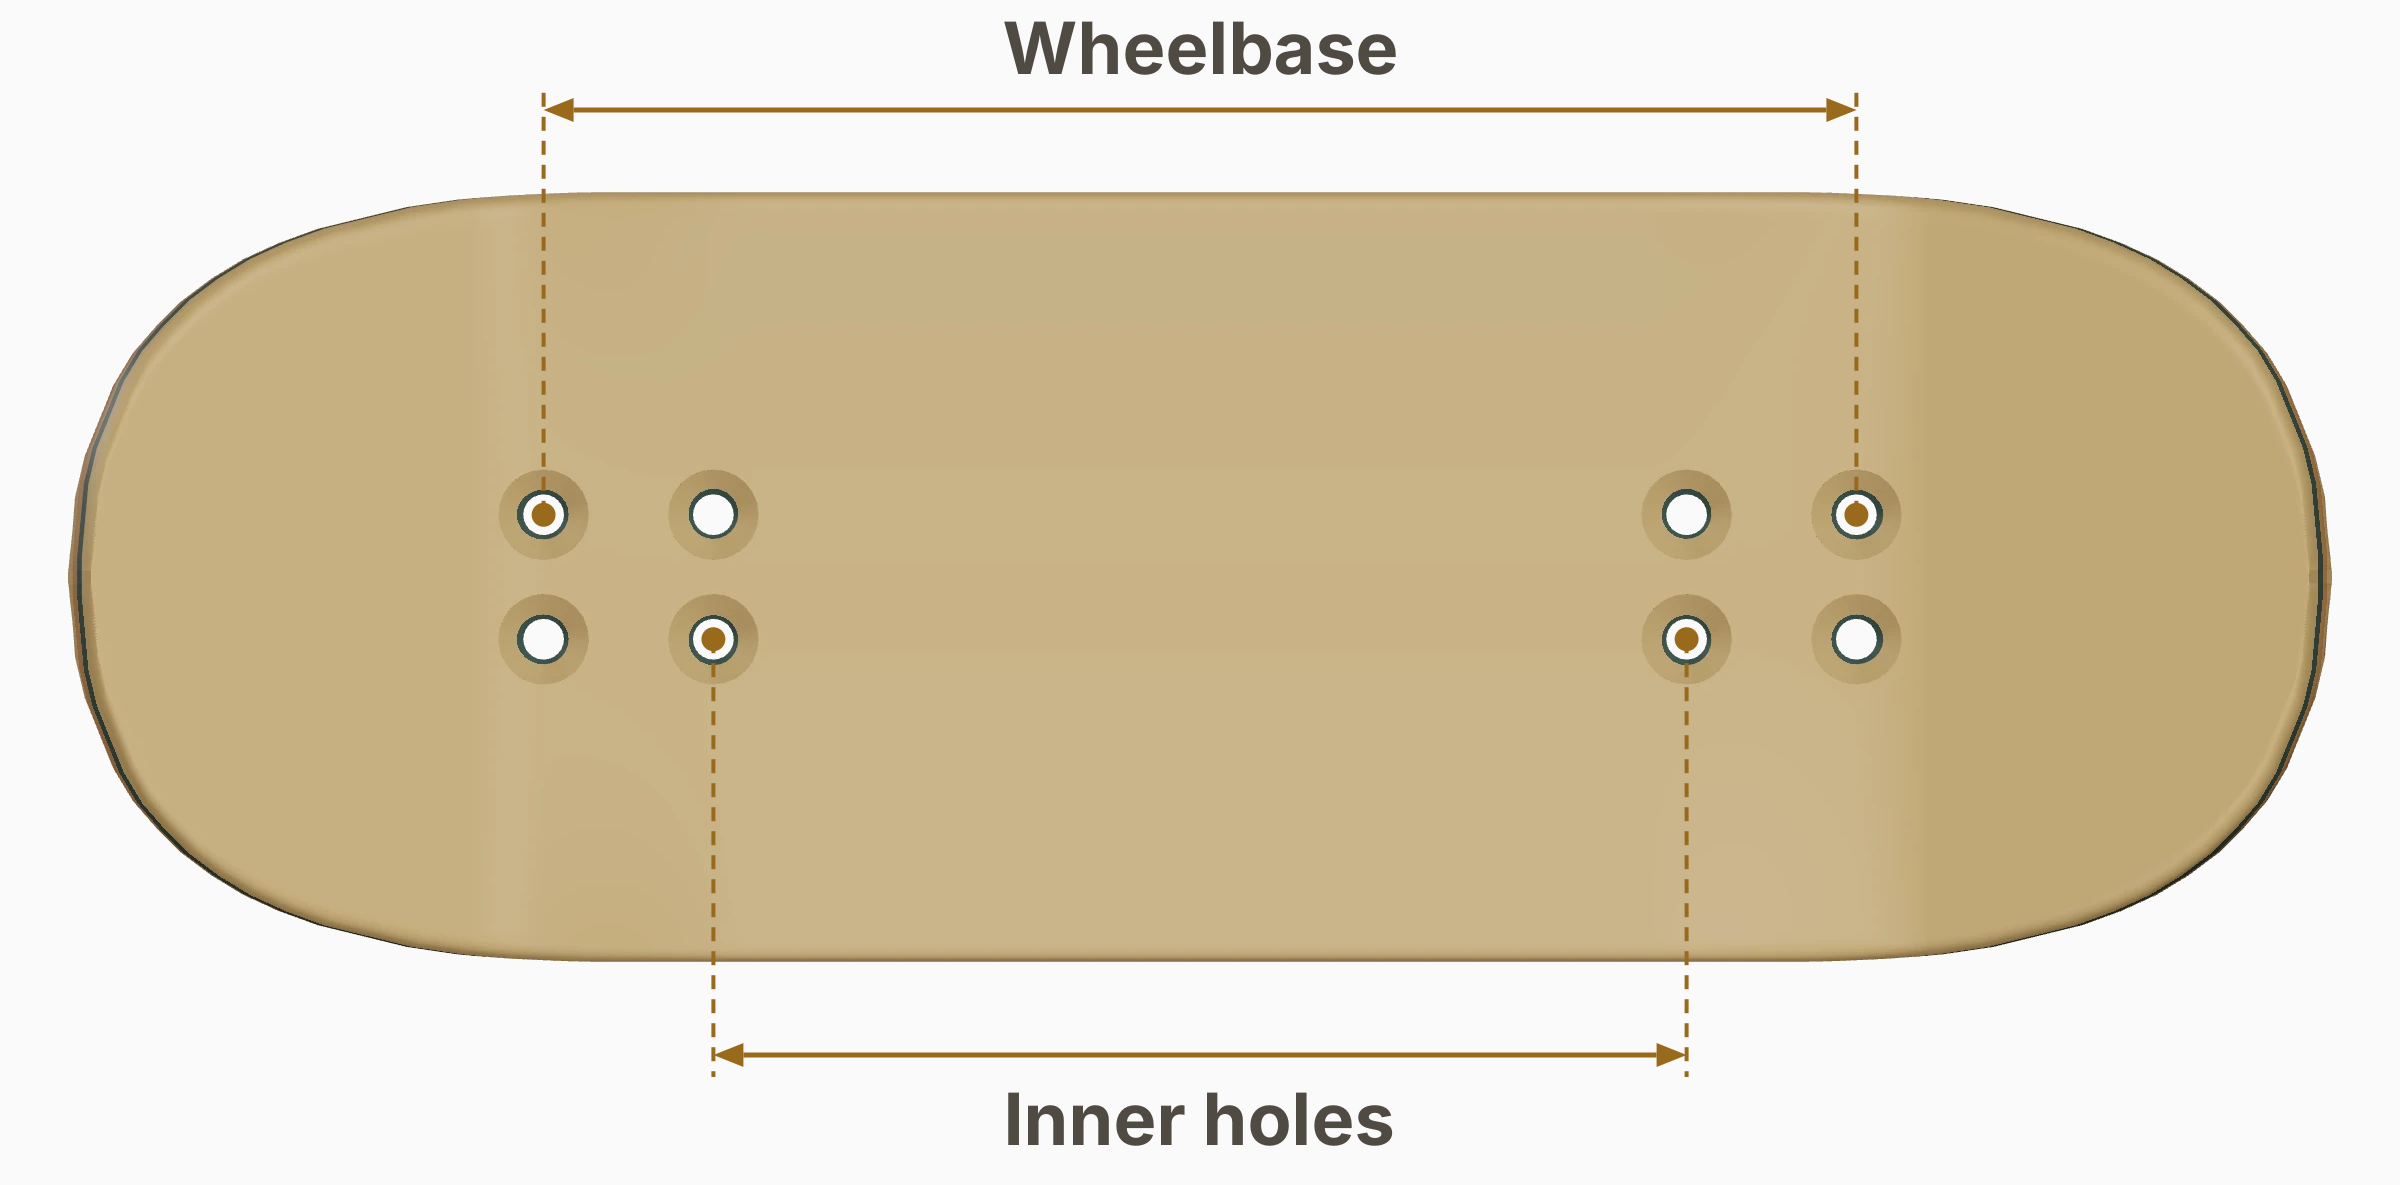
Scroll sideways to see the full illustration.
Wheelbase describes the spacing between the trucks, but makers don't all measure it the same way. In this guide, we measure between the centers of the outermost holes, as shown above.
Skateboard specs and some fingerboard mold makers use the innermost holes instead. With a 7.5 mm hole pattern, that measurement is 15 mm shorter. Always check which holes a maker means before comparing numbers.
The distance between the axles also depends on the trucks fitted to the deck.
The truck holes often sit near the start of each kick. Their position relative to the kicks can affect how the board feels when you pop.
Hole pattern
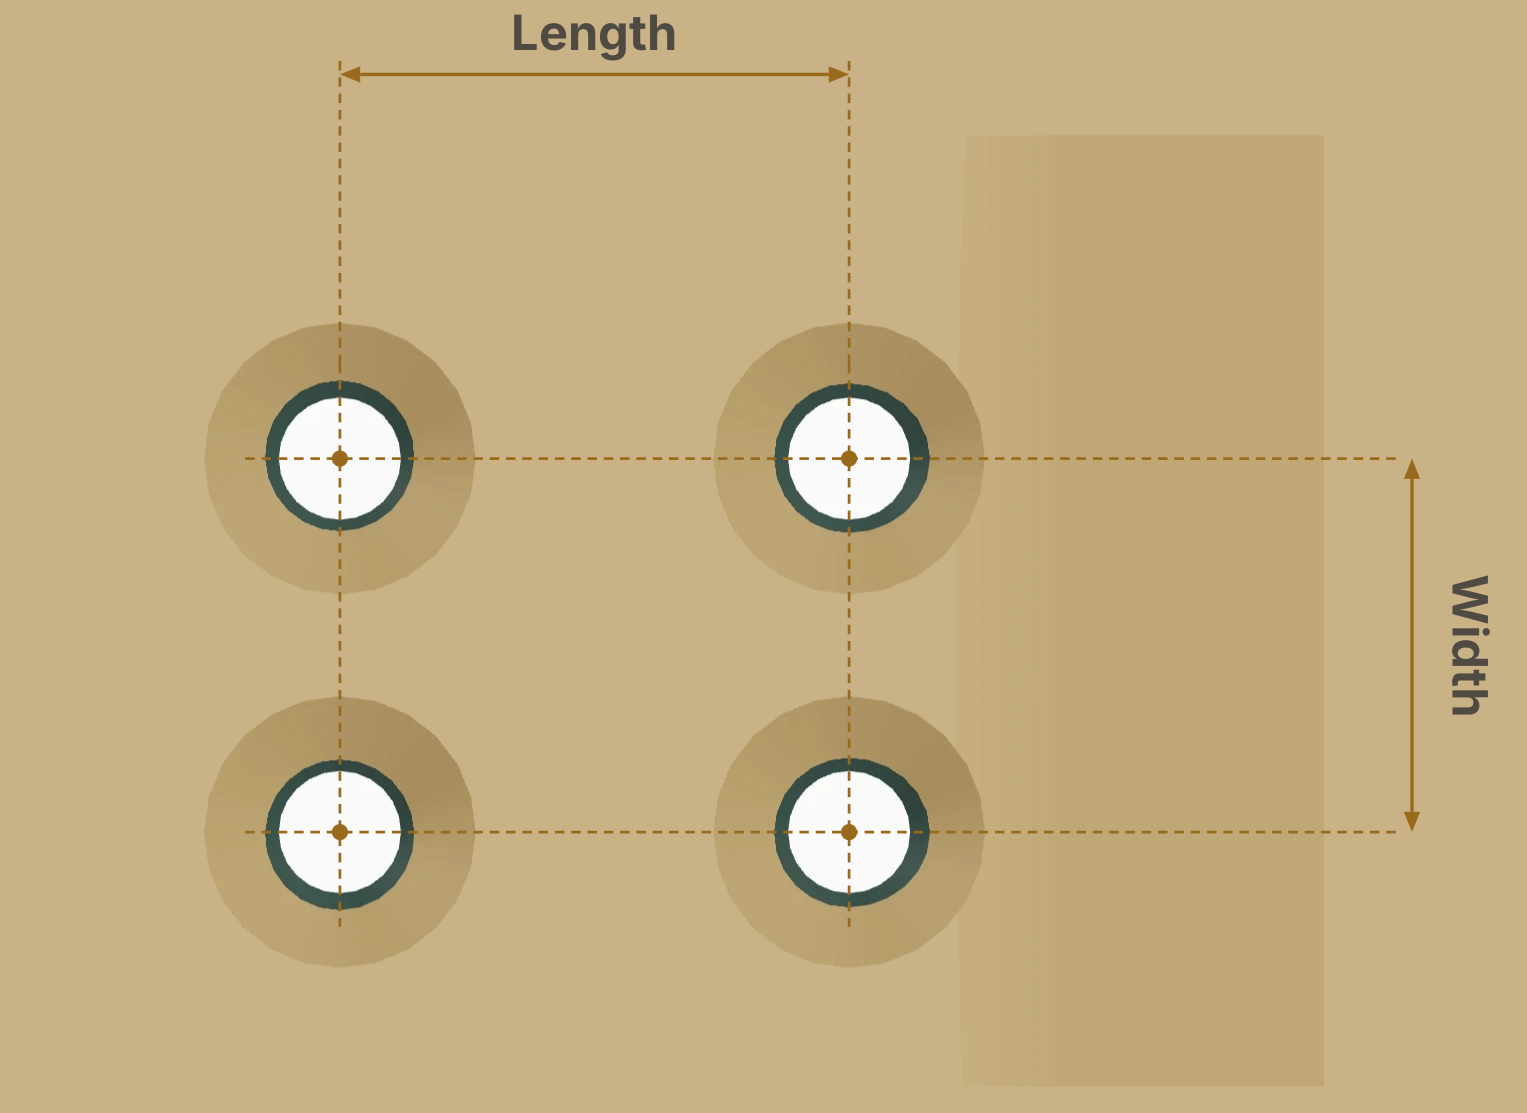
Scroll sideways to see the full illustration.
Each truck bolts through four holes arranged in a rectangle. Measure between the hole centers: pattern length runs along the deck, and pattern width runs across it. A common pattern is about 7.5 × 5.5 mm, but check your actual baseplate before drilling.
Hole diameter
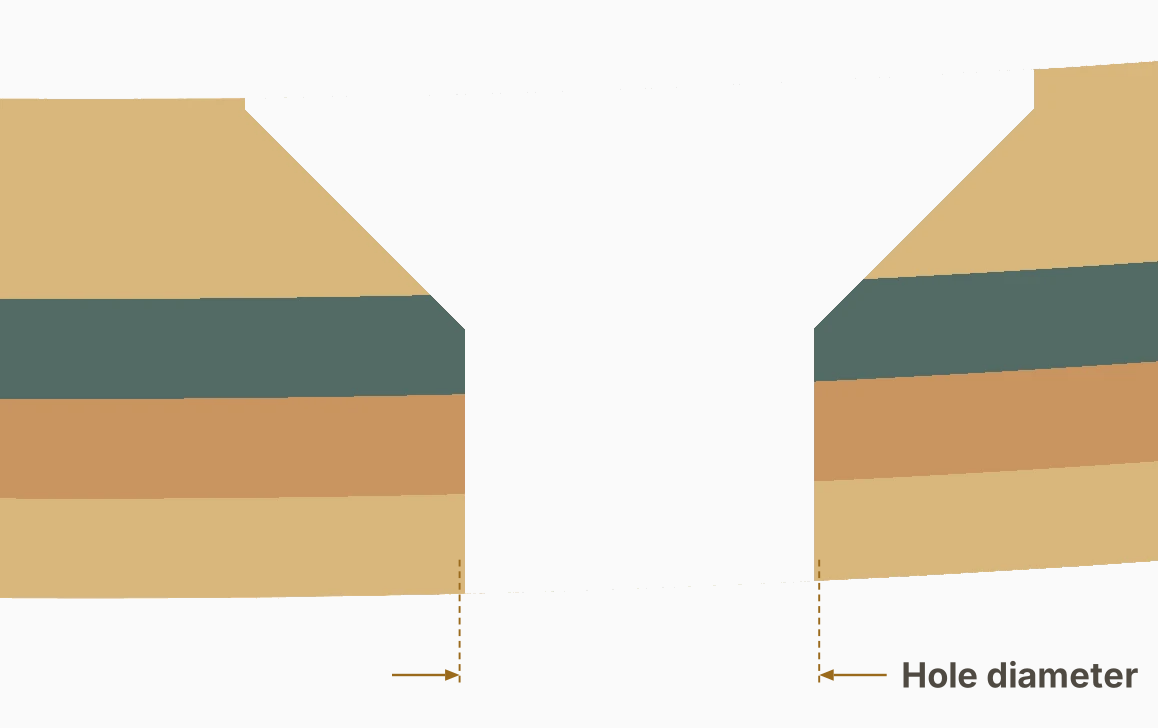
Scroll sideways to see the full illustration.
This is the width of the straight hole through the wood. It needs to let the truck screw pass through, so check the screws you'll be using before choosing a drill size.
Countersink
Scroll sideways to see the full illustration.
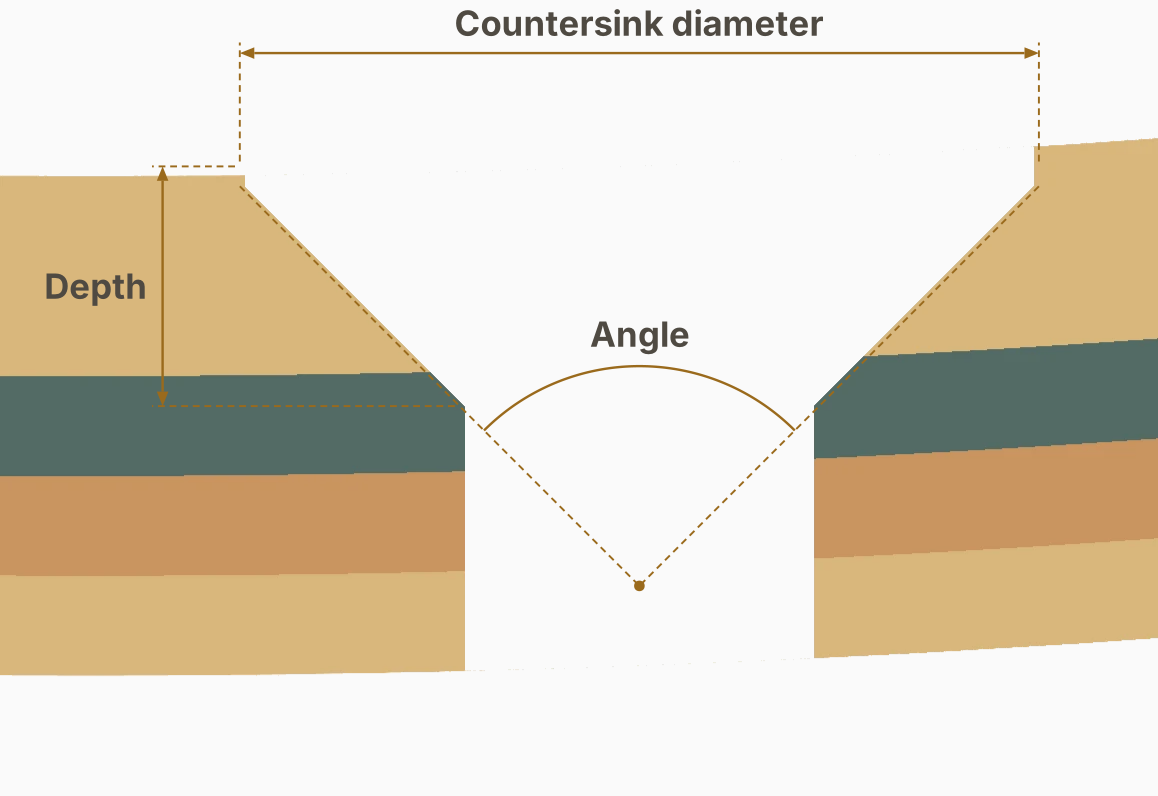
The countersink is the cone-shaped recess around the top of a truck hole. It gives the screw head somewhere to sit, so it can lie flush with the deck instead of sticking up under the grip tape.
- Diameter is the width of the recess at the surface. Size it to suit the screw head.
- Angle is measured between the two sides of the cone. 90° is common for metric countersunk screws, but match it to your hardware.
- Depth runs from the surface down to where the recess meets the straight hole. For a simple cone, the two diameters and the angle determine this depth.
If you drill a countersink deeper, its opening gets wider. Studio's depth setting works differently: extra depth adds a straight section above the cone, letting the head sit below the surface without widening the opening.
Mold
Scroll sideways to see the full illustration.
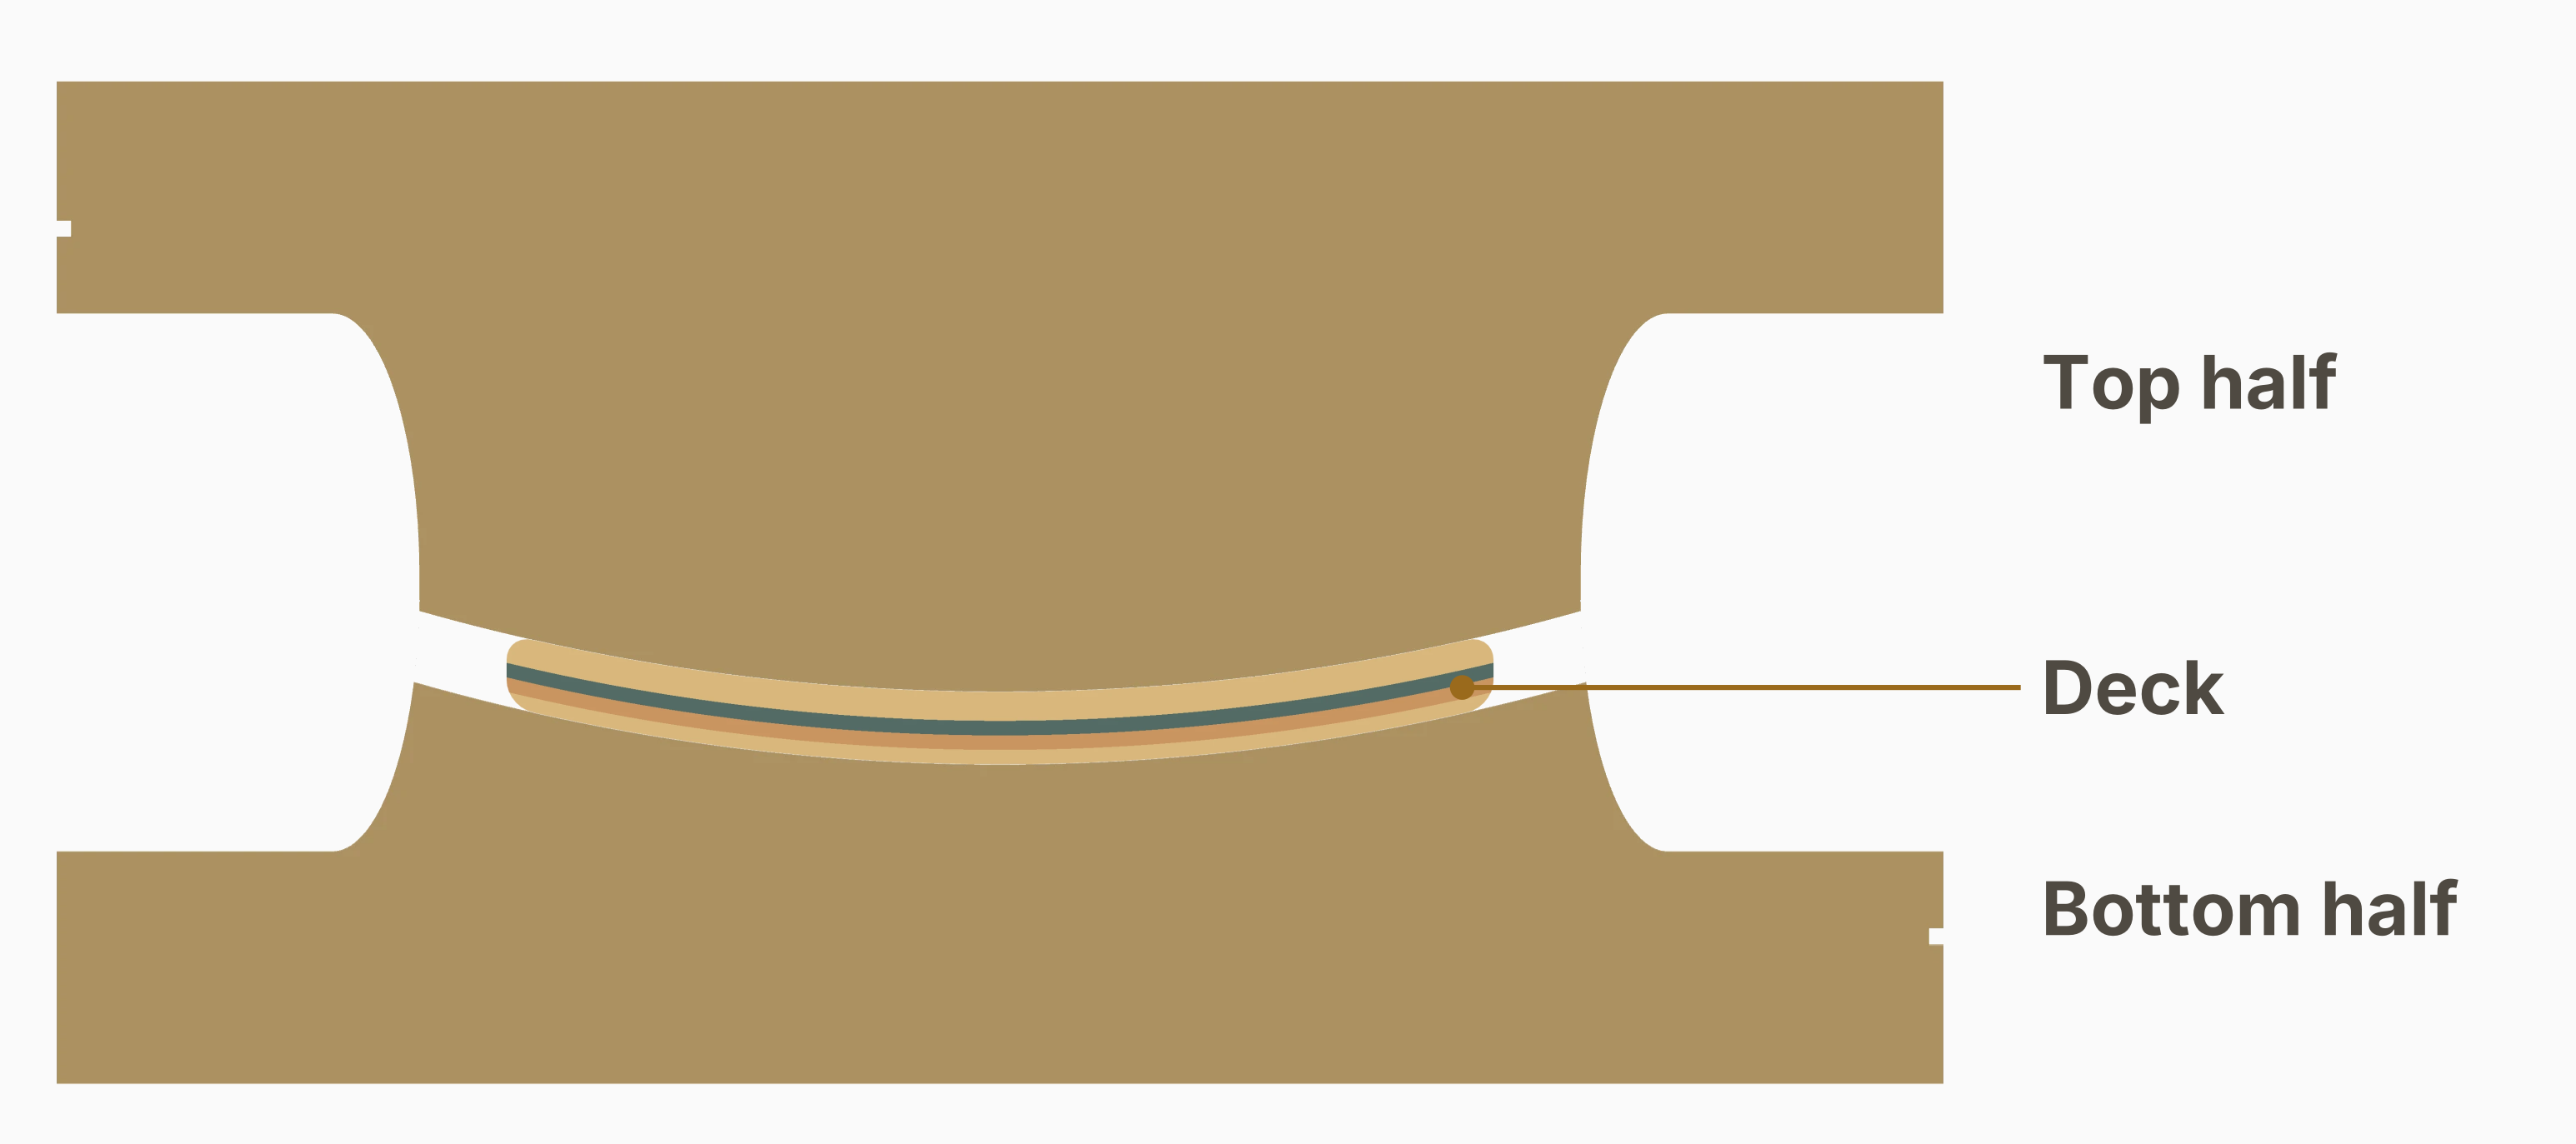
A mold presses the glued veneers into the deck's curves. In the two-part mold shown here, one half follows the underside of the deck and the other follows the top.
The space between them allows for the deck's thickness. This gap is sometimes called the offset. Getting that gap right helps the mold press evenly across the wood.
Mold type
Scroll sideways to see the full illustration.
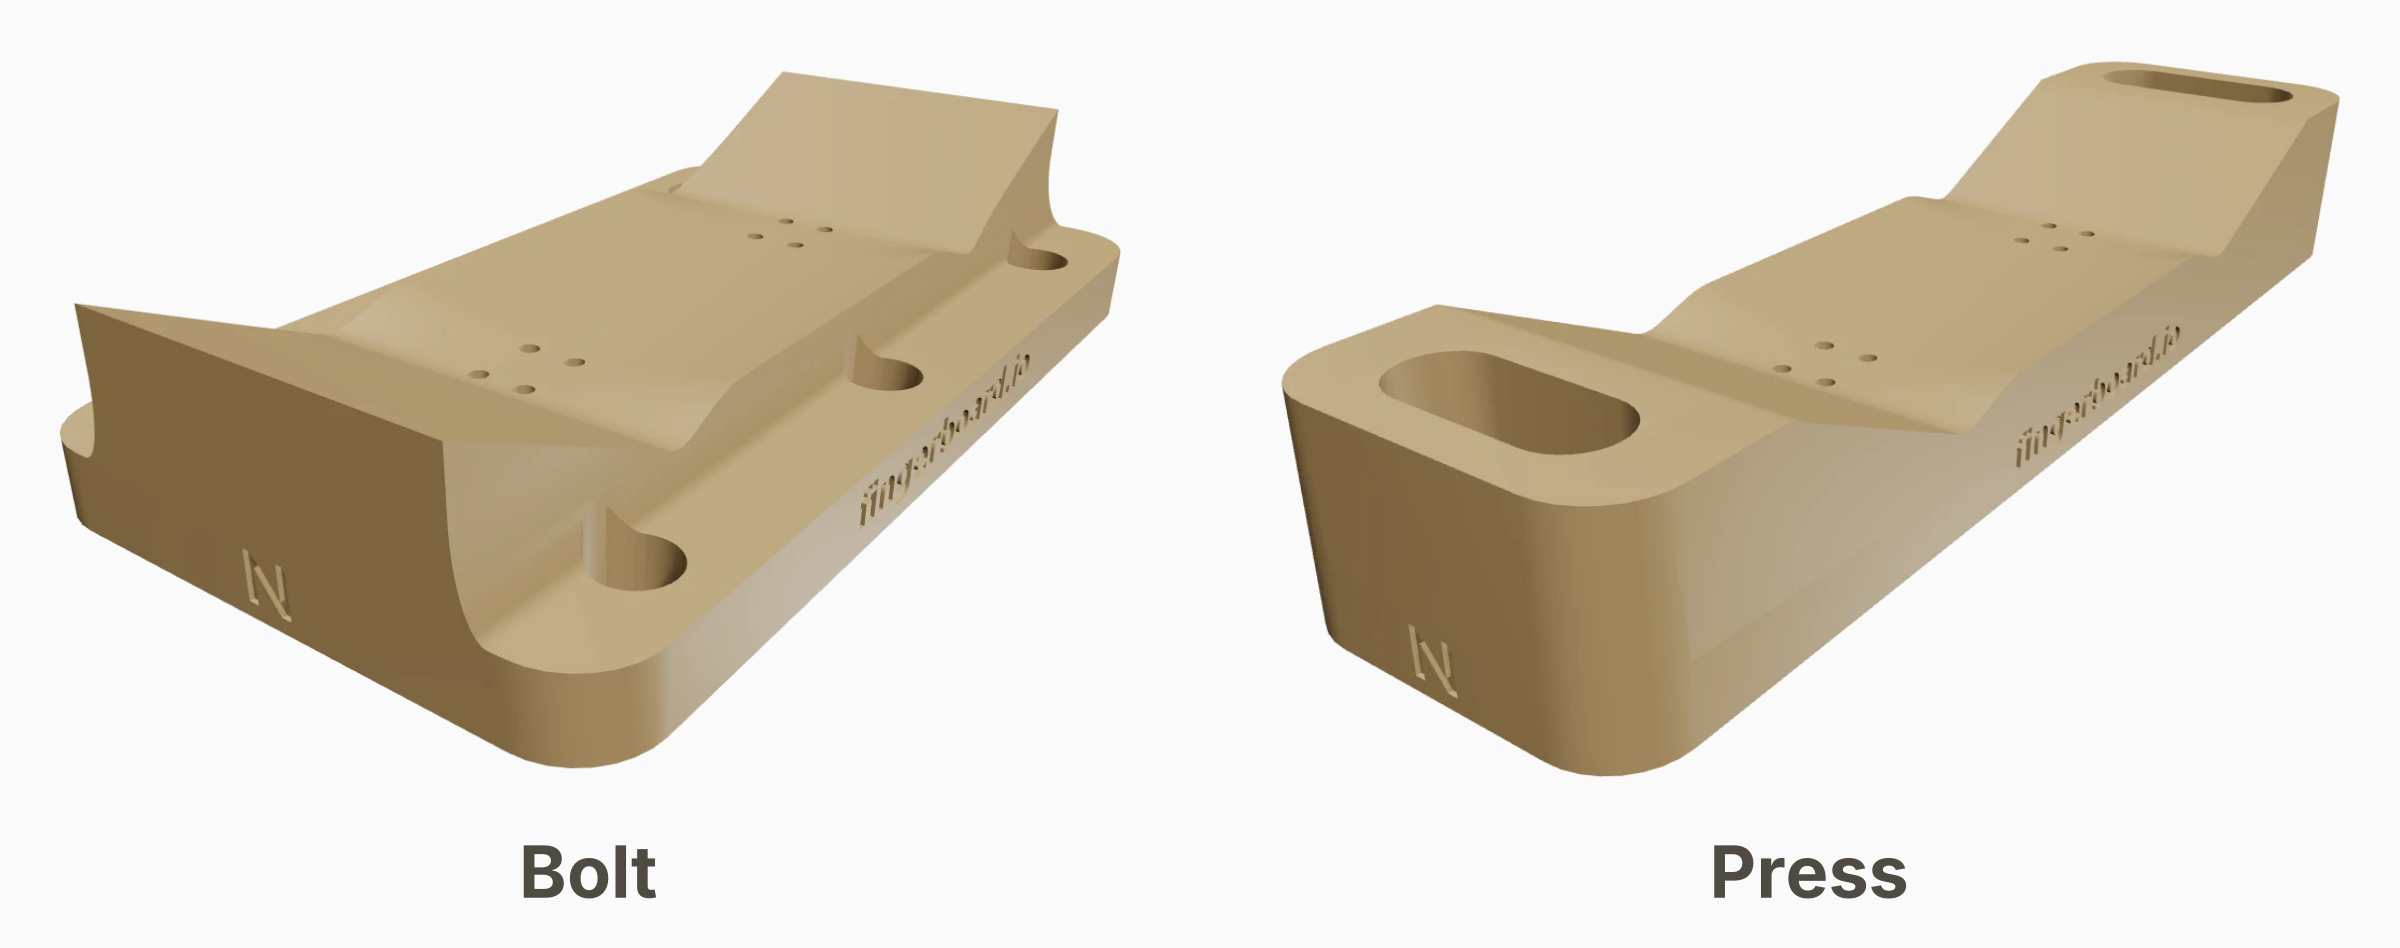
These are the bottom halves of two mold designs. The main difference is how you squeeze the halves together.
- Bolt molds are for use without a press or vise. Bolts down both sides provide the pressing force: tightening them pulls the halves together and helps keep them aligned.
- Press molds are for use with a press or vise, which supplies the force to squeeze the halves together. On the one shown, a post at each end of the top half fits into a pocket in the bottom half to keep everything lined up.
Form length and width
Scroll sideways to see the full illustration.
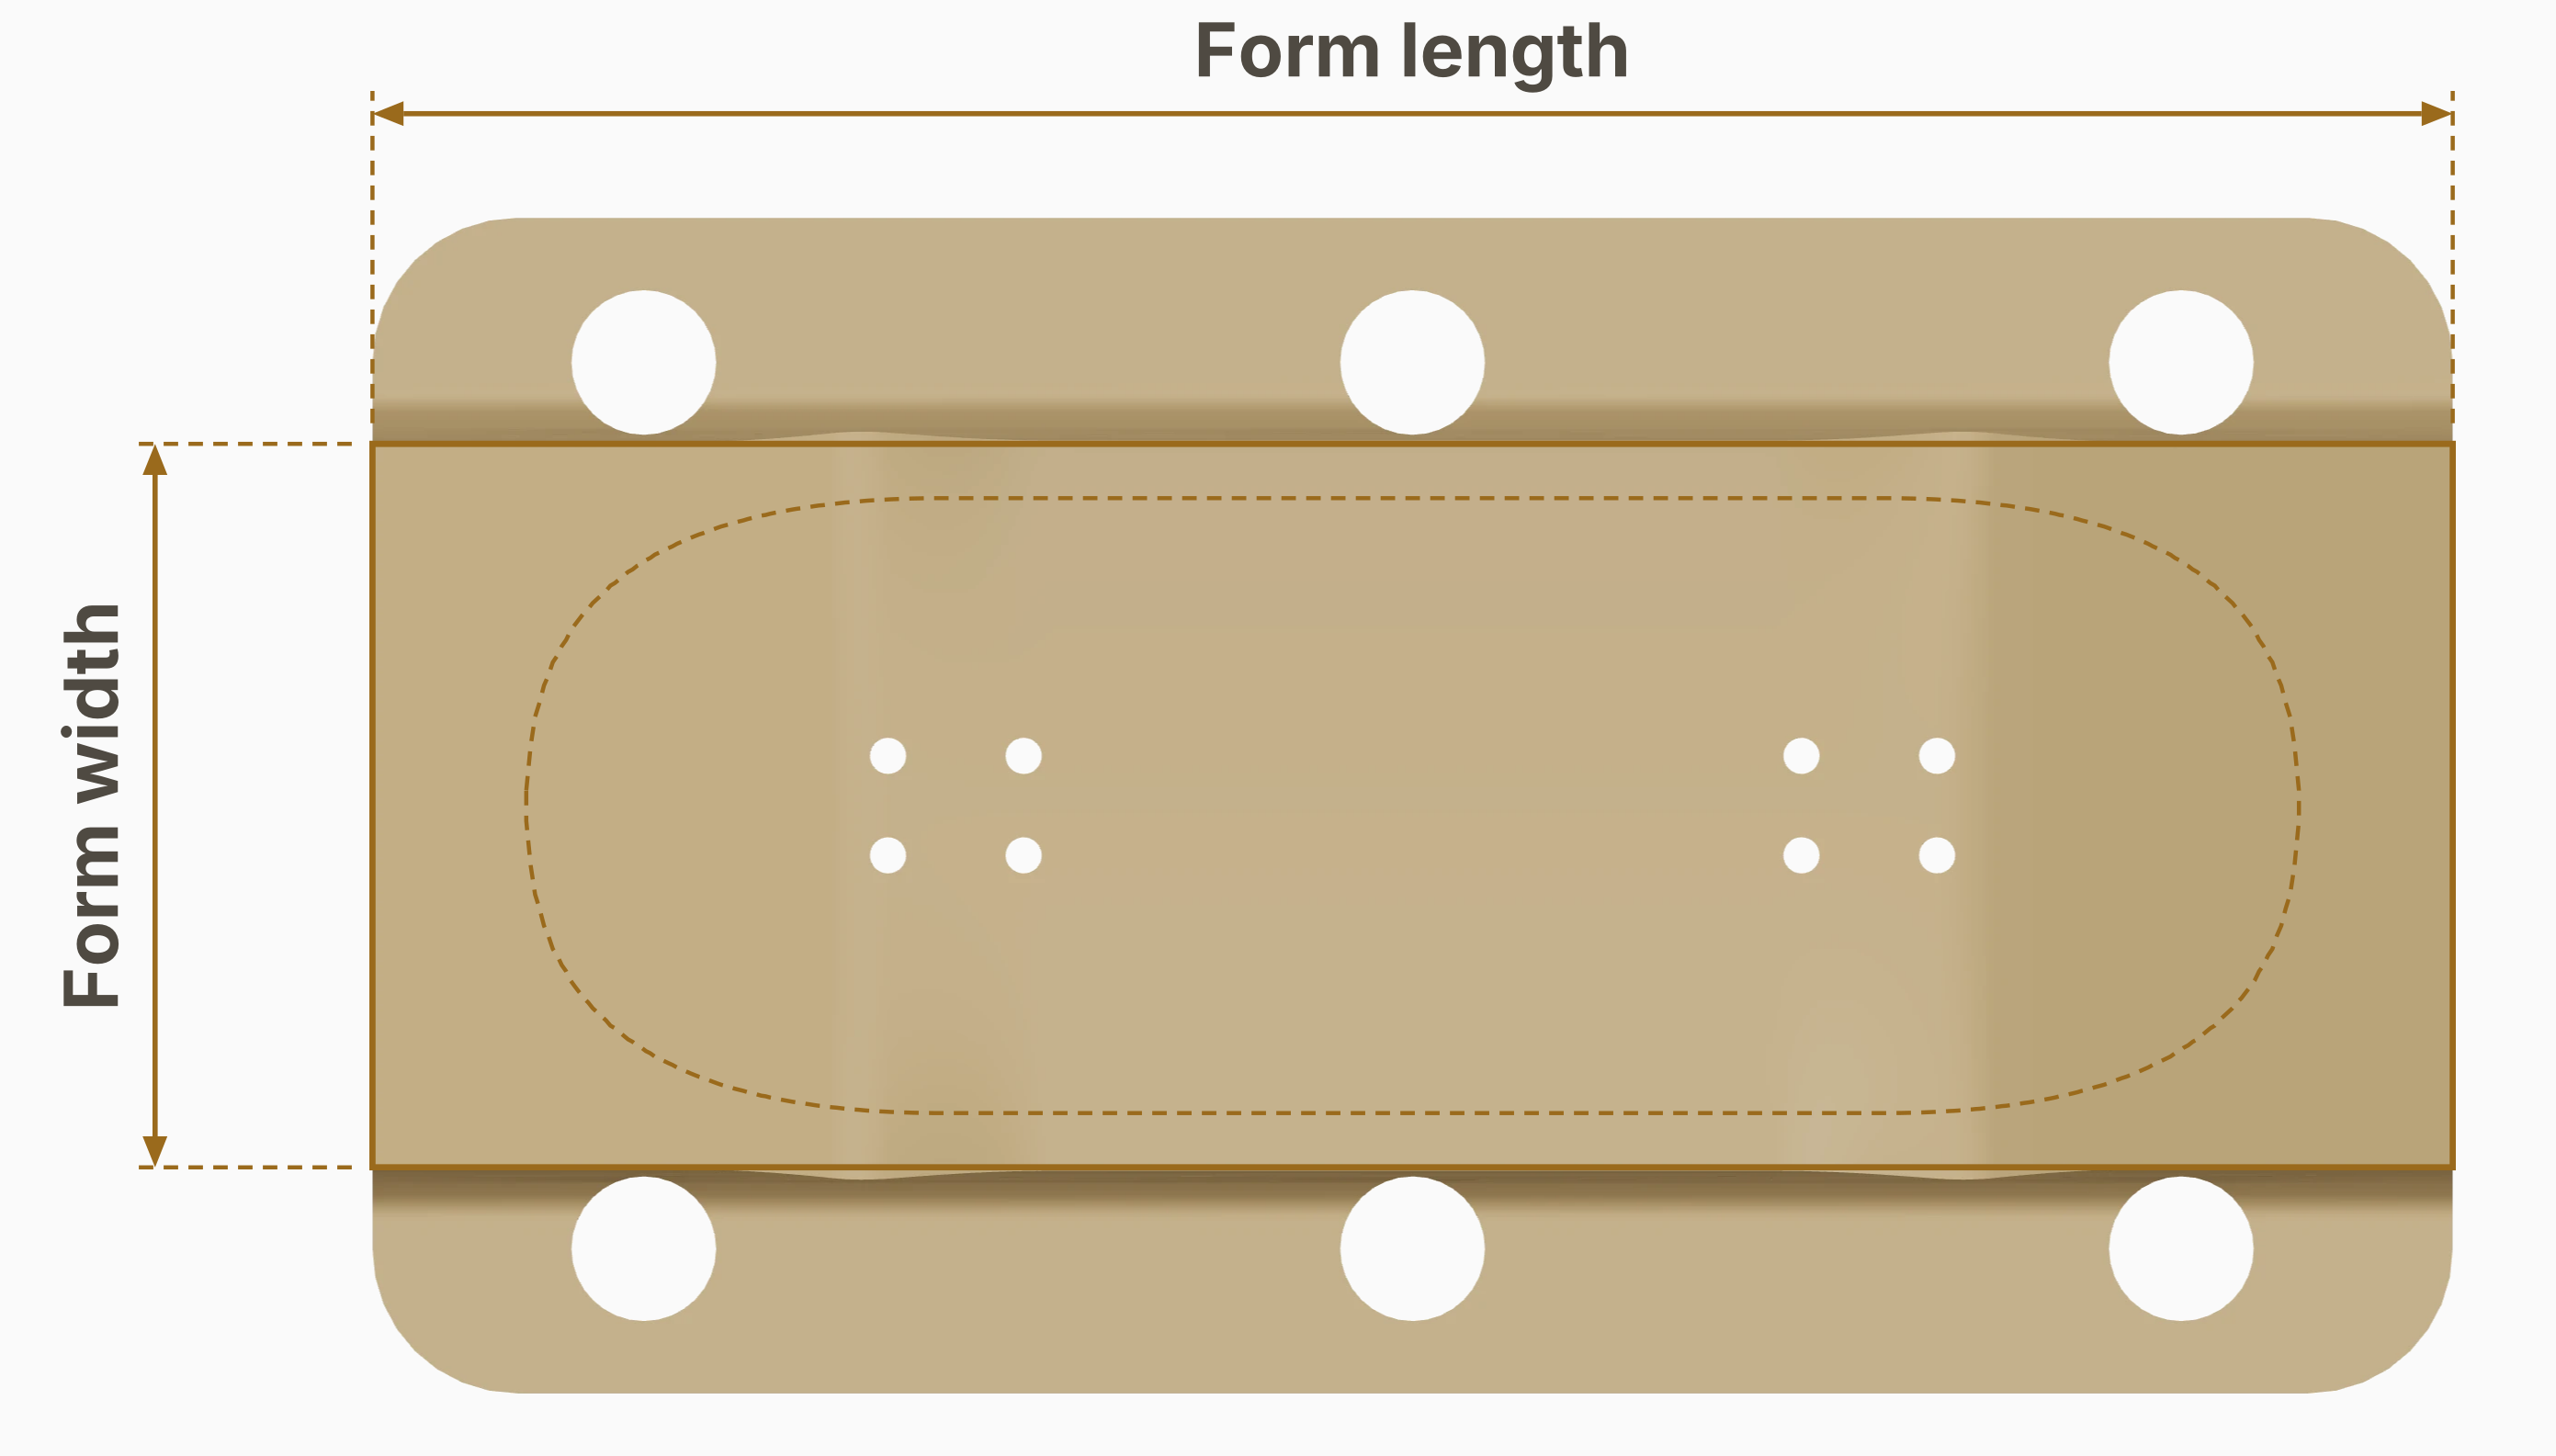
The form is the curved area that presses the wood. It extends beyond the finished deck on every side, giving you room to press a rectangular blank and trim it afterward.
Bolt holes
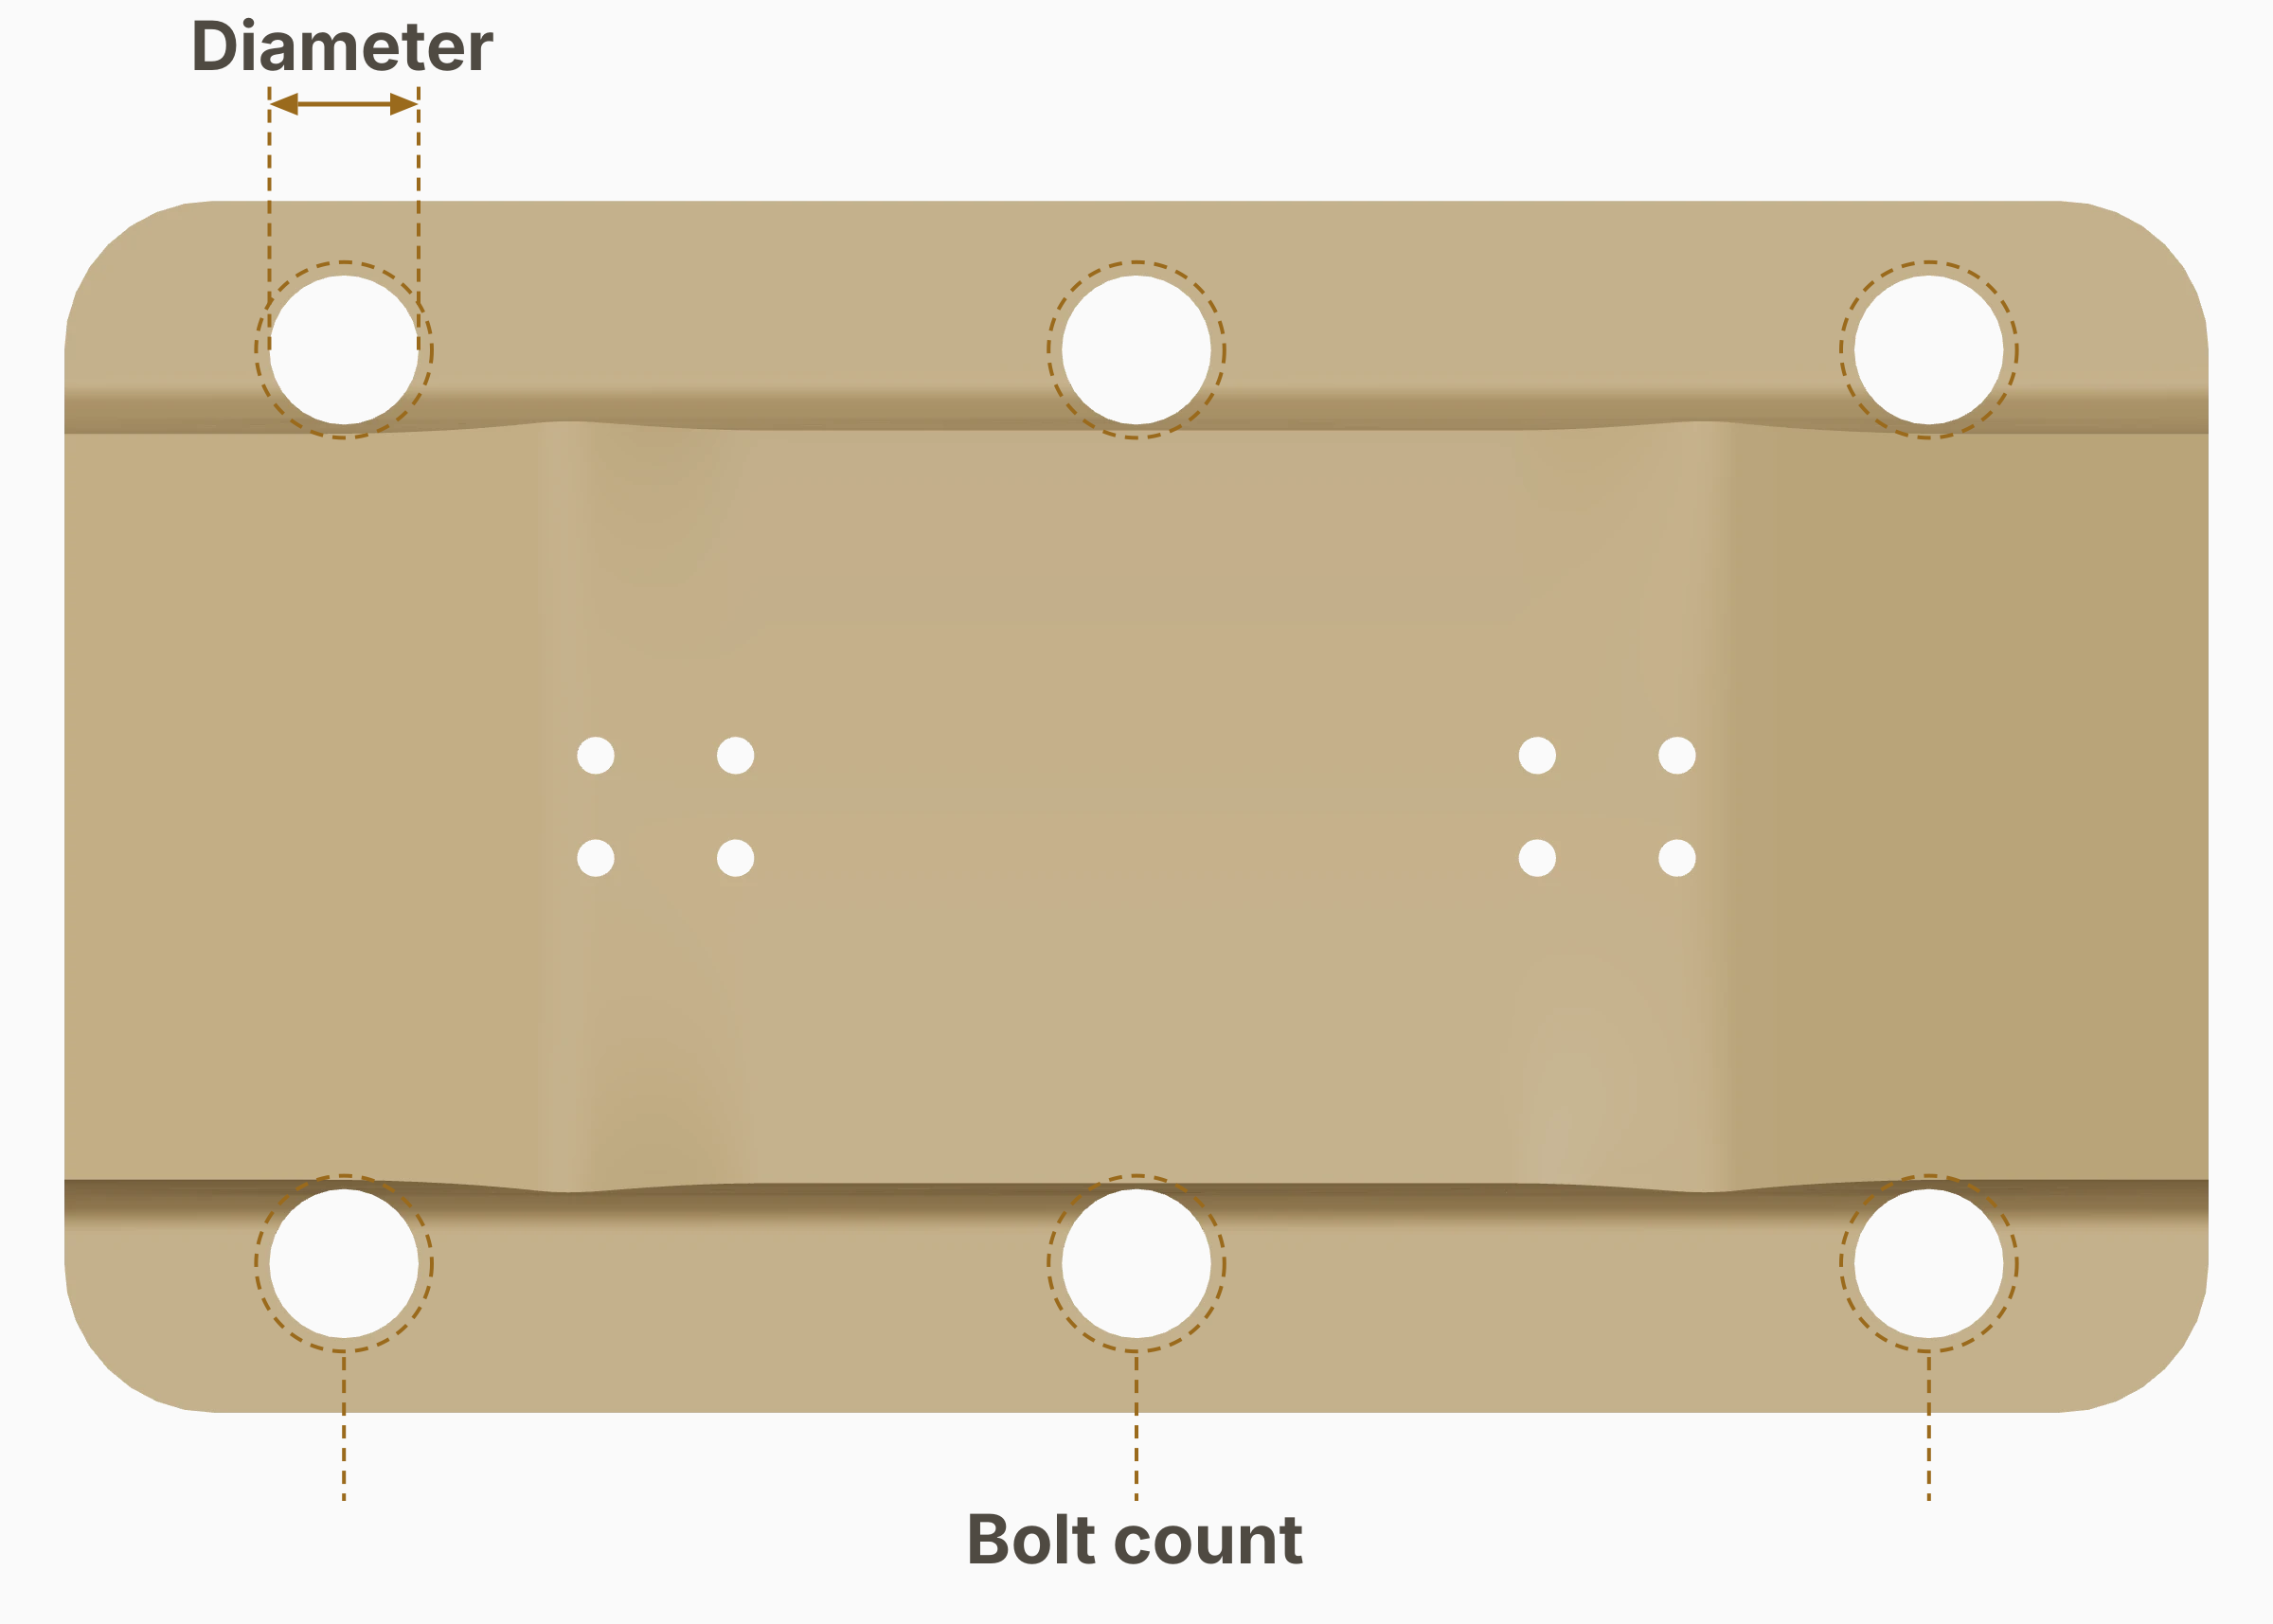
Scroll sideways to see the full illustration.
These holes take the bolts that pull the mold shut. Choose a hole diameter to suit your bolts. In Studio, bolt count means the number on each side, so a count of three gives you six bolts in total.
Truck holes
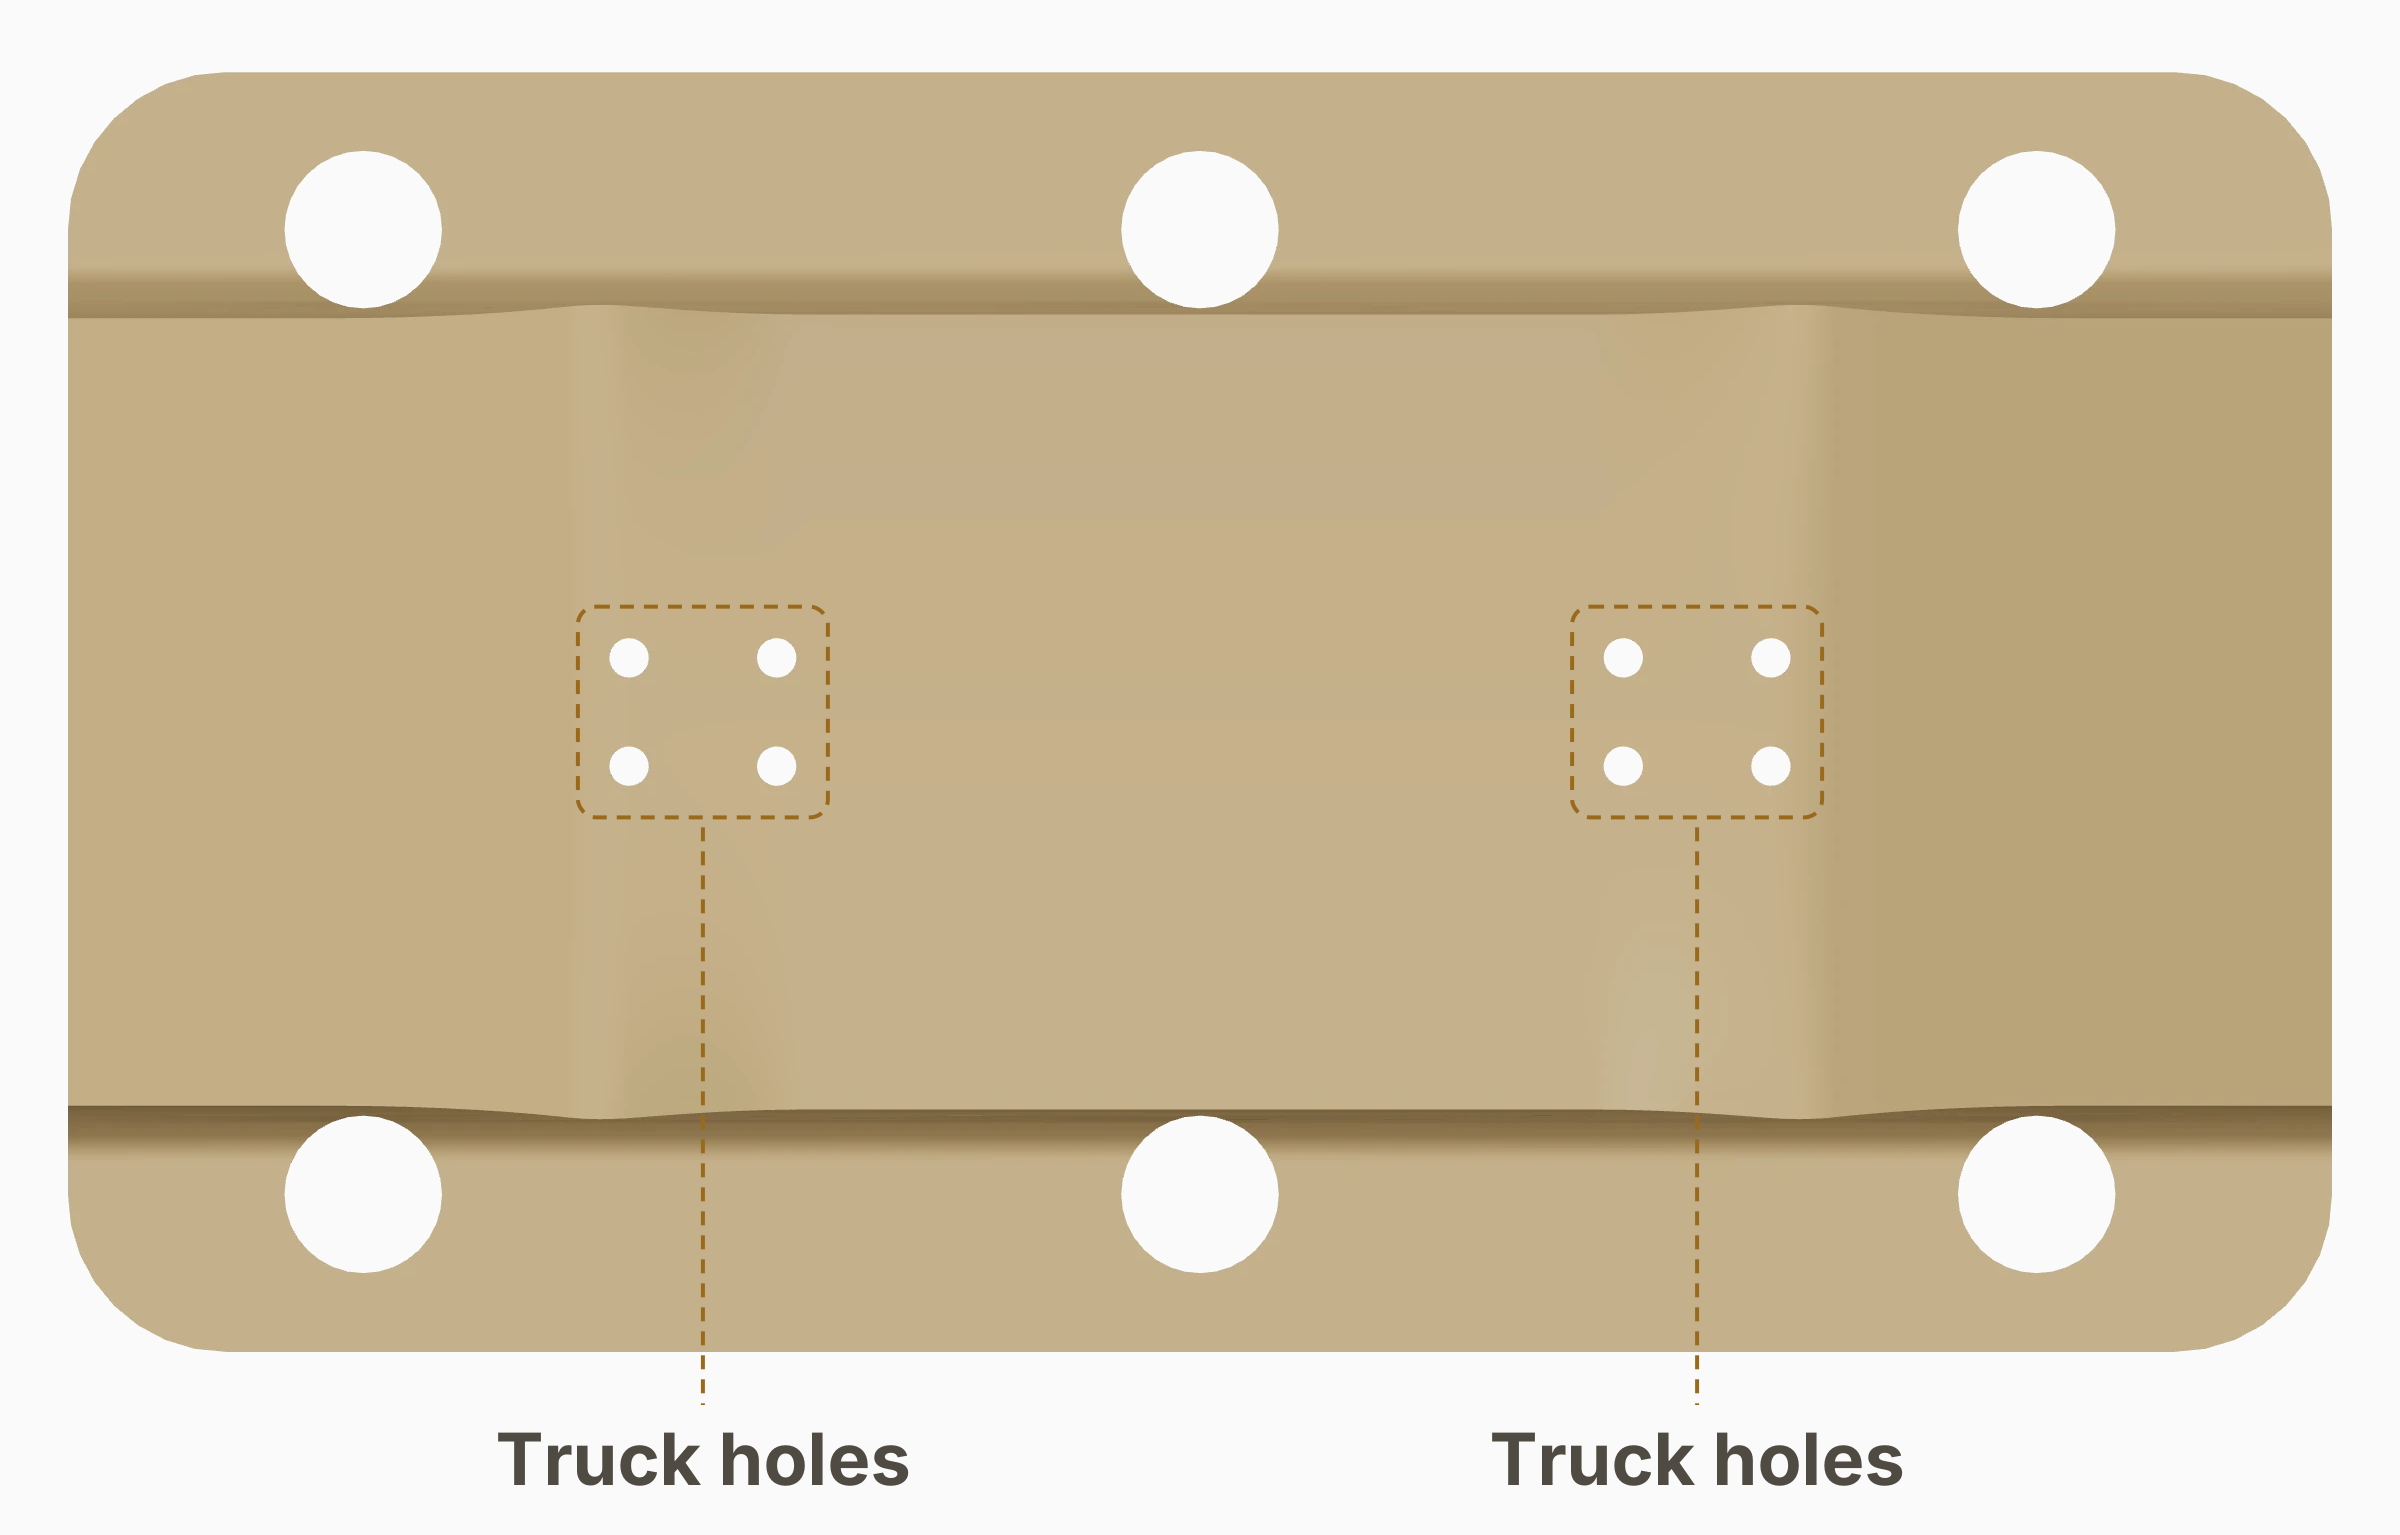
Scroll sideways to see the full illustration.
These small holes line up with the deck's truck holes. Depending on the mold, you can use pins to leave drilling marks in the blank or drill through the holes as a guide.
Thickness stop
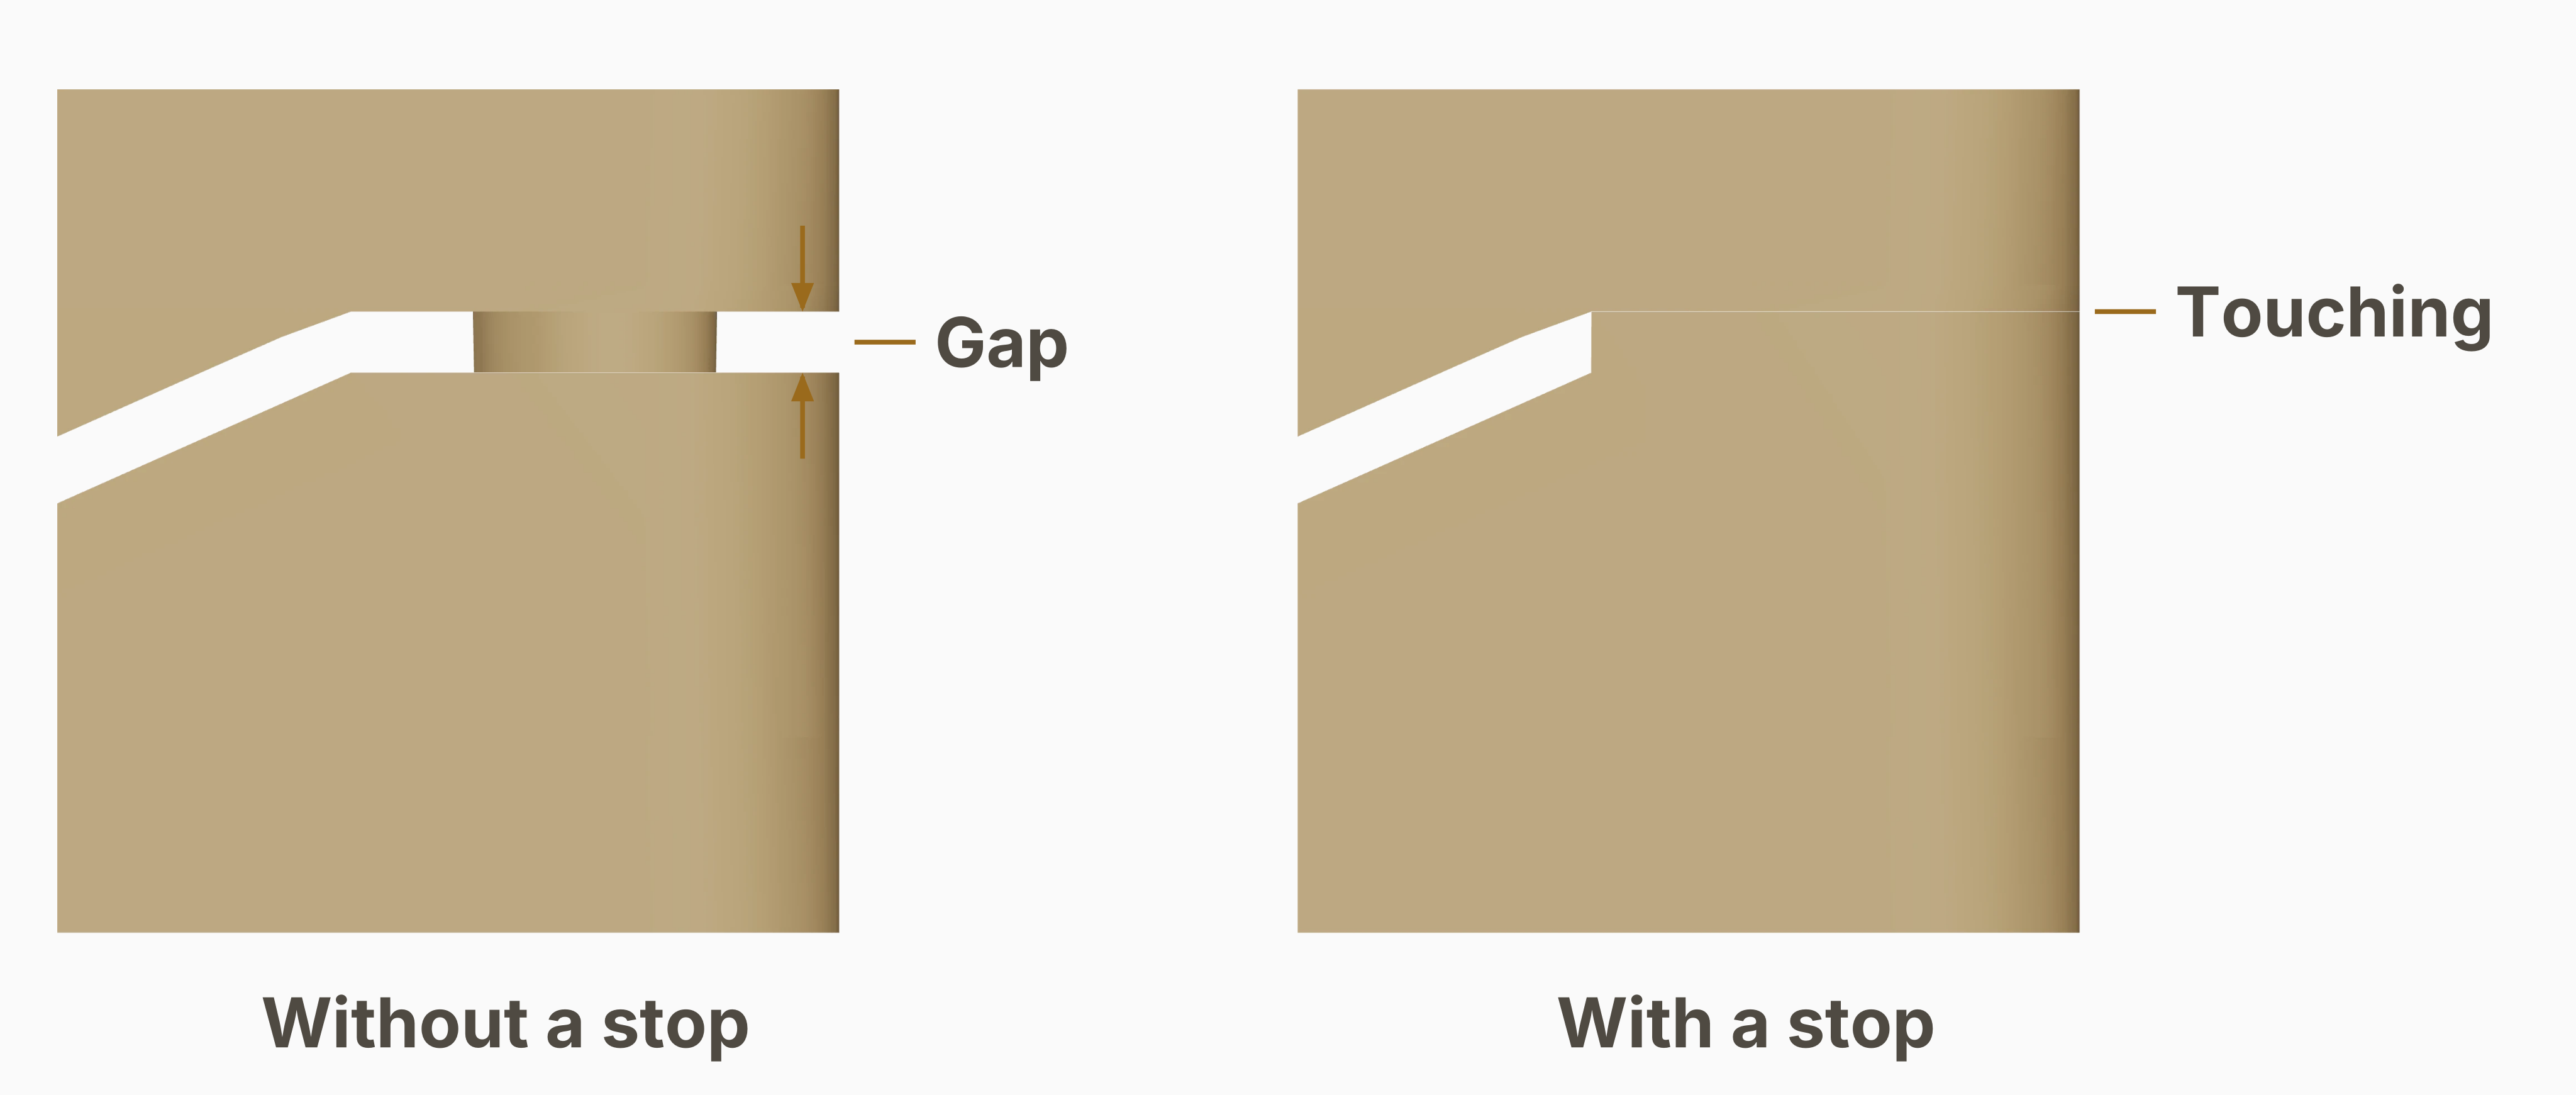
Scroll sideways to see the full illustration.
On the Studio press mold shown here, each half has a flat platform at either end. With a thickness stop, those platforms meet at the intended deck thickness and stop the halves closing farther. Without the stop, a gap remains between the platforms, so you control how far the mold closes as you press.
If you use a stop, keep the veneers within the length of the form. Any wood hanging over the ends can get trapped between the platforms and stop the mold closing properly.
Shaper
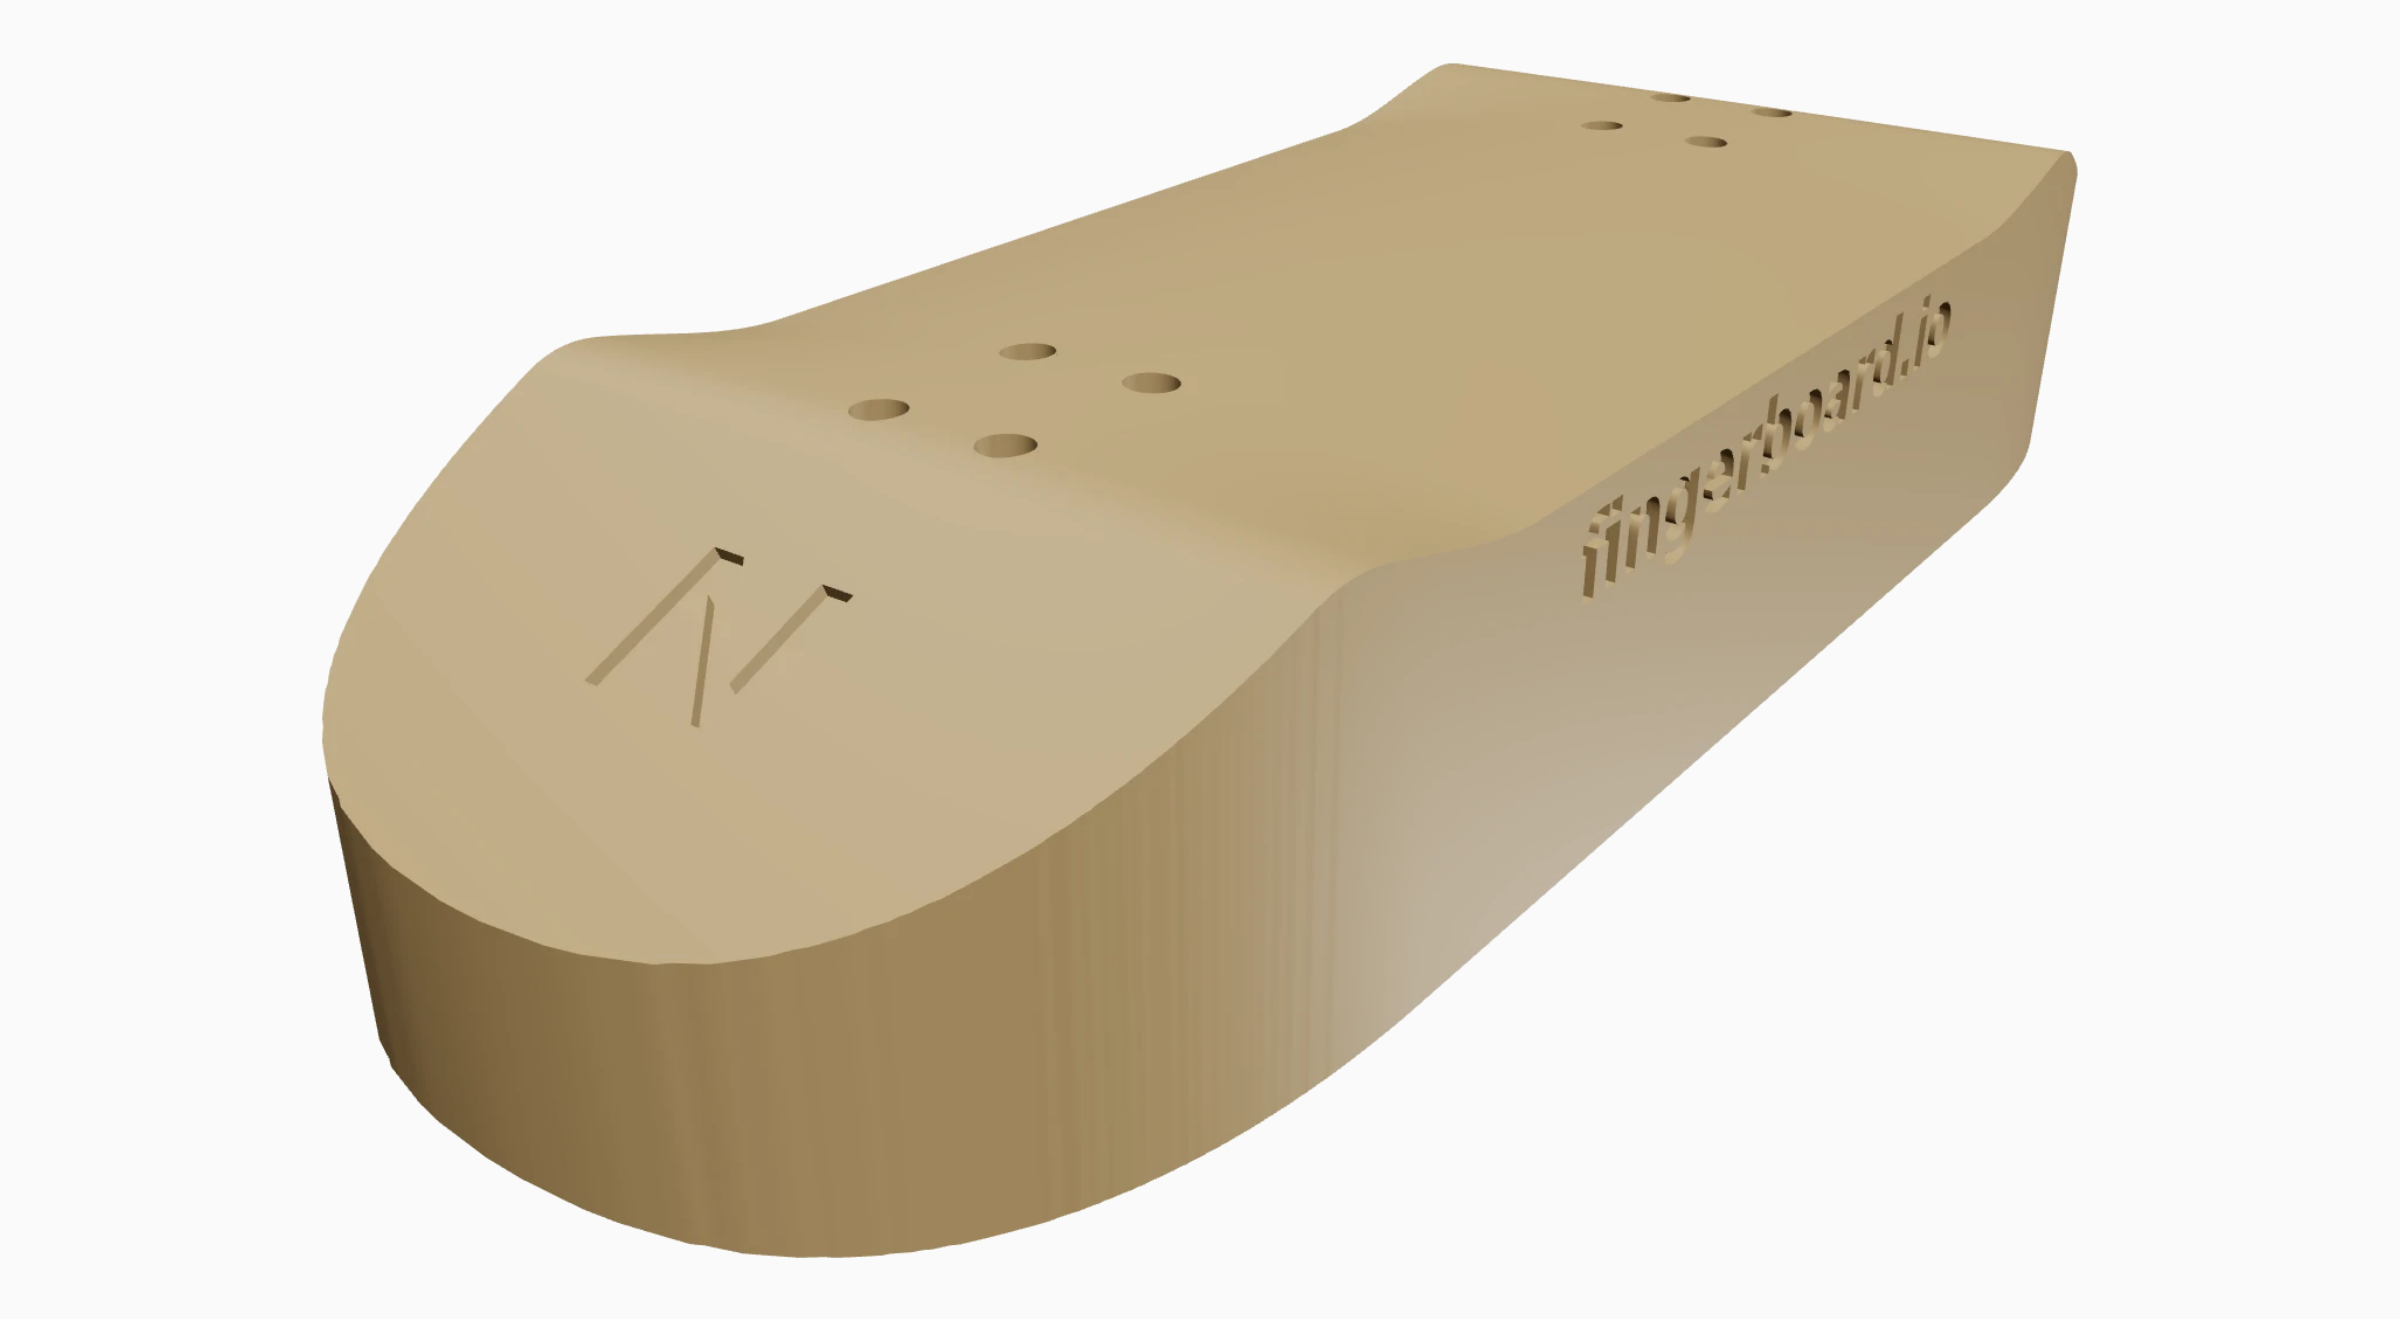
Scroll sideways to see the full illustration.
Once you've pressed a blank, the shaper helps you cut it to its final outline. The blank rests against the shaper's curved surface, with pins through the truck holes to stop it moving.
One way to trim it is with a bearing-guided router bit. The bearing follows the shaper's sides while the cutter trims the wood above it. After that, you sand and finish the edges.
Shaper form
Scroll sideways to see the full illustration.
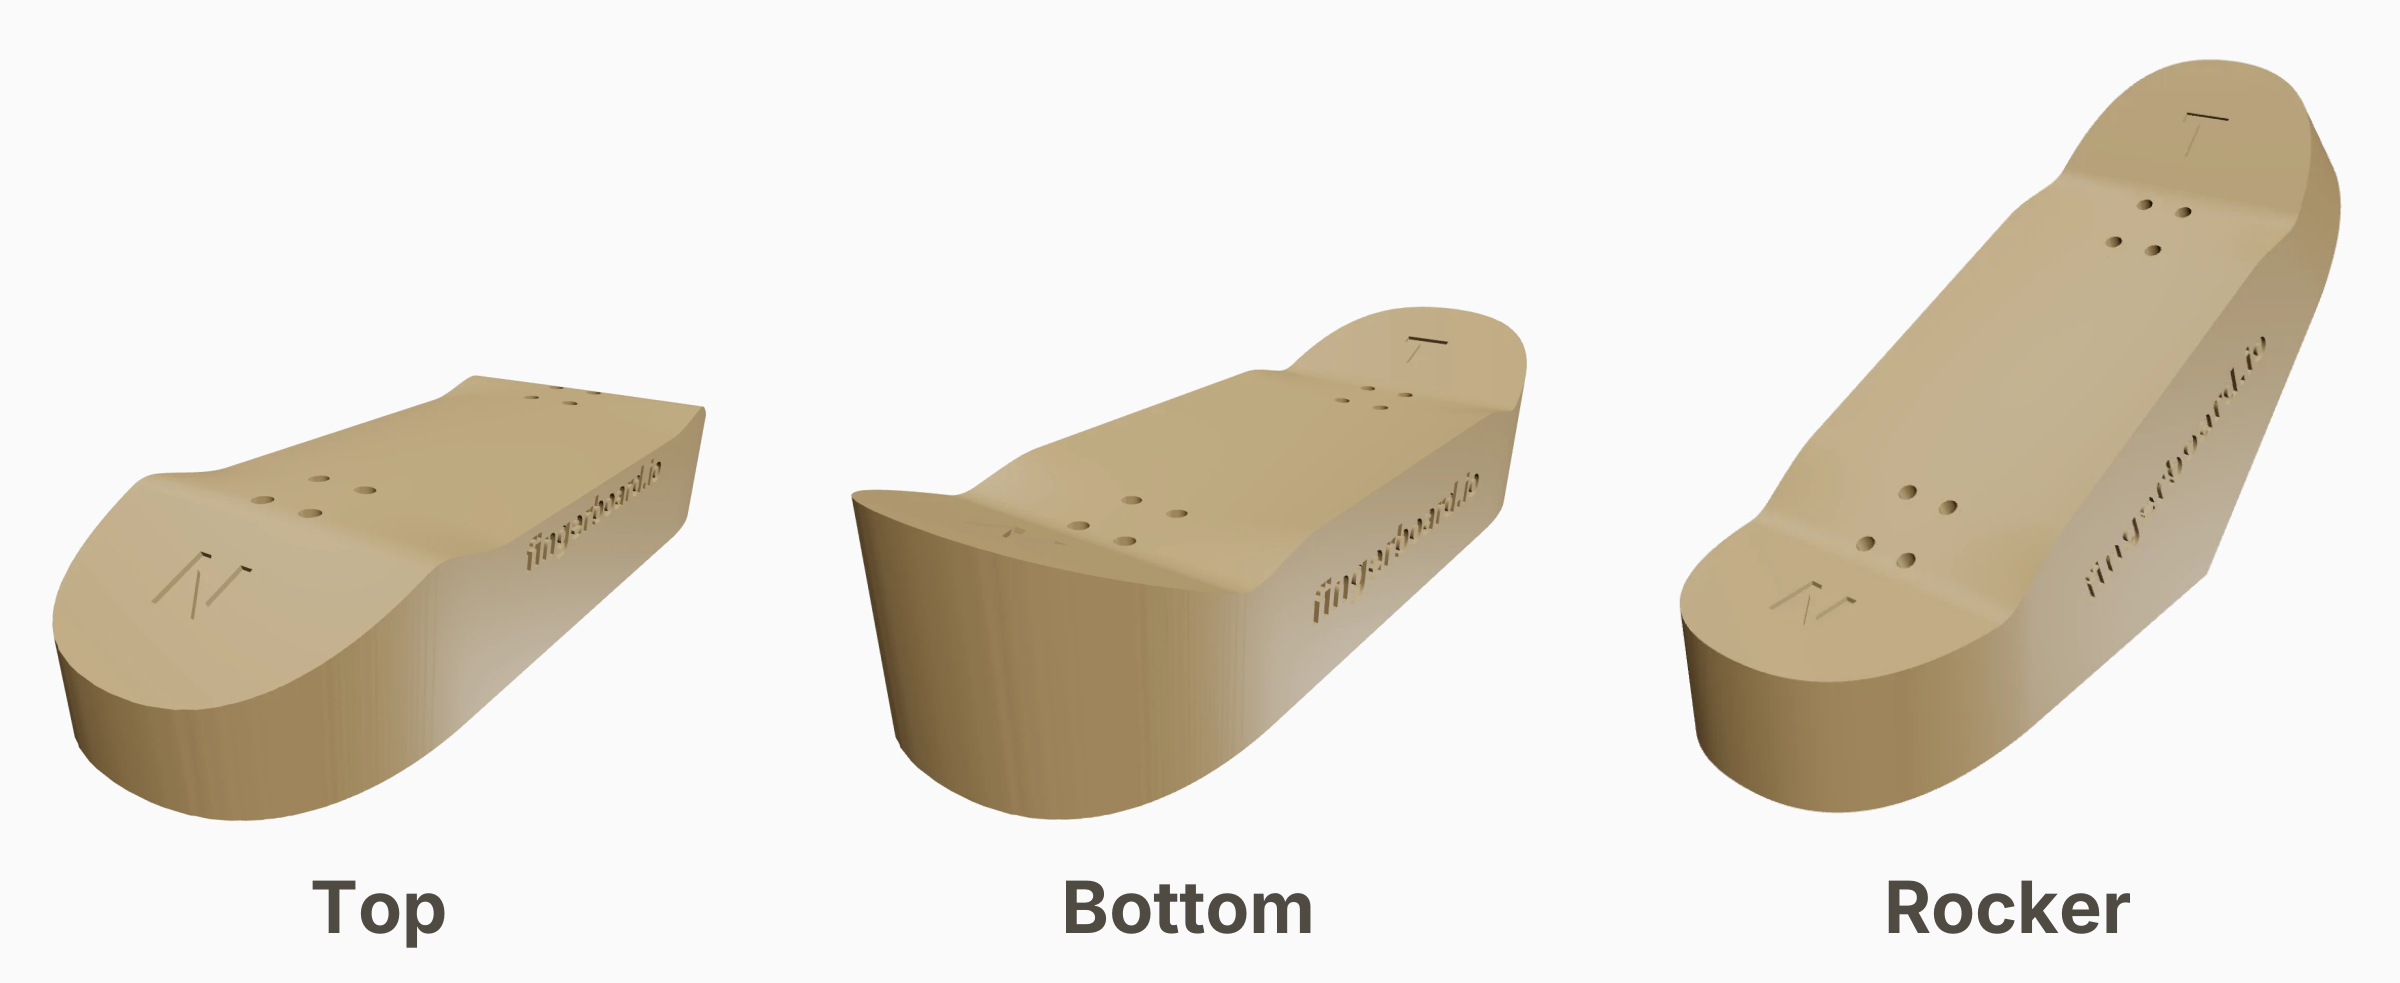
Studio offers three shaper forms:
- Top supports the deck with its grip side facing down against the shaper.
- Bottom supports the underside, so the deck sits the right way up.
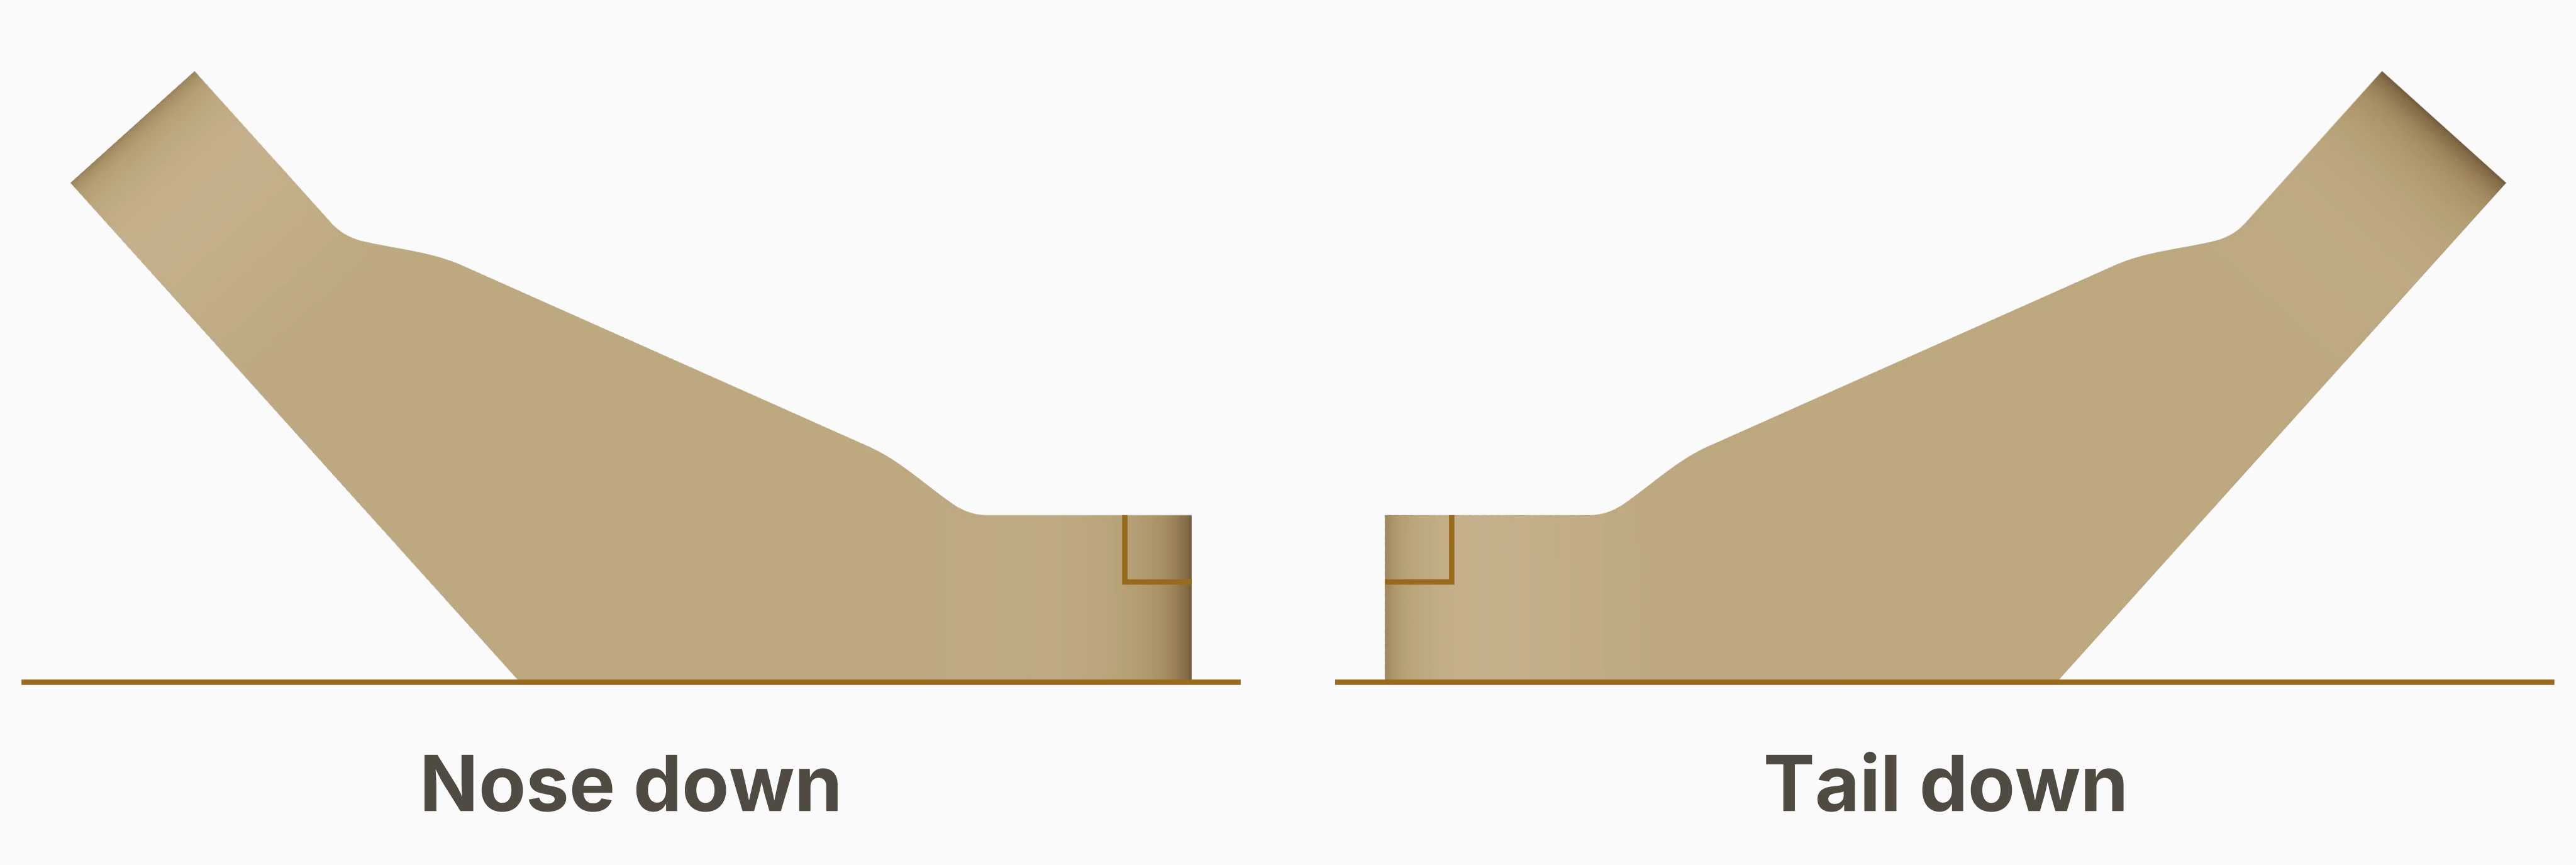
- Rocker supports the underside too, but has two angled faces underneath the block. You can rest it on either face to bring the nose or tail level.
Scroll sideways to see the full illustration.
The rocker helps with the edges around the kicks. On a regular shaper, a vertical cut leaves those edges at an angle to the raised kick, so you may need to sand them square afterward. Rock the shaper onto one face and that kick lies level, letting you cut its edge square to the surface. Then rock it the other way to work on the other end.
Shaper width
Scroll sideways to see the full illustration.
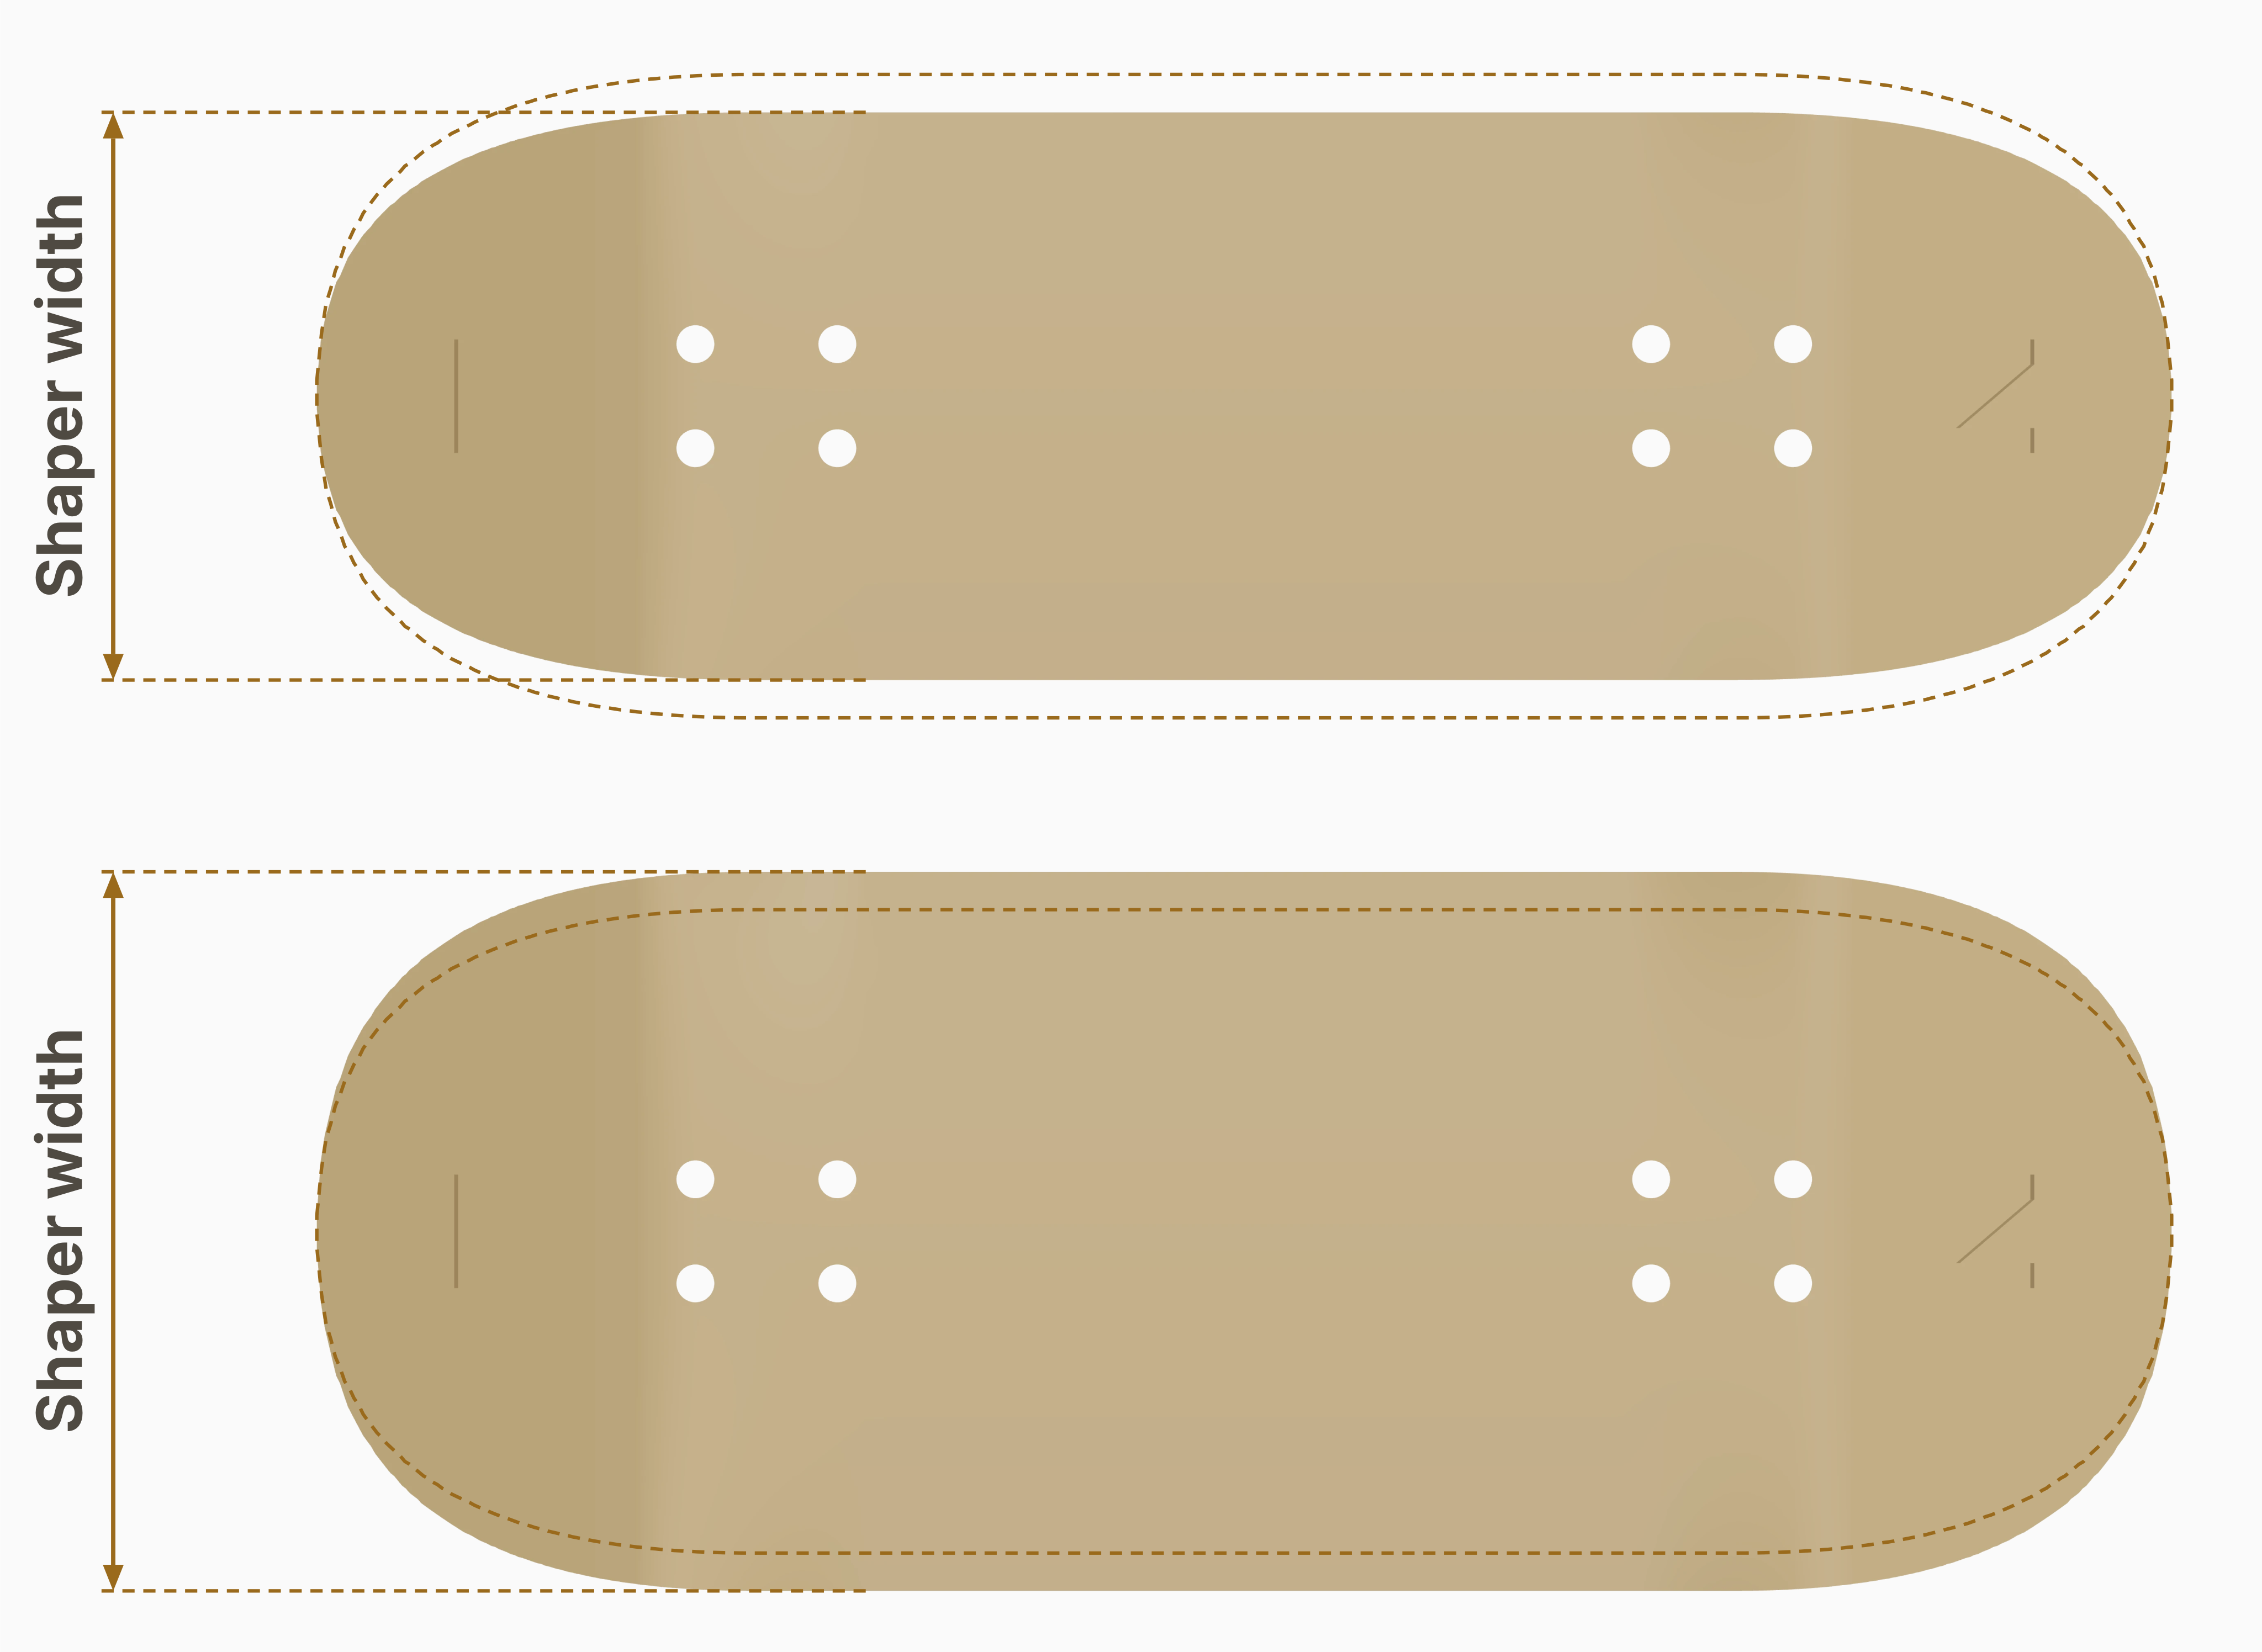
You can make several deck widths from the same mold by using different shapers. In Studio, use Shaper width for this. It changes the cutting outline while keeping the surface matched to your existing mold.
Changing Deck width instead recalculates the concave across the new width. That's useful when designing a new deck and mold, but the resulting shaper may no longer fit blanks from the mold you already have. Shaper width can go up to the width of the mold's form.
Shaper height
Scroll sideways to see the full illustration.
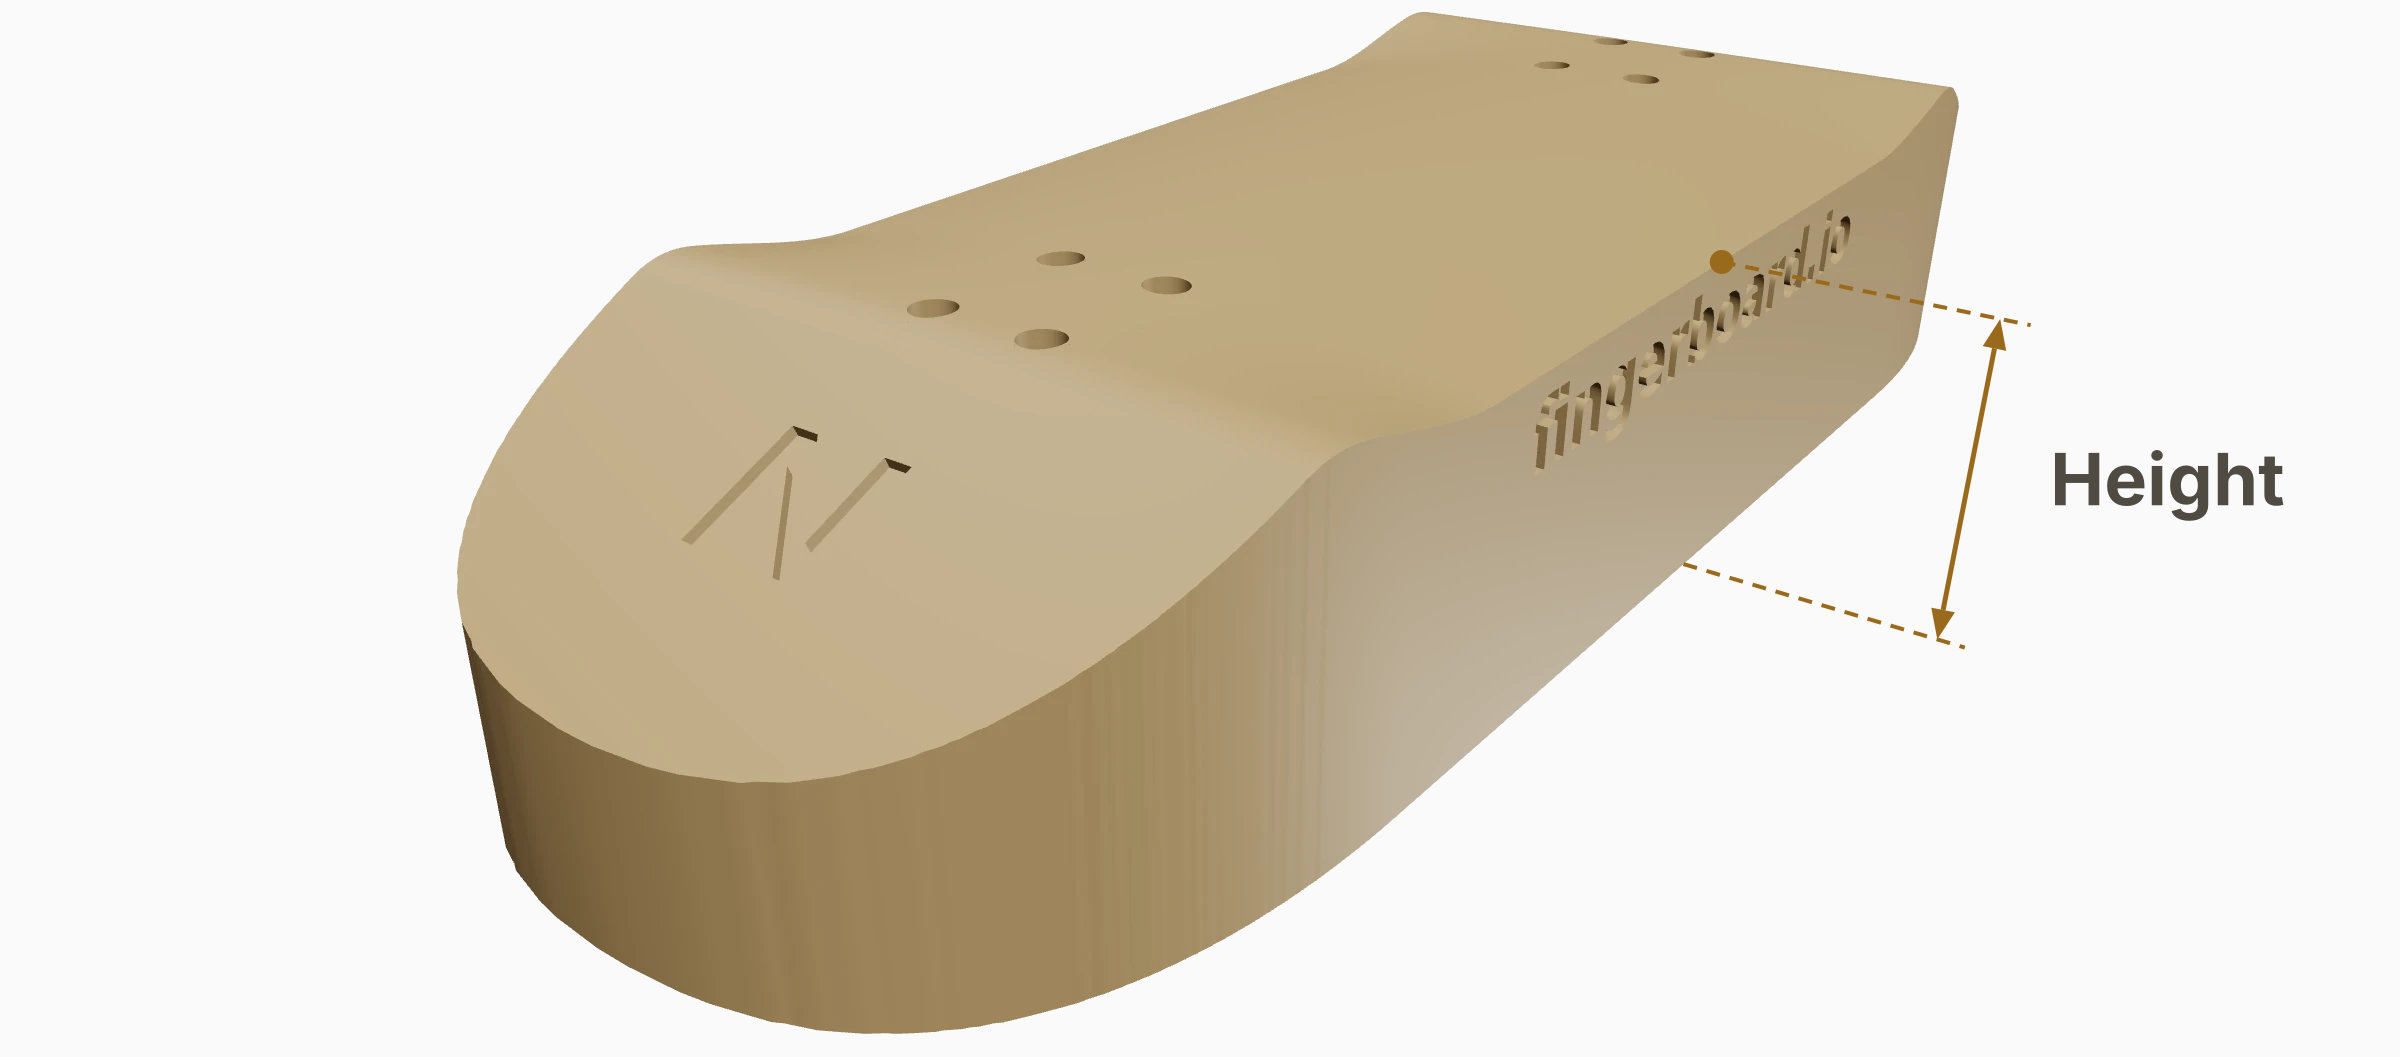
Measure shaper height at the middle of the deck, from the base up to the lowest point of the surface the blank rests on. A taller shaper gives your tool more sidewall to follow.
Truck holes
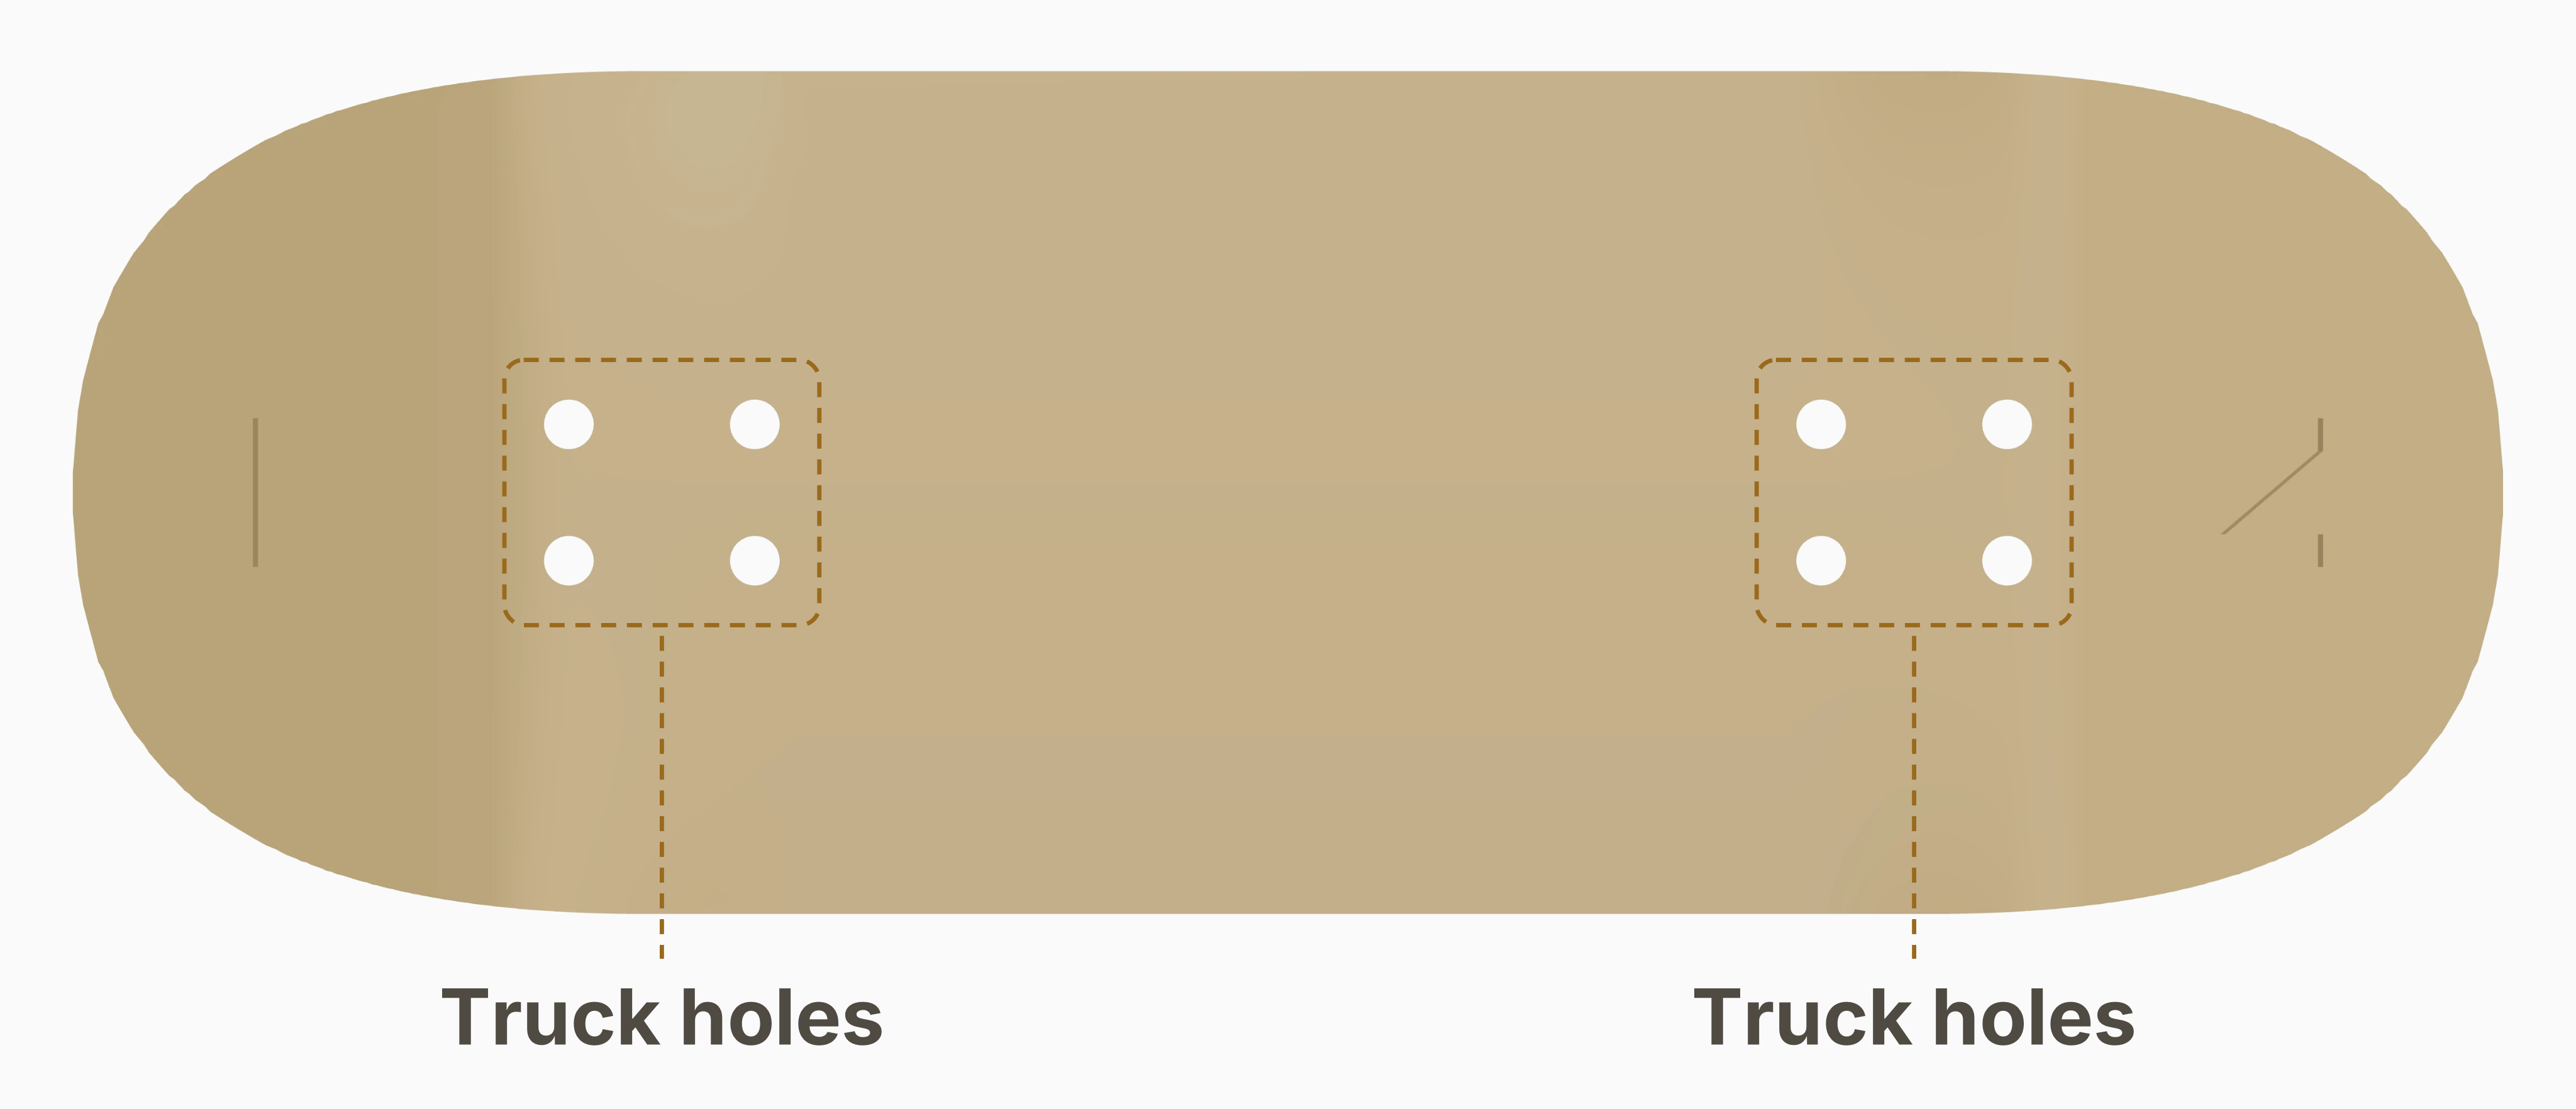
Scroll sideways to see the full illustration.
These holes line up with the truck holes you've already drilled in the blank. Pins through both keep the blank in position while you shape it.
Outline inset
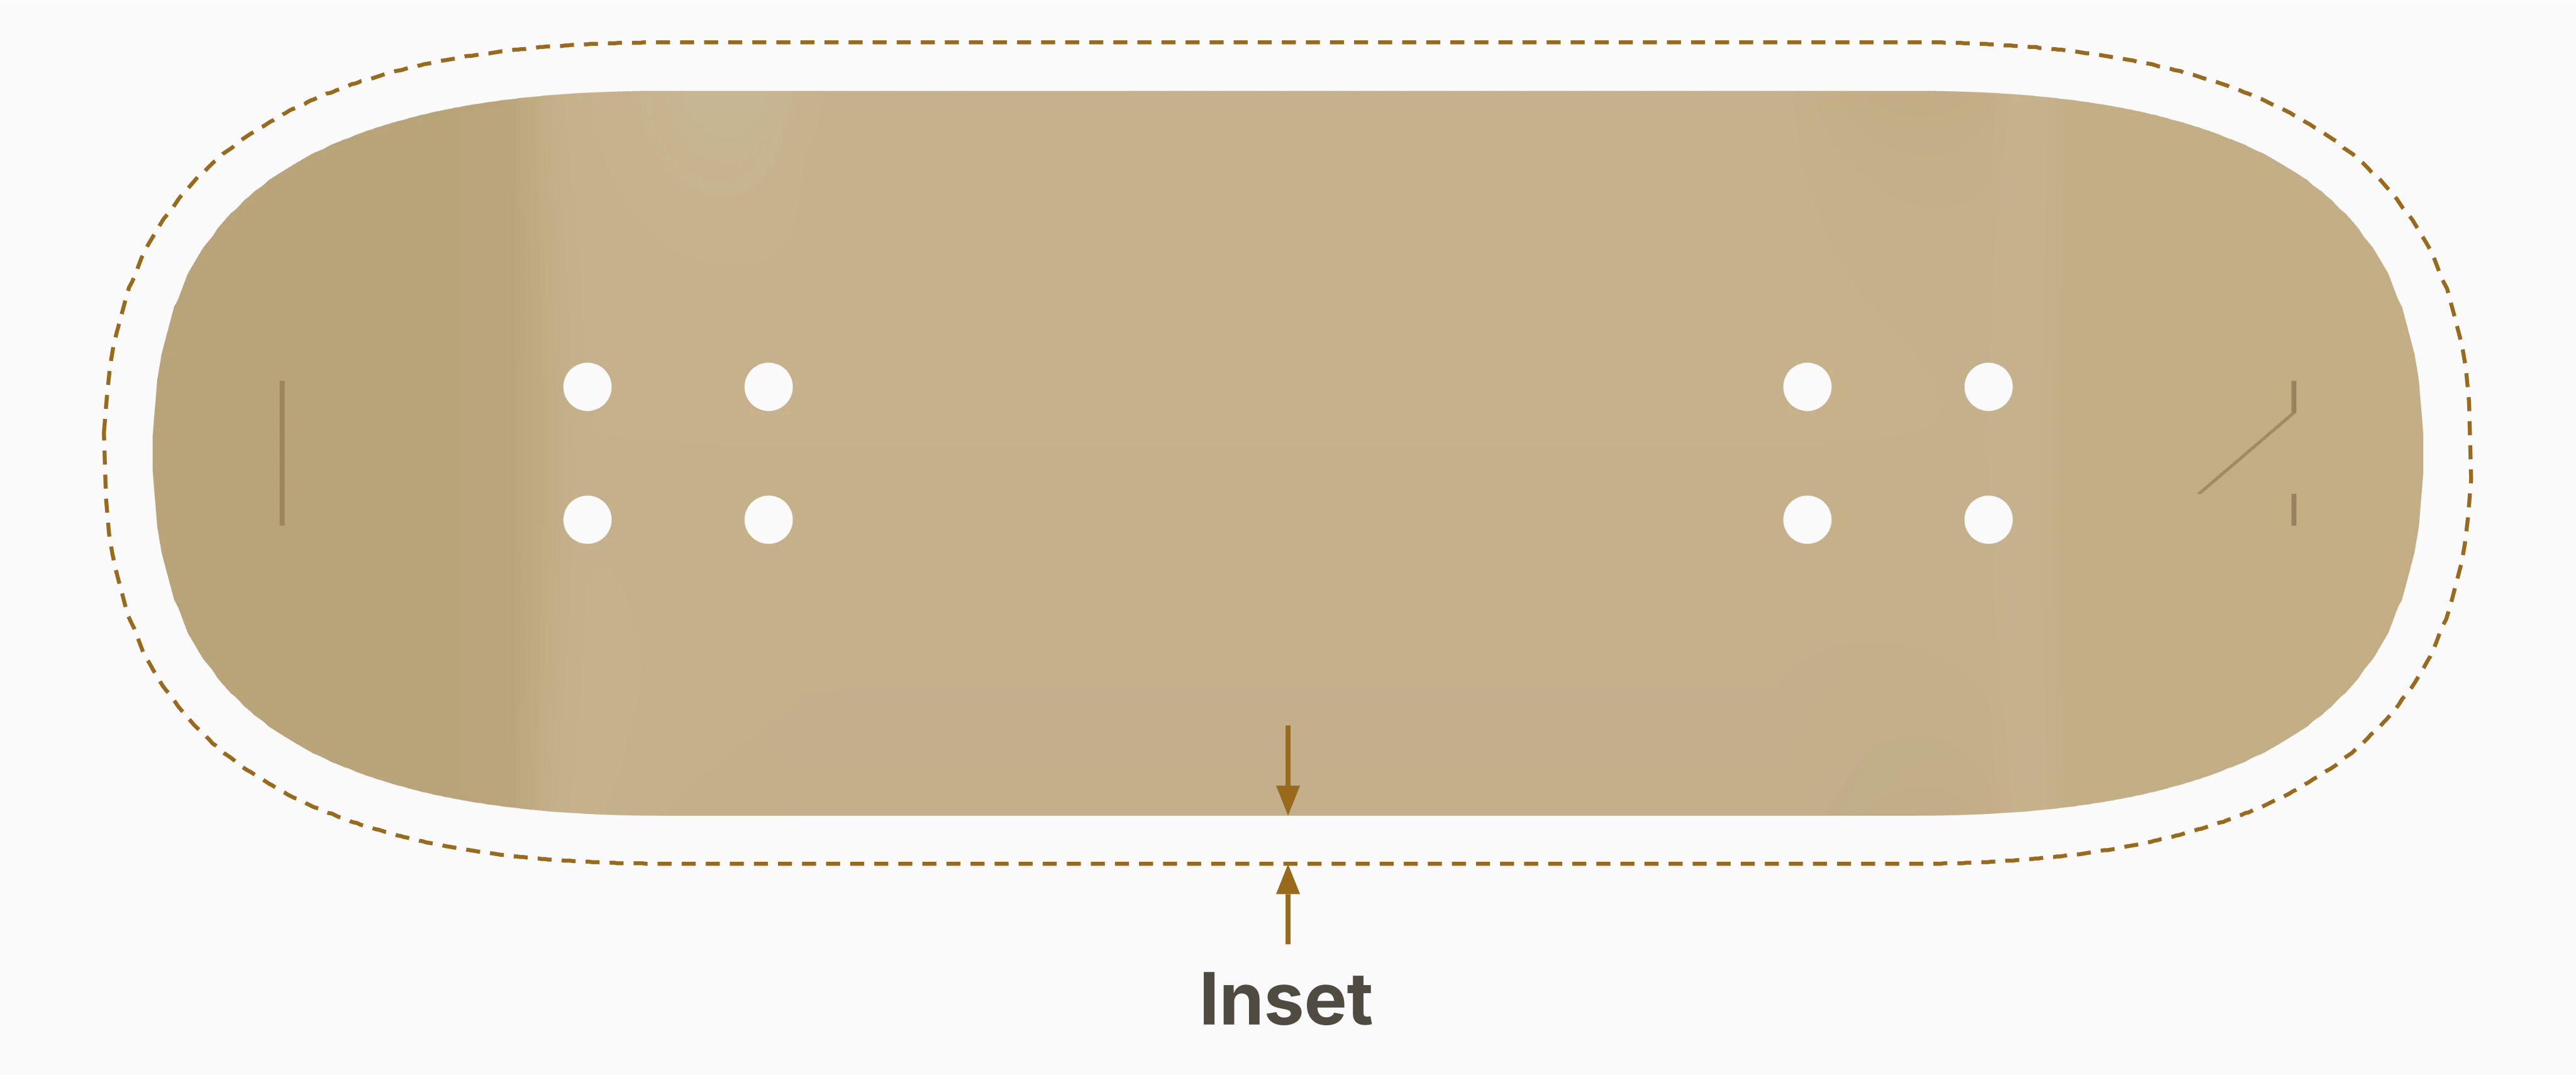
Scroll sideways to see the full illustration.
An outline inset moves the shaper's edge inward by the same distance all the way around. The surface supporting the blank keeps the same curves.
Match the inset to any offset between your cutting guide and the cut. With a flush-trim bit whose bearing and cutter have the same diameter, leave it at zero.
Table-mount holes
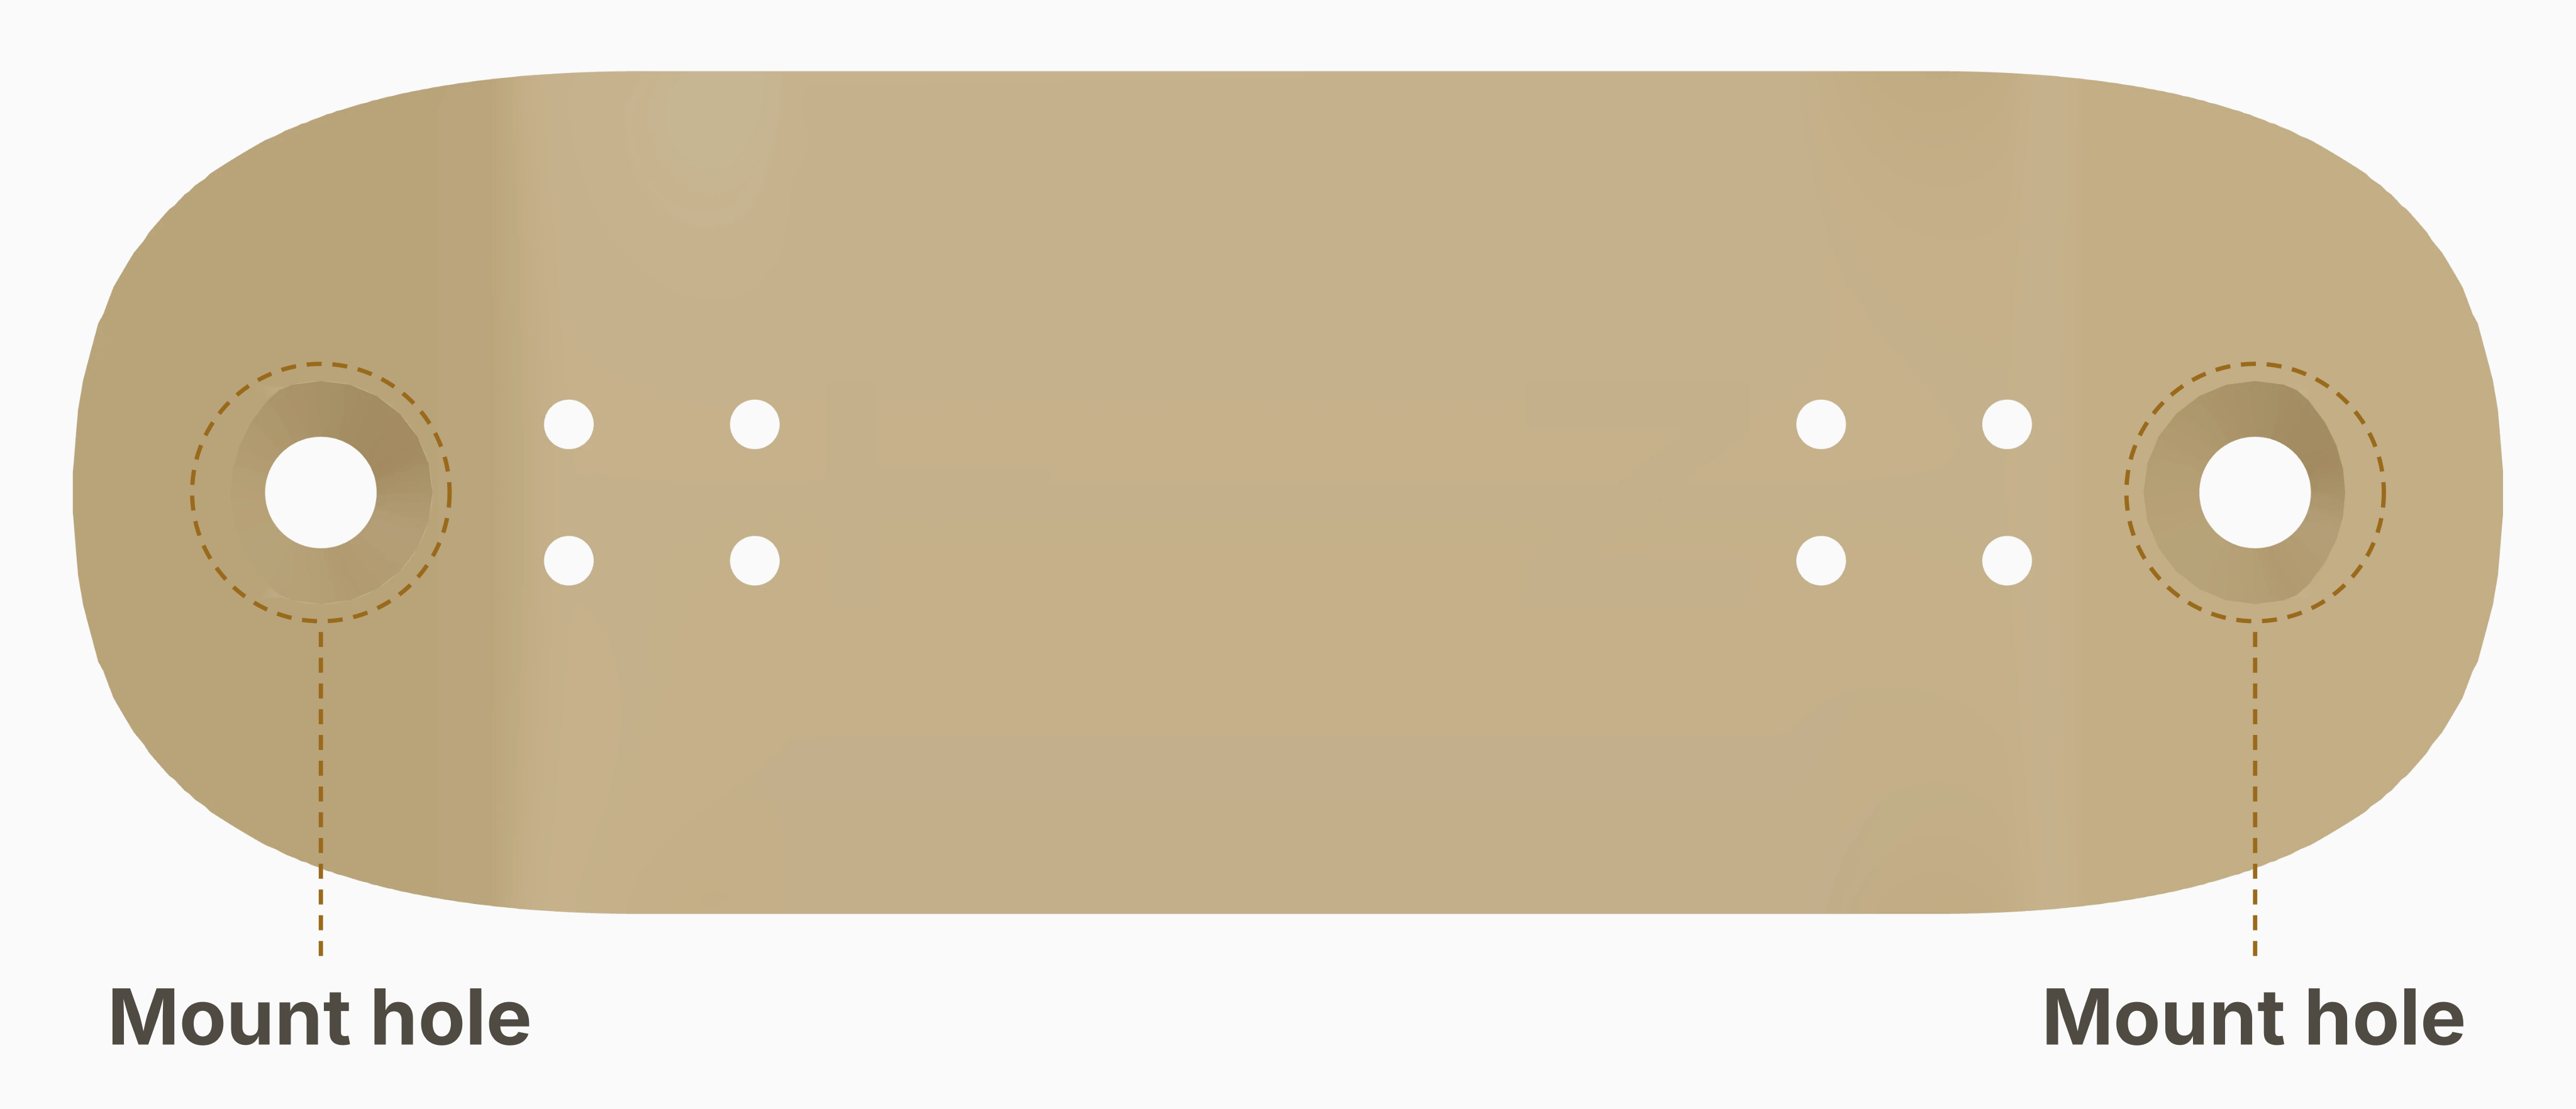
Scroll sideways to see the full illustration.
These larger screw holes let you fasten the shaper to a workbench. There's one through each kick, with a countersink to keep the screw head out of the way of the blank. They aren't available on the Rocker.
Finger notches
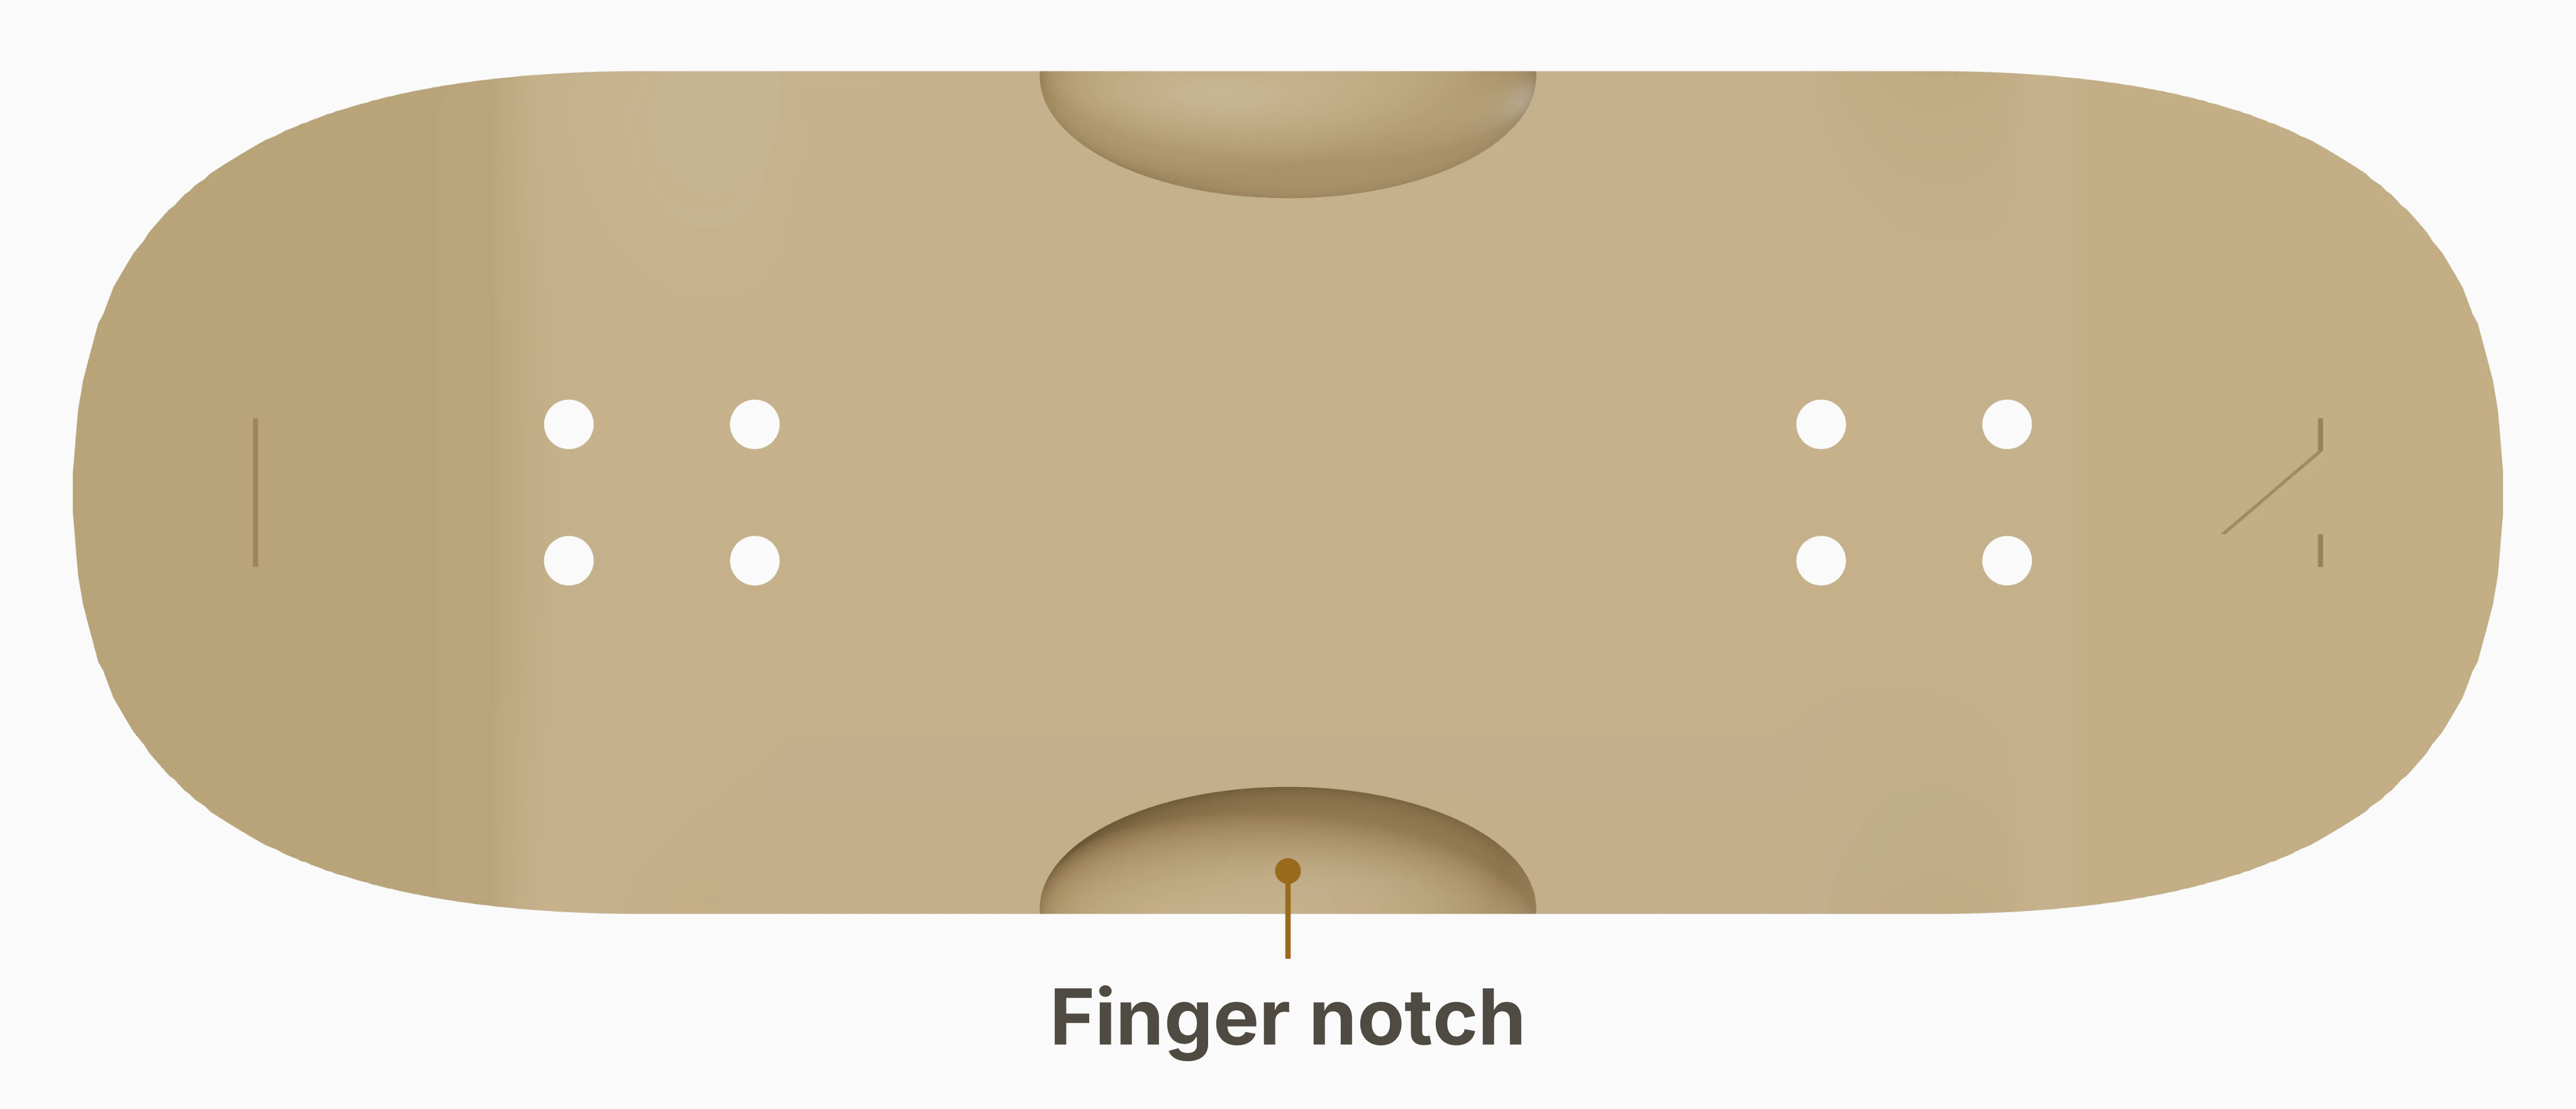
Scroll sideways to see the full illustration.
Once the deck is trimmed flush, it can be hard to get hold of. These scoops in the shaper's sides give you room to slip a fingertip underneath and lift it off the pins.
Engrave deck size
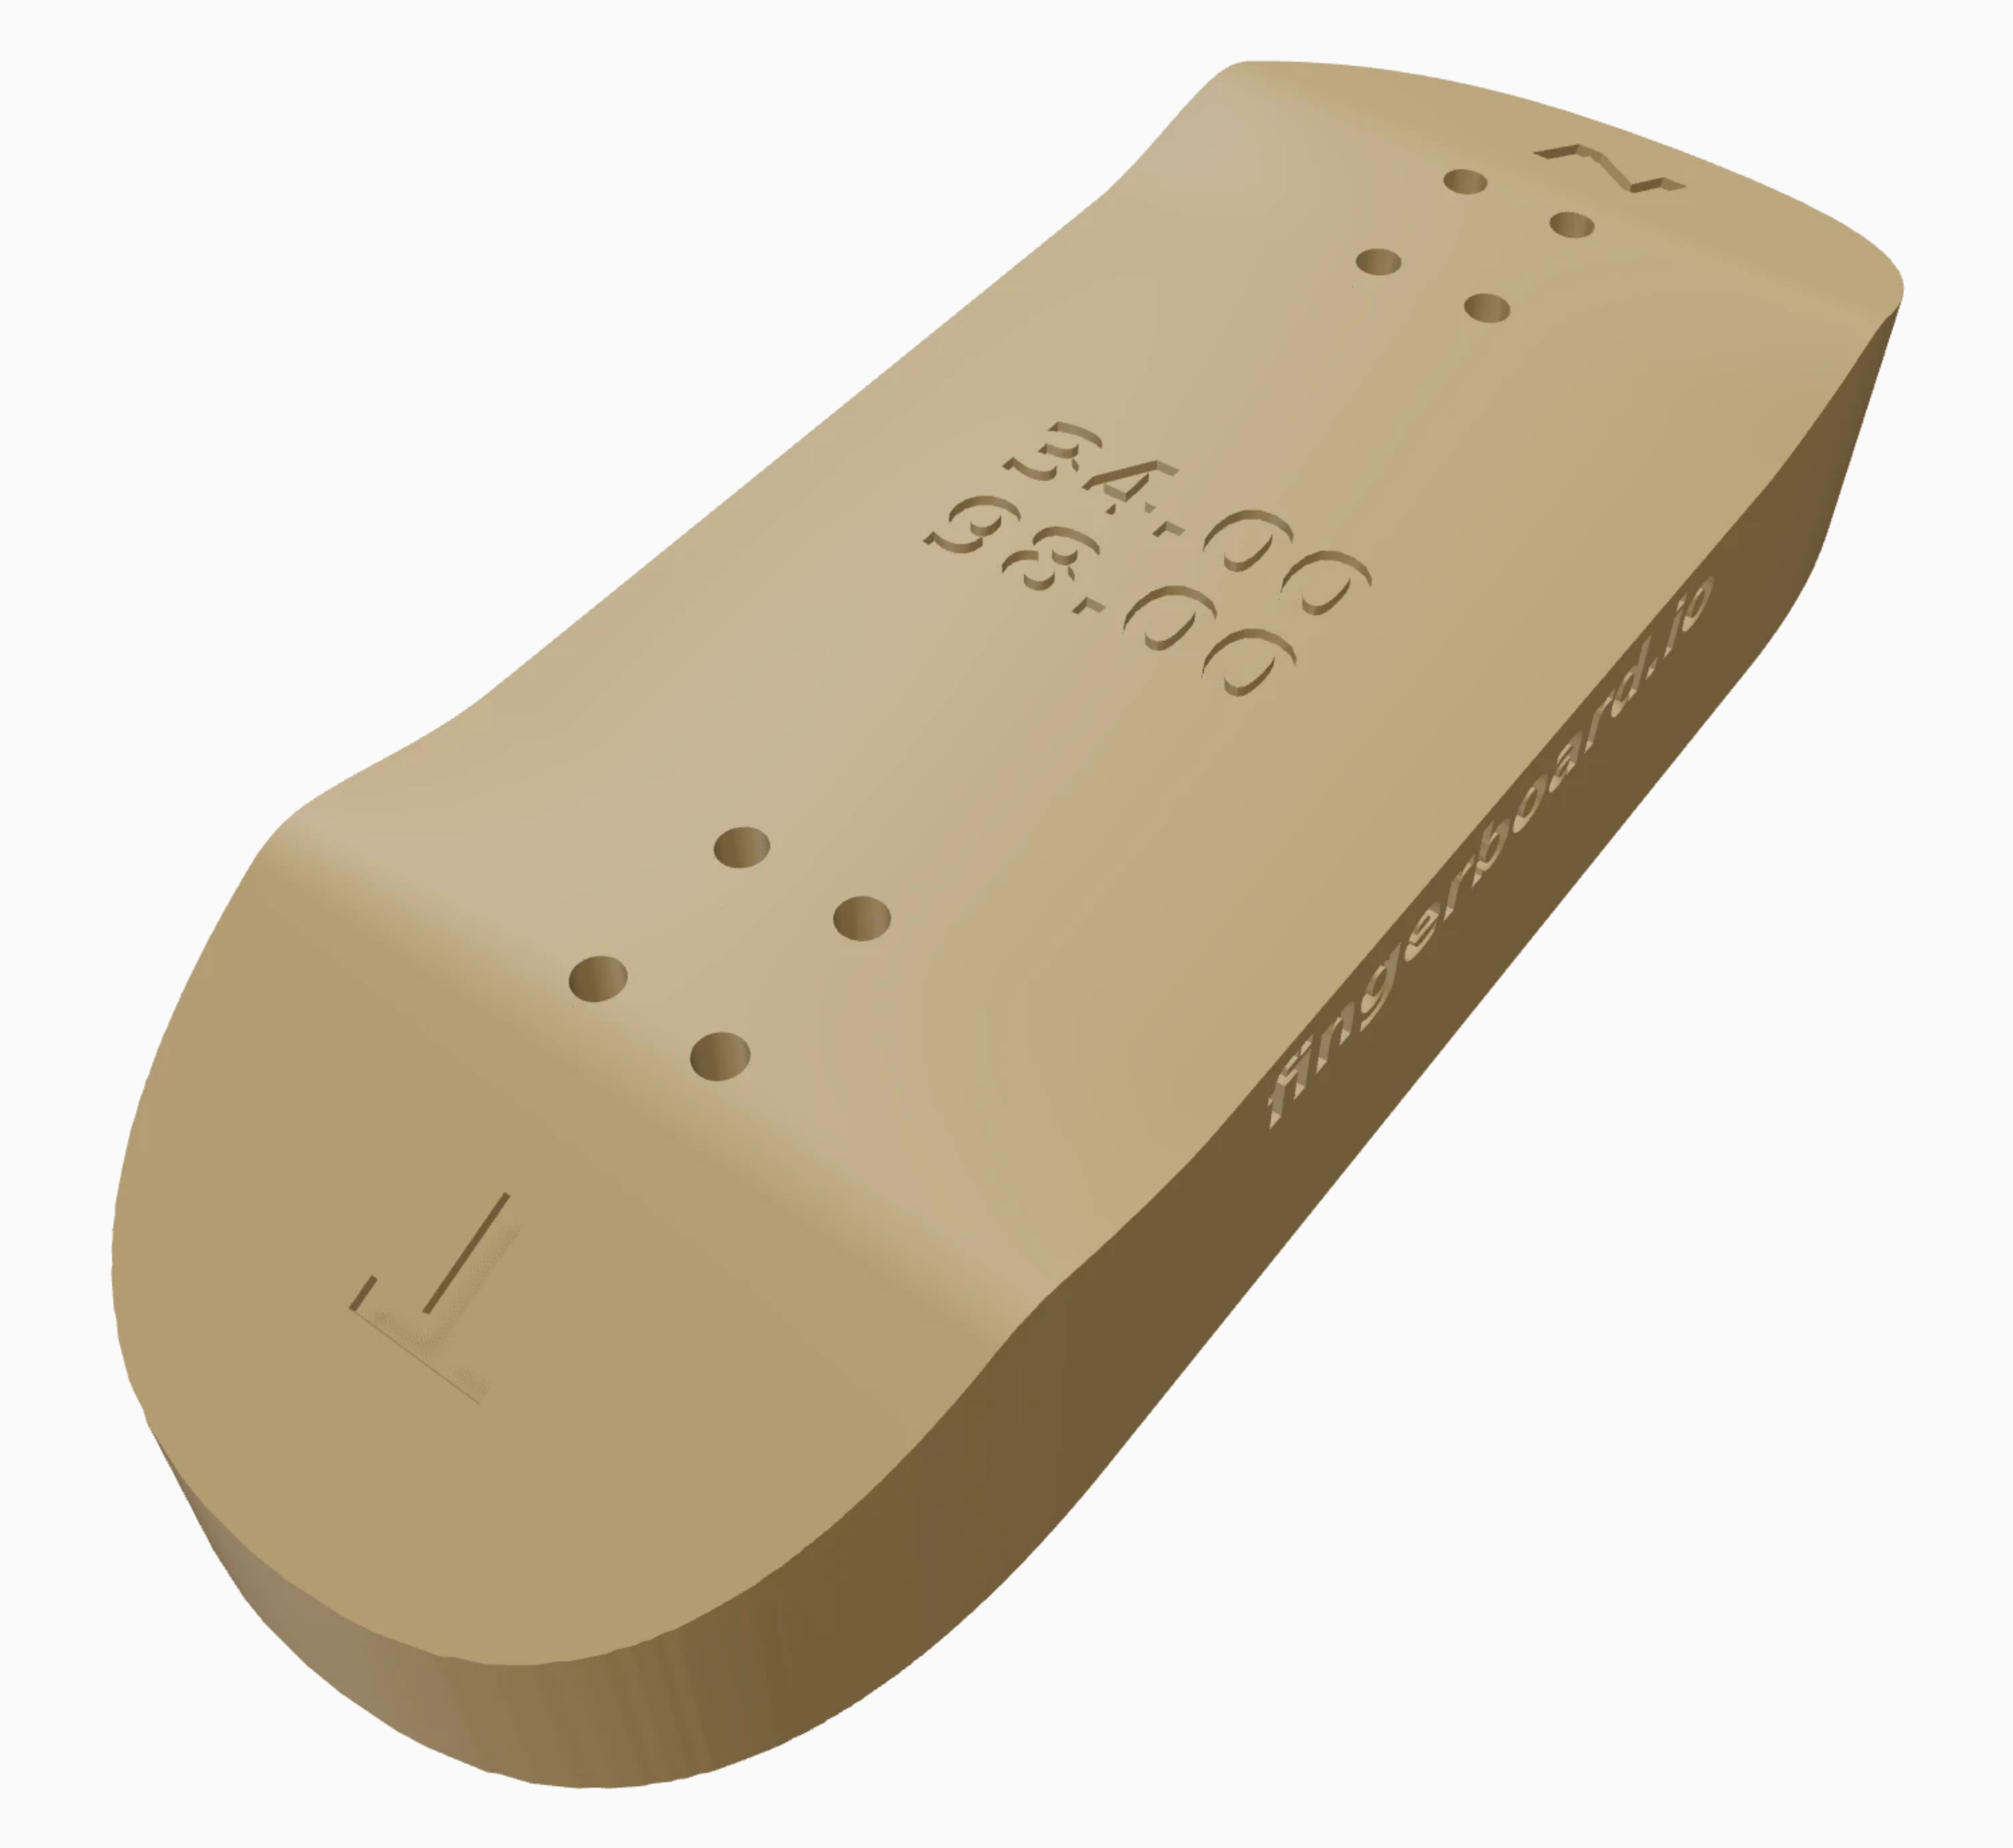
Scroll sideways to see the full illustration.
If you've got several shapers on the bench, an engraved width and length makes it easier to pick the right one. Studio can add those measurements to the top of the block.
You can try these measurements in Studio to design a deck and generate its mold and shaper.
Corrections welcome. If something here doesn't match what you're seeing in the real world, get in touch on Instagram or Discord and we'll fix it.